Save to My DOJO
When it comes to ease of installation, Windows has always had a sketchy history. By the time Windows 2000 came out, most enthusiasts and professionals had learned to adopt a strategy of “installation by any means necessary”. What that meant was that we would take any steps, no matter how drastic, just to get the OS installed. It was almost always easier to clean up any problems after the first boot than it was to try to rectify them during installation.
With the newer versions of Windows, that’s diminished somewhat. Part of it is that each successive version has removed decision points that could introduce problems. The last couple of versions ask for no interaction except for an acceptance of the license agreement, entering of a product key, operating mode, and which disk will receive Windows. Even though the process has gotten a lot smoother, that doesn’t mean we’ve seen the last of installation problems. Some of them are compounded in a Hyper-V environment.
Before You Start, Commit to a Plan
I initially envisioned this post being only about troubleshooting guest OS installations, but I realized I would be doing you a disservice if I started there. What I’m going to talk about first isn’t troubleshooting at all. I’m putting it here at the beginning of the post in the hopes that you’ll take my advice on this before finding the solution to your problem and rushing off to fix it. This is an annoying thing I want you to do that will pay major dividends in time and effort in the long haul, provided that you’re willing to invest some time and effort now: The very first time you successfully install a guest operating system, make it into a template that you’ll use for all subsequent installations of that operating system. Doing so means that you’ll never have to solve installation problems for that OS more than once. Even if you’ve never had problems before, there’s almost no chance you’ll ever regret having a template available.
Prepare the System
Before you can begin making the VM into a template, you have to make it a viable operating system. Make any configuration changes that you’d want to be present on any system generated from this operating system. One thing I’ve found that really shines here is the installation of the .Net Framework 2.x/3.x binaries, since, if my experiences are any guide, Microsoft really jumped the gun by removing them so soon. Joining to the domain is a questionable activity, but it’s OK to do so temporarily if will ease any part of the customization. Just remember that it’s best to have it disjoined before making the final preparations. If you’re working with a Windows guest, be aware that the computer name, IP address, and anything saved in a user context, such as a profile, policy, or anywhere in the registry’s user hives, will be lost. Inputting any licensing keys anywhere is a recipe for problems, too. Absolutely avoid any process that creates an SSL key for the computer and doesn’t interact with the Windows Certificates system (you might be surprised at how many third-party apps are doing that).
Generalize for Imaging
The next thing to do is “generalize” the installation. That means removing anything that makes the installation unique. For Windows, you’ll never pull all that off on your own. Fortunately, the sysprep.exe utility has been around for long enough that most admins are at least somewhat familiar with it. You can run this right from its home in C:WindowsSystem32Sysprep if you like. It has a GUI, and the options are pretty simple to understand. I always pick OOBE, Generalize, and Shutdown. If you just look at the other options, you’ll probably figure out what they do. However, if you’re working with a Windows 8+ or Windows Server 2012+ guest, there’s a new switch that’s only available at the command-line: /mode:vm. So now, instead of using the GUI, I have the following in a ready-to-copy-paste text file:
C:WindowsSystem32Sysprepsysprep.exe /oobe /generalize /shutdown /mode:vm
I’d never even heard of this switch before last month (full credit goes to Russell Smith), so almost all my Windows 2012+ guests were generalized using the Sysprep GUI and the three options I mentioned above just like I’ve been doing since I learned about Sysprep. It’s completely OK to do this. All the new switch does is speed up the process… at least if I’m understanding Russell’s post. I’ve tried it myself and it felt faster, but maybe that was just confirmation bias. Sysprep just takes a while.
Sysprep is pretty thorough, but it’s not perfect. One thing I do is remove the virtual machine’s virtual network adapter right before performing Sysprep to avoid it become a ghost in the new machine. Do the following:
- Finish any customizations. Shut the virtual machine off. You might want to consider exporting the VM at this point and saving that somewhere. This is because Sysprep “rearms” the license and there is a fixed number of times that an image can be rearmed. By reviving the export for ongoing maintenance instead of continuing to operate on the same previously Sysprepped image, you can avoid this problem. Of course, that has issues of its own when working with evaluation media.
- Remove the virtual machine’s virtual network adapter (with Hyper-V Manager, PowerShell, or whatever tool you like). Turn the VM back on and log in.
- Open an elevated Command Prompt.
- Enter the following commands:
set devmgr_show_nonpresent_devices = 1
devmgmt.msc
- Device Manager will open. Click the View menu and then click Show hidden devices. The screen will refresh automatically.
- Expand Network adapters. You will see a ghosted Microsoft Hyper-V Network Adapter:
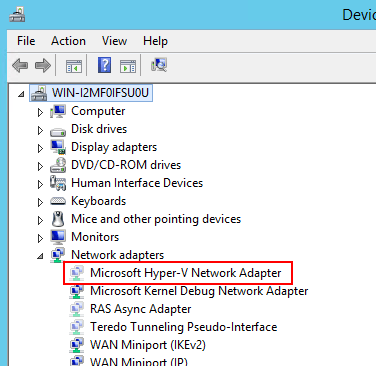
- Right-click on that item and click Uninstall.
- Sysprep the virtual machine.
For Linux guests, there’s not nearly as much work to do so you can probably handle it manually. You need to clear any static MAC and IP addresses and remove any system-specific SSL keys. If you didn’t use a generic name for the system, you’ll want to rename it to avoid collisions later. Search the Internet for details on how to do that on your specific distribution; I know that Ubuntu requires you to change the name in two places. If you want, look for alternatives to Sysprep for your distribution. I found this one for Ubuntu.
Create the Template
If you’re using System Center Virtual Machine Manager, you probably already know how to create a template. If not, it’s trivially simple to figure out. Start by right-clicking the VM. You probably won’t need my help after that.
If you’re not using VMM, you really don’t have that much work to do. You just don’t have a one-stop GUI to help you. Follow these steps to make your template:
- Optionally, use Hyper-V Manager or PowerShell to delete the VM. You’re never going to use it again anyway. Whatever tool you use, make sure it’s one that doesn’t delete the VHD(X) file.
- Find a suitable location for the VHD(X) file and move it there. This should be a place you can easily transfer files out of later, when you’ll be deploying this template. File servers with administrator-only shares make a good repository.
- Rename the VHD(X) file to reflect the OS. For my non-VMM environment, I also decorate the name with useful information. I have things like: Sysprepped-WS12R2Std-lastpatch-2014-08-16.vhdx. Essentially, I leverage a bit of extra typing to avoid having people ask me what a file is for. In VMM, names tend to have a sort of permanence that makes modification obnoxiously difficult, so leave off any decorations.
That’s about it. It’s not really a “template” per se, at least not in the VMM sense of the word, but you can reuse it all you like. Maybe the term “gold image” is more appropriate. Whatever makes sense to you.
Deploying the Template to a New Virtual Machine
If you’re using VMM, again, you probably don’t need my help. During creation of the template, you had to tell it where to put it. Now, you just need to find where it went (hint: start in the Library). Right-click on it, and you’ll have no trouble understanding what to do.
For the non-VMM template, or “gold image”, if you prefer, you’ve got a bit more work. First, decide if you want your VHD(X) now or later. If you want it now, copy it to the location you’ll want the VM to access it from. So, if you run all your VMs from an SMB 3.0 share named \SVSTOREVMs, you’d copy it to “\SVSTOREVMsVirtual Hard Disks”. Then you’d rename it to whatever you want the VM to use, such as “sv-newsystem-OS.vhdx”. Create the VM using your favorite tool. If you moved the VHD(X) already, you can point to the new VHD(X) during VM creation. If you choose the “later” option, then you use the Attach a hard disk later option, then move, rename, and connect the disk afterward.
Once you boot the newly created VM up, you’ll have to provide regional settings, accept the license agreement, and create a local administrator password. After that, you’re in. If you took my advice and removed the network adapter from the base image, don’t worry; the VM is created with an adapter by default and you’ll find that it’s working just fine. Now, imagine that tiny amount of work and time for every single future guest installation of that operating system. Look back over the deployment instructions, imagine a nifty tool called “PowerShell”, and (hopefully) think, “I can script that.” I haven’t done that yet myself as I just don’t think this is much work, but it wouldn’t be anywhere near one of the more complicated scripts that I’ve written.
Troubleshooting Guest OS Installation
Now, on to the actual reason I started writing this article in the first place. Not more than a few days ago, I’d actually been thinking of how much more stable the setup process had become. And then I participated in this forum thread. Looking over all the different answers that so many of us gave to a single error message made me realize that the most stable Windows setup processes I’ve ever used were Windows 7/Server 2008 R2. I’m not sure that I’ve ever had one of those fail on me, whether in hardware or in a VM. 2012 and 2012 R2 have actually gone backward in the setup stability department.
Since you shouldn’t be installing Server 2003 or XP as guests anymore, and since Vista/7/2008/R2 should just work, we’re only going to look at Windows Server 2012 and 2012 R2 problems and a couple of Linux problems. I assume the Windows Server troubleshooting will apply to Win8/8.1 as well, but I haven’t had any problems with those OSs.
“We couldn’t verify the product key. Please check your installation media.”
After a careful bit of recollection, I’ve decided that this message should actually say, “Something broke.” For retail media especially, this really the “General Fault” light of the installation process. It pushes you to look at the product key, which, as far as I can tell, is the least likely of all possible problems.
If you get this, check for typos. Again. And one more time. Microsoft has gradually gotten better at printing Bs that don’t look like 8s and Gs that don’t look like 6s, but only marginally (psst… Microsoft… try using lower-case and/or font sizes and weights that don’t require fighter-pilot-grade visual acuity). If you’re sure it’s entered correctly, the only other way it could be a key problem is if you have a key that doesn’t match your media set. I have never even heard of a misprinted Microsoft key. That system is so reliable that if Microsoft put the same care into the creation and testing of all their other products as they do into the ones that create and validate those keys, they would be the single most beloved software company of all time (or they could start trusting their customers to do the right thing by killing all this key stuff and find ways to make purchasing their software less aggravating, that would probably work too). If you’re sure that the key matches the media and that you’ve entered it correctly, then it’s not the key. Let’s move on.
Things to Try
Rather than pound out a bunch of errors and possible solutions, I’m just going to give you possible solutions. That’s because your symptoms can vary based on the media and keys that you use, but the suggestions are somewhat universal.
- Increase the startup RAM to a minimum of 1GB. As far as I can tell, this is really only a problem with retail media, and as far as I’m concerned, indicates that the retail installer is just plain broken. The minimum requirement for Windows Server 2012+ is 512MB RAM, so it should install on 512MB of RAM. For whatever reason, you need to set a VM to at least 1 GB when using retail media. If you don’t, instead of a nice, helpful memory message, you get the above complaint about the product key (nod to Aidan Finn from the previously referenced forum thread on that one; I haven’t used retail media in a long time so I had completely forgotten about that problem). On volume license media, you’ll get: “Windows installation media encountered an unexpected error. Verify that the installation sources are accessible, and restart the installation. Error code 0xE0000100”. If you attempt to run the repair option (maybe because you’re trying to install over an existing copy of Windows), it will stop with error 80007008. Media that includes Update 1 will replace this error message with “Windows cannot find the Microsoft Software Licensing terms. Make sure the installation sources are valid and restart the installation.”
- Use evaluation media. Since I work from a Sysprepped image in my home lab, I don’t want to deal with any drama about a key that’s in, then out. Since I’m gradually adjusting to the fact that Microsoft is about to murder my Technet subscription, I’m becoming more inclined to just running on evaluation bits anyway. However, this is still a perfectly valid approach that solves the “installation by any means necessary” credo of old. You just need to put in a valid license and activate before you go into production. This is doubly true for domain controllers, because you cannot change their license keys without demoting them first.
- Use Automatic Virtual Machine Activation keys. You can find them on TechNet. I hope it goes without saying that if your management operating system isn’t Windows Server 2012 R2 Datacenter Edition (or something newer), these keys won’t work for very long after the installation succeeds, and without a paid Datacenter license you don’t have a legal right to use them in production anyway. They will, however, satisfy the retail media’s need to have a key before allowing you to install. Again, this is not a push to get you to commit piracy, it’s “installation by any means necessary”.
- Don’t waste time troubleshooting network connections during install. Contrary to common myth, the installer does not need to talk to an activation system during the install portion. That comes later, at activation time. I can’t say for sure whether or not the installer doesn’t “call home” if a network connection is available; I just know for a fact that it doesn’t have to. You will, of course, need a functioning network connection for automatic activation once Windows is running. You always have the option for telephone-based activation, if push comes to shove. If you really want to troubleshoot the network, disconnect the guest’s virtual adapter until you successfully boot it into Windows.
- Make sure the installation media is continuously available until the installation is complete. I’m sure this is obvious for the “Copying Files” portion, but it’s also a requirement when you’re entering the license key during install. If the disk is out of the drive (or the ISO unmounted) when you’re done entering the key, you’ll get the product key error as shown above (in which case, the second half of the message is correct).
Other Windows Issues
Did you add a virtual hard drive? I don’t think I’ve ever messed that up more than a handful of times, but it’s the first, best answer to “Why don’t I have any drives to choose to install to?” If you did attach a drive, is it pass-through? The best option there is: don’t use pass-through. If you just must use pass-through, then sorry, I don’t know how to help you. If it’s not pass-through and still doesn’t show up, I suspect that Hyper-V is having some sort of problem staying reliably connected to the back-end storage. It’s not likely to be a permissions issue, as Hyper-V won’t allow the VM to even start up if it can’t read and write to its VHD(X) files.
For better or for worse, most of the problems are related to that key entry screen. Damaged media can lead to really weird things, though. If all else fails, re-burn/re-image your media or request a replacement. Or, as listed above, use evaluation media.
Linux Guests
I haven’t had a lot of experience with installing Linux guests, but overall I haven’t had a lot of problems. I’d start by searching for guides on your particular distribution. As Microsoft starts taking Linux more seriously and the world starts taking Hyper-V more seriously, more and more people will be out there helping us to round out the wheel on any problems.
My first recommendation is to use a newer distribution, preferably one that Microsoft has already tried and found functional. You can get that list, and a lot more, from the TechNet site about Linux on Hyper-V. While not related to installation, pay very special attention to the “Best Practices” sub-page of that TechNet article. If you’re going to use an older distribution, the 32-bit distributions worked much better than their 64-bit counterparts.
Right now, and into at least the near future, you may not be able to use Generation 2 virtual machines. Some distributions, such as Ubuntu, support it. If you want Gen 2, try it, but be ready to go back to Gen 1 if you can’t install. If you can install as Gen 2, you’re almost undoubtedly going to need to disable Secure Boot. Fortunately, the error messages when you can’t use Secure Boot are very clear.
Now, for my personal experience, I found a point during installation of the 12.04 LTS edition of Ubuntu where it claimed it was going to reboot, but it simply would not proceed. The guest stopped and sat there. The answer was just to power it off and then bring it right back up. Everything worked fine after that. It’s not my favorite answer in the world, but never be afraid to kick a pre-production machine a little. I’ve also had similar behavior with the 14.04 distribution, although it’s not as consistent.
Post-Install Maintenance
All this should be enough to get you going. If you’ve taken my advice and created a template or gold master, then I highly recommend that you spin it up and patch it. It is possible to use tools to apply Windows Updates and other things to offline images, but I find most of them kludgy and not substantially easier than just starting up a VM and doing things manually. Also, I use non-Microsoft software in most of my images, and they don’t have offline maintenance tools like Microsoft does.


Not a DOJO Member yet?
Join thousands of other IT pros and receive a weekly roundup email with the latest content & updates!
More in this category


About the Author

Eric Siron


612 thoughts on "Troubleshooting Hyper-V Guest OS Installations"
Very informative article. It’s not just the content, it’s the way you make it so simple. Very handy information. Thanks a lot.
Thanks!