Save to My DOJO
Table of contents
Checkpoints, or snapshots in previous versions of Hyper-V, can be a great tool for either a test environment or when making significant changes to a VM. The process of creating or removing checkpoints is fairly simple.
How to Create Checkpoints
In our example we will pretend we have a 3rd party application running on the VM TGLAB-WSUS01. The 3rd party application is going to receive a major upgrade, so we want to create a checkpoint to save the state of the VM in case the upgrade goes wrong.
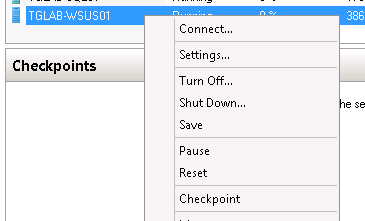
To create a checkpoint, simply right click on the VM and select Checkpoint:
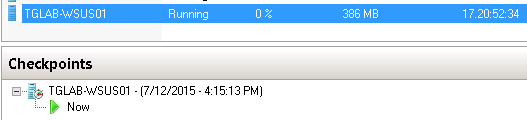
The checkpoint will be created and the status column will show the status of “Creating Checkpoint” followed by the progress percentage of the task:

When you left click on the VM the checkpoints will be displayed in the checkpoint window pane:
If we browse to the location of the VHD file, we can see that a AVHDX file has been created. The virtual machine is then configured to use the AVHDX file and the contents of the VM’s memory are written to it:

Inside the contents of the snapshots folder, we can see the checkpoint configuration file (.xml) and the virtual machine saved state files (.bin and .vsv).


Looking at the hard drive settings of the VM we can see that it is now configured to use the AVHDX file instead of the VHD:
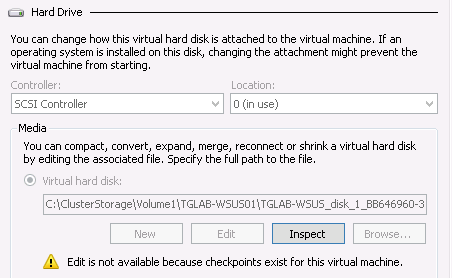
Also notice that the Edit button is now greyed out because there is now an existing checkpoint for this VM. This is for good reason, because you can potentially damage the VHD file if changes are made while a checkpoint is in play.
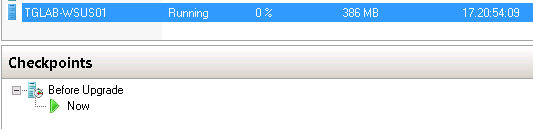
Checkpoints can also be renamed to provide organization. In the example we will right click on the checkpoint we just created and click Rename. We will rename it to “Before Upgrade”:
Note: You should never create checkpoints on a VM that is running the Domain Controller role. Restoring those checkpoints can cause damage to the Active Directory environment.
How to Apply Checkpoints
Lets say our 3rd party application upgrade went horribly wrong. Now we need to restore the VM back to the state of the previous checkpoint we created. To do this, we simply right click on the checkpoint we want to restore to and select Apply:
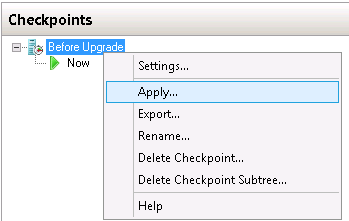
A window will appear asking if you’d like to apply the checkpoint for sure. Since we don’t want to save the current state of the VM we will just click Apply:
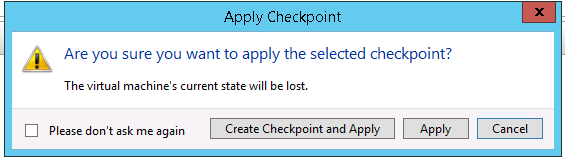
The VM will then be restored back to the state of the checkpoint selected, which in our example is before we did the upgrade. Also note that applying the checkpoint does not cause the checkpoint to be deleted.
How to Delete Snapshots
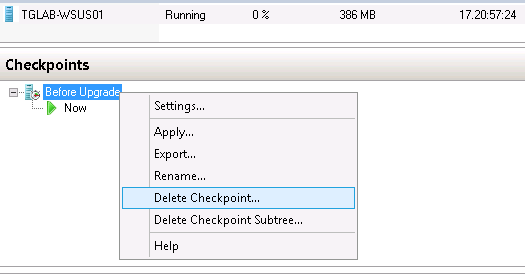
After a successful application upgrade on TGLAB-WSUS01, we no longer need to save the previous state of the VM and can remove the checkpoint. This step can be easily missed, but it’s important to remove the snapshot and not leave it out. For more information on why it’s good to clean up checkpoints be sure to check out the post “How to Search for Checkpoints using PowerShell”. To remove the checkpoint, we simply right click on the snapshot we want to remove and select Delete Checkpoint. The checkpoint will be removed:
If we browse to the location of the VHD, we can see that the AVHDX file has been removed and the contents have been merged with the parent (which is the VHD file in our example since we only had one checkpoint):

Also, if we open up the snapshots folder we see that the checkpoint configuration file and virtual machine saved state files have been removed:

Working with Multiple Checkpoints
Using multiple checkpoints can be very handy in a test environment. It is definitely more efficient from a storage perspective to have a test VM with multiple checkpoints consisting of various VM configurations as opposed to creating a bunch of test VMs for each configuration. However, managing multiple checkpoints can be a little confusing if you can’t find which checkpoint your VM is running from.
In our example we have a VM called Test-VM. The purpose of this VM is to simulate the different workstation builds in the company so that we can run tests on each build before deploying out new software. The checkpoint tree structure is configured with the following setup:
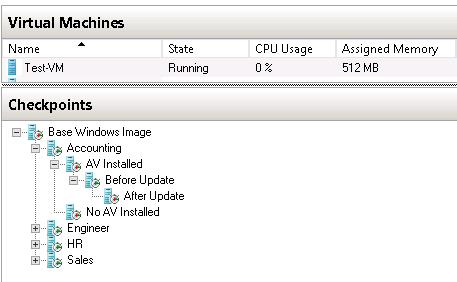
There are checkpoints of each department’s workstation build ( Accounting, Engineers, HR, and Sales) and sub checkpoints of various configurations.
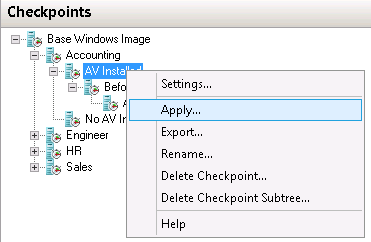
Lets say the accounting department is going to be using a new web application. We need the VM to be running the accounting workstation build in order to test the functionality of the app by applying the “AV Installed” checkpoint of the “Accounting” checkpoint branch. To do this, simply right click on the “AV Installed” checkpoint and select Apply:
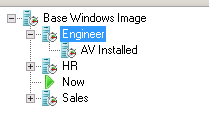
After the checkpoint is restored, the checkpoint window pane now displays which checkpoint the VM is currently using and we are all set to perform testing:
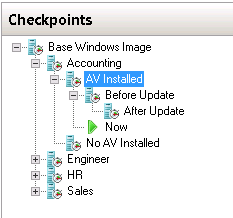
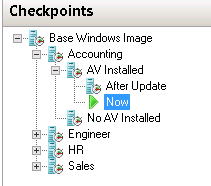
When deleting a checkpoint in a branch there are two options available. You can either delete the checkpoint and the sub tree, or you can just delete the checkpoint. In our example we want to delete the checkpoint “Before Update” but keep the checkpoint “After Update”. To do this, we simply right click on the “Before Update” checkpoint and select Delete Checkpoint. The checkpoint is removed and now the checkpoint hierarchy looks like this:
Now, lets say that the accounting department is going to use the same workstation build as HR and we no longer need the accounting checkpoint branch. To delete a checkpoint and the sub tree checkpoints, right click on the checkpoint and select Delete Checkpoint Sub-tree:
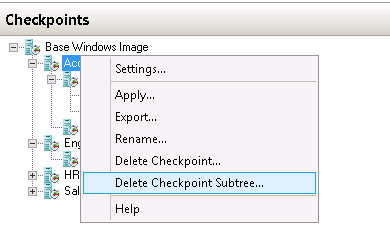
A window will pop up asking if you are sure you want to delete the checkpoint subtree, click Delete. The entire checkpoint tree will be removed.
Deleting the checkpoint sub-tree deletes the configuration file and the virtual machine saved state files of all the checkpoints in that tree. If the VM running is currently using a AVHDX that is a checkpoint in that sub-tree, then that AVHDX file will be merged into the next AVHDX parent that is not in the deleted sub-tree. If the VM is not running from any checkpoints in that tree, then the checkpoints files are just deleted without any merging taking place.
In the example above since we deleted the “Accounting” sub-tree and were running off of a checkpoint in that tree, the AVHDX file was then merged with the next parent checkpoint that is not being deleted which is “Base Windows Image”. The “Now” display arrow is now showing as running from this parent checkpoint:
Each VM can have up to a limit of 64 checkpoints. However, each checkpoint will still consume space so be sure to remove any unnecessary checkpoints.


Not a DOJO Member yet?
Join thousands of other IT pros and receive a weekly roundup email with the latest content & updates!
More in this category


About the Author

Luke Orellana


8 thoughts on "How to Create and Delete Checkpoints (Snapshots)"
If you clone a domain controller you get problems. But can i clone a stand a lone Exchange server? Does this also give problems?
It would likely be disastrous. An Exchange installation modifies Active Directory.
if i delete my previous checkpoint, what will happen to my active directory server?
Hi Jrex,
Deleting a previous checkpoint will merge your snapshots together and the current state of your AD server will not be affected. Also beware of taking snapshots of AD servers older than 2012. Services like Kerberos and time sync can have issues during a snapshot restore.