Save to My DOJO
Table of contents
In a previous article I demonstrated how to create a VHDX file that you could use when creating a Generation 2 Hyper-V virtual machine. If you recall, part of the process included creating partitions for recovery information. However, I didn’t do anything with them at the time so let me guide you on how to use these partitions and even speed up deployment of the new virtual machine. Many of these commands have command line counterparts but we will use PowerShell 4.0. This process will also require the Storage and DISM cmdlets. I will walk through the process with these items:
$path = "D:\vhd\demo3.vhdx
$WIMPath ="D:\wim\Win2012R2-Install.wim"
$Index = 2
How did I know I wanted an index of 2? By looking at what is inside the WIM file with the Get-WindowsImage cmdlet.
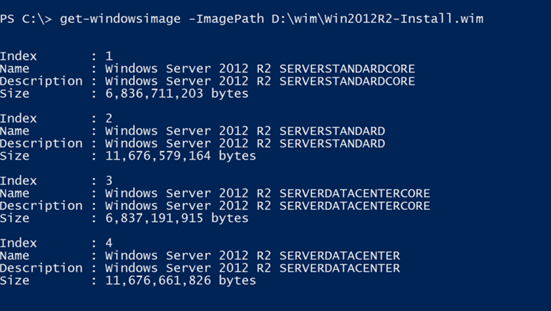
Part of my process will install Windows Server 2012 R2 Standard (GUI). Let’s begin.
WARNING: You will be using commands that involve partitioning and boot configurations. Don’t try anything I am going to demonstrate on a production system.
First, I need to mount the VHDX file and get the disk number
Mount-DiskImage -ImagePath $Path
$disknumber = (Get-DiskImage -ImagePath $path | Get-Disk).Number
Next, I want to prepare the recovery image partition by formatting it and assigning it a drive letter if it doesn’t already have one.
Get-Partition -DiskNumber $disknumber -PartitionNumber 5 | Format-Volume -FileSystem NTFS -NewFileSystemLabel "RecoveryImage" -confirm:$false

if (-Not (Get-Partition -DiskNumber $disknumber -PartitionNumber 5).DriveLetter) {
Get-Partition -DiskNumber $disknumber -PartitionNumber 5 | Add-PartitionAccessPath -AssignDriveLetter
}
I am adding a drive letter so that I can create a folder and copy the WIM file. This is the recovery image. In the event of a serious problem, you could reapply the image using DISM from the recovery console or the Refresh PC settings under advanced tools when in repair mode. Of course, your best protection are adequate operating system and Hyper-V backups. The recovery image can be your last resort option.
In order for this to work, at least in my development, I had to create a folder in the Recovery Image partition.
$recoveryPartition = get-partition -DiskNumber $disknumber -PartitionNumber 5
$recoverfolder = Join-path "$($recoveryPartition.DriveLetter):" "Recovery"
mkdir $recoverFolder
$recoveryPath = Join-Path $recoverfolder "install.wim"
And then copy the WIM to that path as Install.wim.
Copy-Item -Path $WIMPath -Destination $recoverypath
Next, I’m going to go ahead apply that image directly to the operating system partition, in effect installing Windows Server 2012. This technique seems to be much faster than a traditional interactive install. Of course, this will require that the operating system partition have a drive letter.
Get-Partition -DiskNumber $disknumber -PartitionNumber 4 | Format-Volume -FileSystem NTFS -NewFileSystemLabel "Windows" -confirm:$false

if (-Not (Get-Partition -DiskNumber $disknumber -PartitionNumber 4).DriveLetter) {
Get-Partition -DiskNumber $disknumber -PartitionNumber 4 | Add-PartitionAccessPath -AssignDriveLetter
}
With a drive letter, I can now apply the image using the DISM cmdlets.
$windowsPartition = Get-Partition -DiskNumber $disknumber -PartitionNumber 4
$WinPath = Join-Path "$($windowsPartition.DriveLetter):" "\"
$windir = Join-path $winpath Windows
Expand-WindowsImage -ImagePath $recoveryPath -Index $Index -ApplyPath $WinPath
Next, I want to make sure a copy of the Windows recovery tools are in the right partition. Since this is a UEFI disk, they need to go in a separate partition, which I just happen to have. As with the other partitions, I’m quickly reformatting to make sure I have a clean slate and assigning a drive letter.
Get-Partition -DiskNumber $disknumber -PartitionNumber 1 | Format-Volume -FileSystem NTFS -NewFileSystemLabel "Windows RE Tools" -confirm:$false

if (-Not (Get-Partition -DiskNumber $disknumber -PartitionNumber 1).DriveLetter) {
Get-Partition -DiskNumber $disknumber -PartitionNumber 1 | Add-PartitionAccessPath -AssignDriveLetter
}
$retools = Get-Partition -disknumber $disknumber -partitionNumber 1
The recovery tools must go in a specific folder which I can create.
$repath = mkdir "$($retools.driveletter):\Recovery\WindowsRE"
The recovery tools wim (winre.wim) can be found inside the primary WIM file under \Windows\System32\Recovery but it is a hidden file so I have to tell PowerShell to look for hidden files and then copy it to the recovery tools partition.
dir "$($windowsPartition.DriveLetter):\Windows\System32\recovery\winre.wim" -hidden | Copy -Destination $repath.FullName
I will need to make sure the disk will boot properly, i.e. UEFI, so I need to get the System partition and assign it a drive.
if (-Not (Get-Partition -DiskNumber $disknumber -PartitionNumber 2).DriveLetter) {
Get-Partition -DiskNumber $disknumber -PartitionNumber 2 | Add-PartitionAccessPath -AssignDriveLetter
}
$systemPartition = Get-Partition -DiskNumber $disknumber -PartitionNumber 2
$sysDrive = "$($systemPartition.driveletter):"
Because with this information I can re-run BCDBoot to configure all the necessary boot information.
$cmd = "$windir\System32\bcdboot.exe $windir /s $sysDrive /F UEFI"
Invoke-Expression $cmd
The last step is to make sure recovery is properly configured using the Reagentc.exe command line tool. I will use this expression
$cmd = "$windir\System32\reagentc.exe /setosimage /path $recoverfolder /index $index /target $windir"
Invoke-Expression $cmd
Which becomes this: H:\Windows\System32\reagentc.exe /setosimage /path G:\Recovery /index 1 /target H:\Windows. I need to warn you about an quirk with this command in PowerShell. You will most likely see a message in red text that looks like an error, well, technically as far as PowerShell is concerned it is. However, you should also see message text that the operation was successful, which it will be. I don’t know why PowerShell thinks there is an error. But as long as I see “success” I ignore the error. At this point the partitions are configured. Personally, I like cleaning up the drive letters.
get-partition -DiskNumber $disknumber | where {$_.driveletter} | foreach {
$dl = "$($_.DriveLetter):"
$_ | Remove-PartitionAccessPath -accesspath $dl
}
All that remains is to dismount the disk.
Dismount-DiskImage -ImagePath $path
The VHDX file is now ready to use with your Gen2 Hyper-V virtual machine! But wait, it gets better. Since we are already applying an image, we can go ahead and stick in an answer file to complete the installation. The file must be called unattend.xml and it will go in the root of the operating system partition. Creating a complete XML file is beyond the scope of this article, but here is a bare bones one that I use to configure the default administrator password, computer name and time zone.
<?xml version="1.0" encoding="utf-8"?>
<unattend xmlns="urn:schemas-microsoft-com:unattend" xmlns:ms="urn:schemas-microsoft-com:asm.v3" xmlns:wcm="http://schemas.microsoft.com/WMIConfig/2002/State">
<settings pass="oobeSystem">
    <component name="Microsoft-Windows-Shell-Setup" processorArchitecture="amd64" publicKeyToken="31bf3856ad364e35" language="neutral" versionScope="nonSxS" xmlns:wcm="http://schemas.microsoft.com/WMIConfig/2002/State" xmlns:xsi="http://www.w3.org/2001/XMLSchema-instance">
        <UserAccounts>
           <AdministratorPassword>
              <Value>P@ssw0rd</Value>
              <PlainText>true</PlainText>
           </AdministratorPassword>
        </UserAccounts>
    </component>
</settings>
<settings pass="specialize">
    <component name="Microsoft-Windows-Shell-Setup" processorArchitecture="amd64" publicKeyToken="31bf3856ad364e35" language="neutral" versionScope="nonSxS" xmlns:wcm="http://schemas.microsoft.com/WMIConfig/2002/State" xmlns:xsi="http://www.w3.org/2001/XMLSchema-instance">
        <ComputerName>R2Core-Base</ComputerName>
        <RegisteredOwner>Administrator</RegisteredOwner>
        <RegisteredOrganization>Globomantics</RegisteredOrganization>
        <TimeZone>Eastern Standard Time</TimeZone>
    </component>
</settings>
</unattend>
Remember back in the process where I expanded the WIM file and applied it to the operating system partition? Well it is just another simple step to copy an unattend XML file to the root of the OS Partition. The source XML file can be called anything you want. Just make sure you copy it as Unattend.xml.
$unattendpath = Join-Path $winpath "Unattend.xml"
Copy-item c:\work\myunattend.xml -Destination $unattendpath
Continue on with the rest of the process, create the virtual machine and when it starts you will have a configured server ready to go. At least configured as much you set in your unattend.xml file.
Now, I certainly don’t expect you to type everything I’ve demonstrated. Instead I will give you a function that will handle everything for you automatically, including copying the unattend.xml file, if you specify one. The assumption is that you will be configuring a Gen 2 virtual disk that you created with my New-Gen2Disk function from my previous article.
#requires -version 4.0
#requires -modules DISM,Storage
#requires -RunAsAdministrator

Function Set-Gen2Partition {

<#
.SYNOPSIS
Configure Windows image and recovery partitions
.DESCRIPTION
This command will update partitions for a Generate 2 VHDX file, configured for
UEFI. It is assumed you used the New-Gen2Disk to create the VHDX file and that
the partitions are in this order

  1 = Recovery Tools
  2 = System
  3 = Reserved (MSR)
  4 = Basic (Windows)
  5 = Recovery Image

You must supply the path to the VHDX file and a valid WIM. You should also
include the index number for the Windows Edition to install. The WIM will be
copied to the recovery partition.

Optionally, you can also specify an XML file to be inserted into the OS
partition as unattend.xml

CAUTION: This command will reformat partitions.

.EXAMPLE
PS C:\> Set-Gen2Partition -Path D:\vhd\demo3.vhdx -WIMPath D:\wim\Win2012R2-Install.wim -verbose

VERBOSE: Processing D:\vhd\demo3.vhdx
VERBOSE:

   Disk Number: 3

PartitionNumber  DriveLetter Offset                               Size Type
---------------  ----------- ------                               ---- ----
1                            1048576                            300 MB Recovery
2                            315621376                          100 MB System
3                            420478976                          128 MB Reserved
4                            554696704                        14.48 GB Basic
5                            16107175936                         15 GB Recovery

VERBOSE: Processing disknumber 3
VERBOSE: Formatting Recovery Image
VERBOSE: Assigning drive letter to Recovery Image partition
VERBOSE: copying D:\wim\Win2012R2-Install.wim to G:\Recovery\install.wim
VERBOSE: Formatting Windows partition
VERBOSE: Assigning drive letter to Windows partition
VERBOSE: Applying image from G:\Recovery\install.wim to H:\ using Index 1
VERBOSE: Dism PowerShell Cmdlets Version 6.3.0.0

LogPath : C:\windows\Logs\DISM\dism.log

VERBOSE: Formatting Windows RE Tools partition
VERBOSE: Assigning drive letter to Windows RE Tools partition
VERBOSE: Creating Recovery\WindowsRE folder
VERBOSE: Copying H:\Windows\System32\recovery\winre.wim to J:\Recovery\WindowsRE
VERBOSE: Assigning drive letter to System partition
VERBOSE: Running bcdboot-> H:\Windows /s K: /f UEFI
VERBOSE: H:\Windows\System32\reagentc.exe /setosimage /path G:\Recovery /index 1 /target H:\Windows
Directory set to: \\?\GLOBALROOT\device\harddisk3\partition5\Recovery

H:\Windows\System32\reagentc.exe : REAGENTC.EXE: Operation Successful.
At line:1 char:1
+ H:\Windows\System32\reagentc.exe /setosimage /path G:\Recovery /index 1 /target  ...
+ ~~~~~~~~~~~~~~~~~~~~~~~~~~~~~~~~~~~~~~~~~~~~~~~~~~~~~~~~~~~~~~~~~~~~~~~~~~~~~~~~
    + CategoryInfo          : NotSpecified: (REAGENTC.EXE: Operation Successful.:String) [], Remote
   Exception
    + FullyQualifiedErrorId : NativeCommandError

VERBOSE:

   Disk Number: 3

PartitionNumber  DriveLetter Offset                               Size Type
---------------  ----------- ------                               ---- ----
1                J           1048576                            300 MB Recovery
2                K           315621376                          100 MB System
3                            420478976                          128 MB Reserved
4                H           554696704                        14.48 GB Basic
5                G           16107175936                         15 GB Recovery

VERBOSE: Removing access paths
VERBOSE: Dismounting D:\vhd\demo3.vhdx
VERBOSE: Finished

.EXAMPLE
PS C:\> Set-Gen2Partition -Path D:\vhd\test3.vhdx -WIMPath D:\wim\Win2012R2-Install.wim -Unattend C:\scripts\unattend.xml

#>

[cmdletbinding(ConfirmImpact="High")]
Param(
[parameter(Position=0,Mandatory=$True,
HelpMessage="Enter the path to the VHDX file",
ValueFromPipeline=$True,
ValueFromPipelineByPropertyName=$True)]
[Alias("FullName","pspath")]
[ValidateScript({Test-Path $_})]
[string]$Path,
[parameter(Position=1,Mandatory=$True,
HelpMessage="Enter the path to the WIM file")]
[ValidateScript({Test-Path $_})]
[string]$WIMPath,
[ValidateScript({,
 $last = (get-windowsimage -ImagePath $PSBoundParameters.WIMPath |
         sort ImageIndex | select -last 1).ImageIndex
 If ($_ -gt $last -OR $_ -lt 1) {
    Throw "enter a valid index between 1 and $last"
 }
 else {
    #index is valid
    $True
 }
})]
[int]$Index = 1,
[ValidateScript({Test-Path $_})]
[string]$Unattend
)

Process {
Write-Verbose "Processing $path"

if ($PSCmdlet.ShouldContinue("Are you sure you want to process $path`? Any existing data will be lost!","WARNING!")) {

    #mount the VHDX file
    Mount-DiskImage -ImagePath $Path

    #get the disk number
    $disknumber = (Get-DiskImage -ImagePath $path | Get-Disk).Number

    #pre-processing
    Write-Verbose (Get-Partition -DiskNumber $disknumber | out-string)

    #prepare Recovery Image partition
    Write-Verbose "Processing disknumber $disknumber"

    Write-Verbose "Formatting Recovery Image"
    Get-Partition -DiskNumber $disknumber -PartitionNumber 5   |
    Format-Volume -FileSystem NTFS -NewFileSystemLabel "RecoveryImage" -confirm:$false |
    Out-Null

    #mount the Recovery image partition with a drive letter
    if (-Not (Get-Partition -DiskNumber $disknumber -PartitionNumber 5).DriveLetter) {
     Write-Verbose "Assigning drive letter to Recovery Image partition"
     Get-Partition -DiskNumber $disknumber -PartitionNumber 5 |
     Add-PartitionAccessPath -AssignDriveLetter
    }

    $recoveryPartition = get-partition -DiskNumber $disknumber -PartitionNumber 5

    #copy the WIM to recovery image partition as Install.wim
    $recoverfolder = Join-path "$($recoveryPartition.DriveLetter):" "Recovery"

    mkdir $recoverFolder | Out-Null
    $recoveryPath = Join-Path $recoverfolder "install.wim"

    Write-Verbose "copying $WIMpath to $recoverypath"
    Copy-Item -Path $WIMPath -Destination $recoverypath

    #mount the OS partition with a drive letter
    Write-Verbose "Formatting Windows partition"
    Get-Partition -DiskNumber $disknumber -PartitionNumber 4 |
    Format-Volume -FileSystem NTFS -NewFileSystemLabel "Windows" -confirm:$false |
    Out-Null

    if (-Not (Get-Partition -DiskNumber $disknumber -PartitionNumber 4).DriveLetter) {
    Write-Verbose "Assigning drive letter to Windows partition"
    Get-Partition -DiskNumber $disknumber -PartitionNumber 4 |
    Add-PartitionAccessPath -AssignDriveLetter
    }

    $windowsPartition = Get-Partition -DiskNumber $disknumber -PartitionNumber 4

    #apply the image from recovery to the OS partition
    $WinPath = Join-Path "$($windowsPartition.DriveLetter):" "\"
    $windir = Join-path $winpath Windows

    Write-Verbose "Applying image from $recoveryPath to $winpath using Index $index"
    Expand-WindowsImage -ImagePath $recoveryPath -Index $Index -ApplyPath $WinPath

    #copy XML file if specified
    if ($Unattend) {
        $unattendpath = Join-Path $winpath "Unattend.xml"
        Write-Verbose "Copying $unattend to $unattendpath"
        Copy-item $Unattend -Destination $unattendpath
    }

    #mount the recovery tools partition with a drive letter
    Write-Verbose "Formatting Windows RE Tools partition"
    Get-Partition -DiskNumber $disknumber -PartitionNumber 1 |
    Format-Volume -FileSystem NTFS -NewFileSystemLabel "Windows RE Tools" -confirm:$false |
    Out-Null

    if (-Not (Get-Partition -DiskNumber $disknumber -PartitionNumber 1).DriveLetter) {
      Write-Verbose "Assigning drive letter to Windows RE Tools partition"
      Get-Partition -DiskNumber $disknumber -PartitionNumber 1 |
      Add-PartitionAccessPath -AssignDriveLetter
    }

    $retools =  Get-Partition -disknumber $disknumber -partitionNumber 1

    #create \Recovery\WindowsRE
    Write-Verbose "Creating Recovery\WindowsRE folder"
    $repath = mkdir "$($retools.driveletter):\Recovery\WindowsRE"

    Write-Verbose "Copying $($windowsPartition.DriveLetter):\Windows\System32\recovery\winre.wim to $($repath.fullname)"

    #the winre.wim file is hidden
    dir "$($windowsPartition.DriveLetter):\Windows\System32\recovery\winre.wim" -hidden |
    Copy -Destination $repath.FullName

    #assign a letter to the System partition
    Write-Verbose "Assigning drive letter to System partition"
    Get-Partition -DiskNumber $disknumber -PartitionNumber 2 |
    Add-PartitionAccessPath -AssignDriveLetter

    $systemPartition = Get-Partition -DiskNumber $disknumber -PartitionNumber 2
    $sysDrive = "$($systemPartition.driveletter):"
    Write-Verbose "Running bcdboot-> $windir /s $sysDrive /f UEFI"
    $cmd = "$windir\System32\bcdboot.exe $windir /s $sysDrive /F UEFI"
    Invoke-Expression $cmd

   $cmd = "$windir\System32\reagentc.exe /setosimage /path $recoverfolder /index $index /target $windir"
    Write-Verbose $cmd
    Invoke-Expression $cmd

    #this doesn't appear to be necessary. I get a message this is already enabled
    # $cmd = "$windir\System32\reagentc.exe /setreimage /path $($repath.fullname) /target $windir"
    # Write-Verbose $cmd
    # invoke-expression $cmd

    #post processing
    Write-Verbose (Get-Partition -DiskNumber $disknumber | out-string)

    #clean up
    Write-Verbose "Removing access paths"
    get-partition -DiskNumber $disknumber | where {$_.driveletter}  | foreach {
     $dl = "$($_.DriveLetter):"
     $_ | Remove-PartitionAccessPath -accesspath $dl
    }

    #dismount
    Write-Verbose "Dismounting $path"
    Dismount-DiskImage -ImagePath $path

    Write-Verbose "Finished"

} #confirm
else {
  Write-Verbose "Process aborted."
}

} #process

} #end function
When you run the function, you will be prompted if you want to continue because the disk partitions will be reformatted. Probably unnecessary if you are using a disk you just created but I wanted to accommodate disks created elsewhere. Be aware that the function will assume your partitions are in this order:
1 = Recovery Tools
2 = System
3 = Reserved (MSR)
4 = Basic (Windows)
5 = Recovery Image
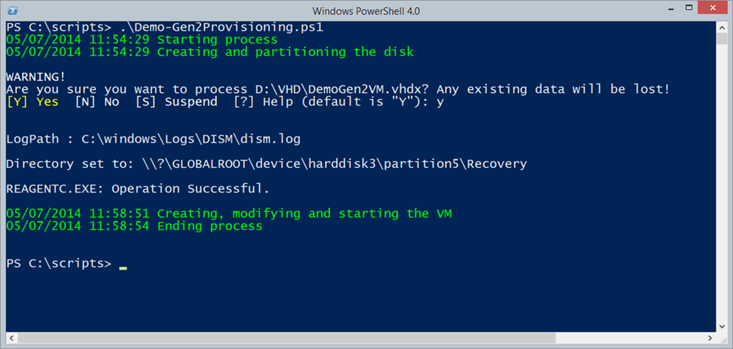
How will all of this work? Here’s a simple PowerShell script to create a ready-to-go Windows Server 2012 R2 virtual machine. Like all of the commands I’ve been demonstrating this requires that you run as administrator in an elevated session.
#requires -version 4.0
#requires -modules DISM,Storage,Hyper-V
#requires -RunAsAdministrator

#demonstrate full provisioning of a new Gen2 HyperV VM

[cmdletbinding()]
Param()
Write-Host "$(get-date) Starting process" -ForegroundColor Green

#dot source functions. Adjust your paths accordingly
#or paste the functions into this script
. C:\scripts\New-Gen2VHD.ps1
. C:\scripts\Set-Gen2Partition.ps1

#create the disk
$diskParams = @{
Path = "D:\VHD\DemoGen2VM.vhdx"
Size = 50GB
Dynamic = $True
ErrorAction = "Stop"
}

#parameters for partition command
$partParams = @{
WimPath = "D:\wim\Win2012R2-Install.wim"
Index = 2
Unattend = "C:\scripts\unattend-2012R2.xml"
ErrorAction = "Stop"
}

#create the disk and pipe to the partitioning command
Write-Host "$(get-date) Creating and partitioning the disk" -ForegroundColor Green
Try {
 New-Gen2Disk @diskParams #| Set-Gen2Partition @partParams
}
Catch {
 Write-warning "Ooops. $($_.exception.message)"
 #bail out
 Write-Host "$(get-date) aborting the script" -ForegroundColor red
 Return
}

#create the VM
$vmParams = @{
Name = "Demo Gen 2"
Generation = 2
VHDPath = $diskParams.path
MemoryStartupBytes = 1GB
SwitchName = "Work Network"
}

#modify VM parameters
$setParams = @{
ProcessorCount = 2
DynamicMemory =$True
MemoryMaximumBytes = 2GB
Notes = "demonstration Gen 2 VM"
Passthru = $True

}

#create the VM and start it
Write-Host "$(get-date) Creating, modifying and starting the VM" -ForegroundColor Green

New-VM @vmParams | Set-VM @setParams | Start-VM

Write-Host "$(get-date) Ending process" -ForegroundColor Green
As you can see in the screen shot, it only takes a little under 5 minutes to create a complete Windows Server 2012 R2 standard server virtual machine running as a Generation 2 virtual machine.
You are limited to what operating systems are supported as Gen 2 but from a management perspective, Windows Server 2012 R2 is pretty fantastic so why not use it. Finally, I hope it goes without saying, but please test and re-test everything I have shown you in the last few articles in a non-production environment.


Not a DOJO Member yet?
Join thousands of other IT pros and receive a weekly roundup email with the latest content & updates!
More in this category


About the Author

Jeffery Hicks


35 thoughts on "Customizing a Generation 2 VHDX"
Fantastic articles, thank you very much.