Save to My DOJO
Table of contents
In this final post of the series, I’ll show you how to automate the deployment of multiple Windows VMs and have them automatically join an Active Directory domain.
Using PowerShell to read CSV files
In part 2 of the series, I’ve discussed how using the New-VM PowerCLI cmdlet, a VM can be deployed from template and configured using GOSC. I also introduced a few PowerCLI cmdlets that are used to manipulate existing GOSCs.
In order to fully automate the deployment process, we need to supply a list of computer names and IP addresses to a PowerCLI script. One way of doing this is to use a csv file, something that PowerShell can handle natively. The simple PowerCLI script I propose, incorporates the commands outlined in this series so you should be familiar with the large part of it.
The first thing we need to do is create the csv file itself. For this task, I used MS Excel to create a csv file having 2 columns VMName and IPAddress as shown in Fig.1. I populated the columns with the computer names and IP address of the VMs I will eventually deploy using the Windows template. The csv headers are mandatory as they are referenced in the script.
When you’re done, save the file as a CSV selecting the correct format from the list of file options. I’ve saved mine as ADComputers.csv.
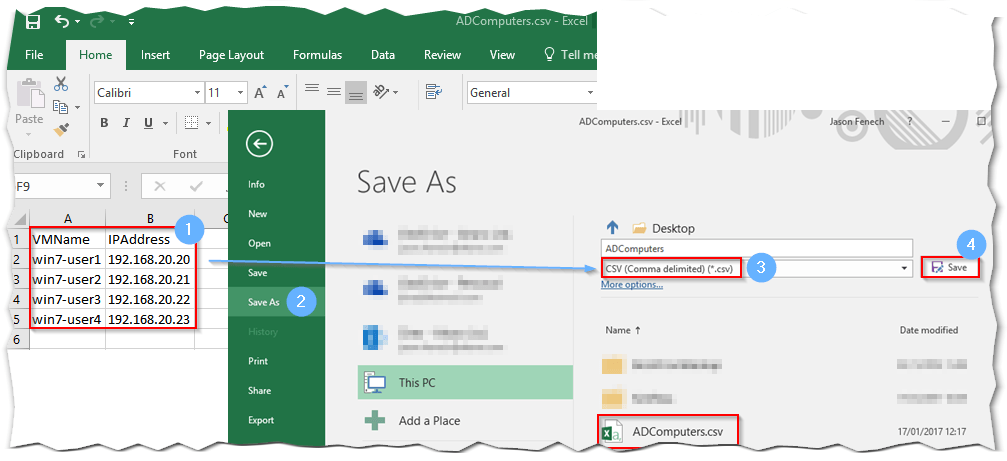
Figure 1 – Creating a CSV file in Excel
Now, launch a PowerShell or PowerCLI window and type the following:
ipcsv -Path .\ADComputers.csv
Ipcsv is shorthand for Import-CSV. Fig.2 shows the cmdlet’s output, which corresponds to the contents of the csv file displayed in tabular form. There isn’t much we can do with the output as it is, so we redirect it to a variable called $computers as shown:
$computers = ipcsv -Path .\ADComputers.csv
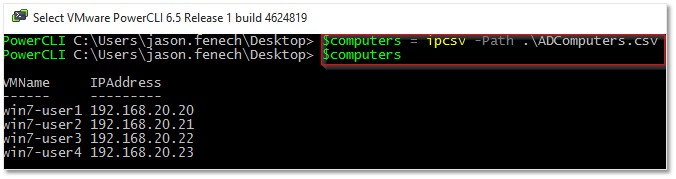
Figure 2 – Reading a CSV file with PowerShell
What we really end up with is a hash table containing the values read from the csv file. For instance, to display VMName and IPAddress from the first record, type:
$computers[0]
Displaying individual values is similarly easy:
$computers[0].VMName
$computers[0].IPAddress
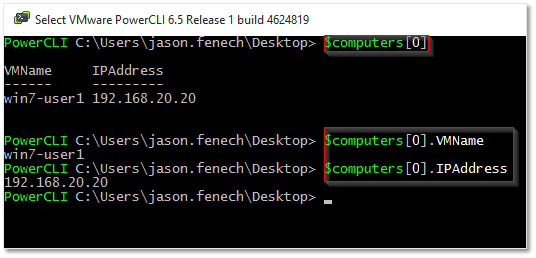
Figure 3 – Displaying the contents of a hash table
Now that we know how to parse a CSV file and extract individual key values, we can use a simple for-each loop to iterate on every value using something like this:
ForEach($computer in $computers){
  $computer.VMName + " has IP Address " + $computer.IPAddress
}

Figure 4 – Using a loop to retrieve key values from a hash table
Putting it all together
We can now build a script that allows us to deploy a number of VMs, the details of which are read from the csv file previously created. Here’s a template of the script we need to put together.
Read the contents of the CSV file into a hash table.
For each element in the hash table do
{
  Replace the VM Name in the GOSC with the current value from the hash table.
  Replace the IP Address in the GOSC with the current value from the hash table.
  Create a new VM from template and apply the amended GOSC.
}
The resulting no-frills PowerCLI script that does the job is as follows. I did not include error trapping, checks and what not, just to keep the script short and easy to follow. The lines of code you need to update, to reflect your environment, are appended with a Change as required comment.
If additional settings, such as the subnet mask or gateway, differ from one VM to another, modify the csv file to include this information (header + data) and update the script so it reads this additional info from the CSV file.
#Define vCenter Server vars
 $VIServer = "192.168.0.10"                             #Change as required
 $VIUser = "[email protected]"                #Change as required
 $VIPass = "**********"                                 #Change as required

#Connect to vCenter Server
 Write-Host ("`nConnecting to vCenter Server " + $ViServer)
 Connect-VIServer $VIServer -User $VIUser -Password $VIPass | out-null
 Write-Host ("-------------------------------------------------------------------------------------------")

#Compute and storage resources
 $ESXHost = (Get-VMHost)[0]
 $DataStore = Get-Datastore -Name "Datastore Name"      #Change as required
 $Location = Get-Folder "VM Folder"                     #Change as required

#GOSC and Template info
 $GOSCName = "GOSC Name"                                #Change as required
 $TempName = "Template Name"                            #Change as required
 $TempToUse = Get-Template -Name $TempName

#Get list of Computer names and IP address from file
 $CSVFile = ipcsv -Path "C:\ADComputers.csv"            #Change path as required

#IP Settings included in the GOSC
 $IPMask = "255.255.255.0"                              #Change as required
 $IPGateway = "192.168.0.1"                             #Change as required
 $DNS = "192.168.0.200"                                 #Change as required

#Iterate over the values read from file (hash table)
 foreach ($VM in $CSVFile){

  #Read the computer name and IP address
   $CompName = $VM.VMName
   $IPAddr = $VM.IPAddress

  #Amend the computer name and IP address in the GOSC
   Write-Host ("GOSC : Adding " + "IP Address" + $IPAddr + " and Computer Name " + $CompName)
   Get-OSCustomizationSpec $GOSCName | Set-OSCustomizationSpec -NamingPrefix $CompName -NamingScheme fixed | Out-Null
   Get-OSCustomizationNicMapping -OSCustomizationSpec $GOSCName | Set-OSCustomizationNicMapping -IpMode UseStaticIP -IpAddress $IPAddr -SubnetMask $IPMask -DefaultGateway $IPGateway -Dns $DNS | Out-Null

  #Create a new VM based on the set template and GOSC
   Write-Host ("Deploying : " + $CompName + " from template " + $TempName + "`n")
   New-VM -Name $CompName -Template $TempToUse -OSCustomizationSpec (Get-OSCustomizationSpec -Name $GOSCName) -Location $Location -VMHost $ESXHost -Datastore $Datastore | Out-Null

}

Write-Host ("-------------------------------------------------------------------------------------------")

#Power up the VMs. This will allow the settings to be applied.
 foreach ($VM in $CSVFile){
  Write-Host("Power Up : " + $VM.VMName)
  Start-VM -VM $VM.VMName
 }

Write-Host ("-------------------------------------------------------------------------------------------")
Note that the script targets the first ESXi host it enumerates. If you have a DRS enabled cluster set up, switch to the following lines of code instead.
#Target the cluster where you want the VM deployed
 $ResourcePool = Get-cluster -Name "cluster name"       #Change as required

#Create a new VM based on the set template and GOSC
 New-VM -Name $CompName -Template $TempToUse -OSCustomizationSpec (Get-OSCustomizationSpec -Name $GOSCName) -ResourcePool $ResourcePool -Location $Location -Datastore $Datastore | Out-Null
To execute the script, open a new PowerCLI window and run it from its parent folder. DO NOT use an existing PowerCLI instance as this may cause the New-VM cmdlet to throw an “Operation is not valid due to the current state of the object” error. This seems to be a known issue but I haven’t had the time to dig deeper for permanent workarounds.
If you come across the issue, simply close the current PowerCLI window and open up a new one. Alternatively, run the script using an IDE such as PowerGUI. Figure 5 shows the script’s output.
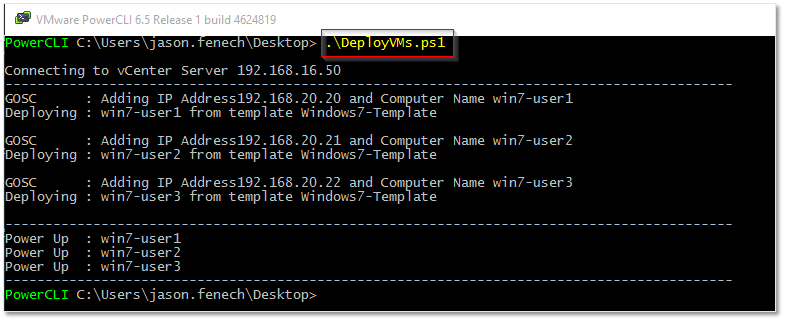
Figure 5 – The script’s output when run from a PowerCLI window
When the script terminates, give the customization process some time to complete. The time taken depends on the quality, so to speak, of your environment. I’m running everything nested so performance isn’t that great. In fact, the whole process took roughly 40 minutes from start to finish. As per Fig.6, you can verify that the VMs have successfully joined the domain from the vSphere Web client and the Active Directory Users and Computers (ADUC) console.
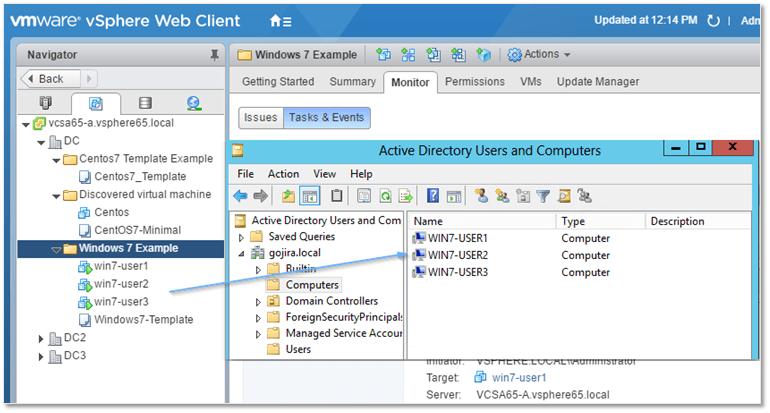
Figure 6 – Verifying that the computers have joined the domain
You should have a look at the Events section of a deployed VM just to verify that guest OS customization has been applied correctly. This is shown in Fig. 7 in the bottom-most-right section boxed in red .
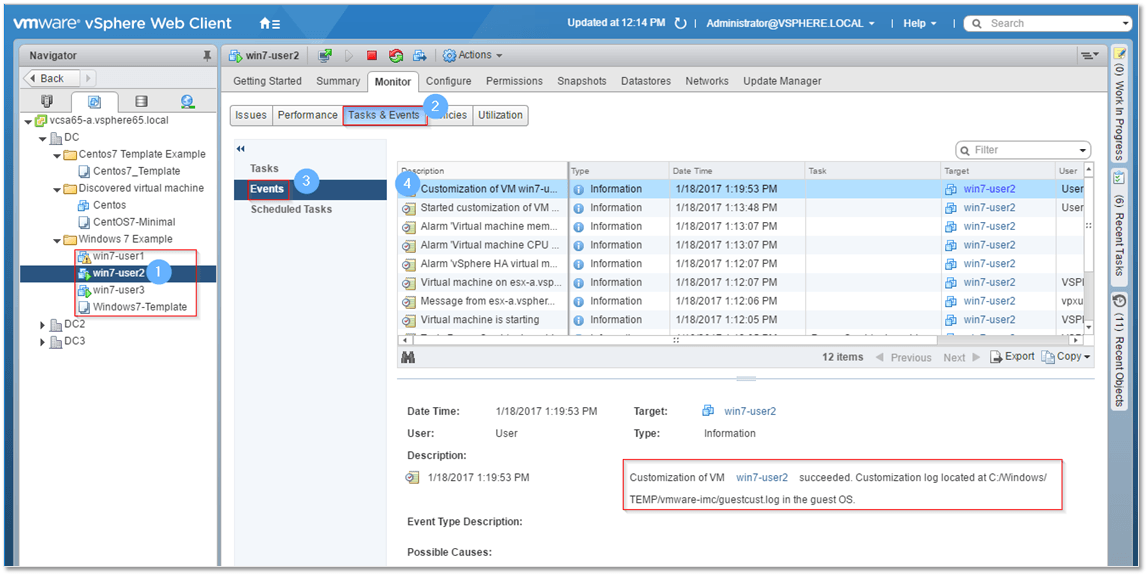
Figure 7 – Verifying that customization has completed successfully via the events section
Conclusion
This concludes the 4-part series on vSphere VM templates. I really had a blast doing this one since I learned quite a lot myself. I beleive that I have covered all the basics and more. If you can think of anything else that should be included, by all means let me know and I’ll update!
In the meantime, have a look at the complete list of VMware articles on this blog.
[the_ad id=”4738″][the_ad id=”4796″]


Not a DOJO Member yet?
Join thousands of other IT pros and receive a weekly roundup email with the latest content & updates!
More in this category


About the Author
Jason Fenech

