Save to My DOJO
Table of contents
Welcome to the first installment of this three-part series where I’ll show you how to set up a nested vSphere 6 environment comprising vCenter Server 6.0 for Windows and ESXi 6.0 hosts. If the term nested virtualization is alien to you, don’t worry. All it means is that we will be running a hypervisor as a VM running under another hypervisor. So, in this case, ESXi will be installed as a VM which is itself hosted on a physical ESXi host. One of the advantages of nesting, is that you can test out new VMware features or simulate upgrade paths to a new vSphere release. Nesting is also frequently used for QA/DEV and other testing environments as well as for home labs.
In Part 1, we will have a look at how to download the required VMware ISO images and how to create the VMs needed for the nested ESXi hosts.
In Part 2, we will install and configure ESXi on the VMs created in Part 1.
Part 3 covers the installation and configuration of vCenter Server, how to add nested ESXi hosts to it and also some basic tasks.
The Requirements
There are a few prerequisites you’ll need to take care of first.
1 – If you don’t have one, register for a VMware account here. Once you do, an activation link is sent to your email address. Activating it will allow you to download the ESXi hypervisor and vCenter Server ISO images.
2 – A physical ESXi host (v5.5 or later) managed by vCenter Server
3 – On the physical ESXi host, do the following.
- Create a virtual machine and install Windows Server 2008 or a later version on it.
- Enable promiscuous mode and forged transmits on the virtual switch’s portgroup as per Fig.1. This is where you’ll connect the ESXi VMs you’ll go on and create it later on.
NOTE: If you’re new to networking, I suggest having a look at my post on the subject here and here.
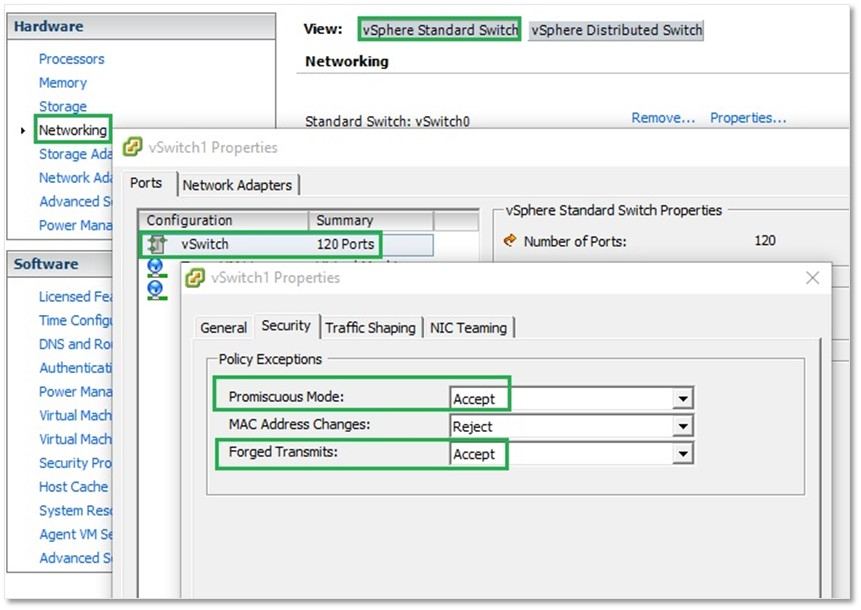
Figure 1 – Enabling promiscuous mode and forged transmits on a virtual switch
Downloading the VMware ISO images
You first need to download the ESXi and vCenter Server for Windows ISO images. Go to this link and download the ISO shown in Figure 2. Save the ISOs to a local folder or upload them to a datastore mounted on the physical ESXi host. Either method will work just fine however for this post, I’ll be using the local folder method.
As an alternative to the vCenter Windows version, you can also try out vCenter Server Appliance (VSCA) which is a Linux based appliance. You can read about the two vCenter Server versions here. Both ESXi and vCenter Server can be fully and freely evaluated for up to 60 days.
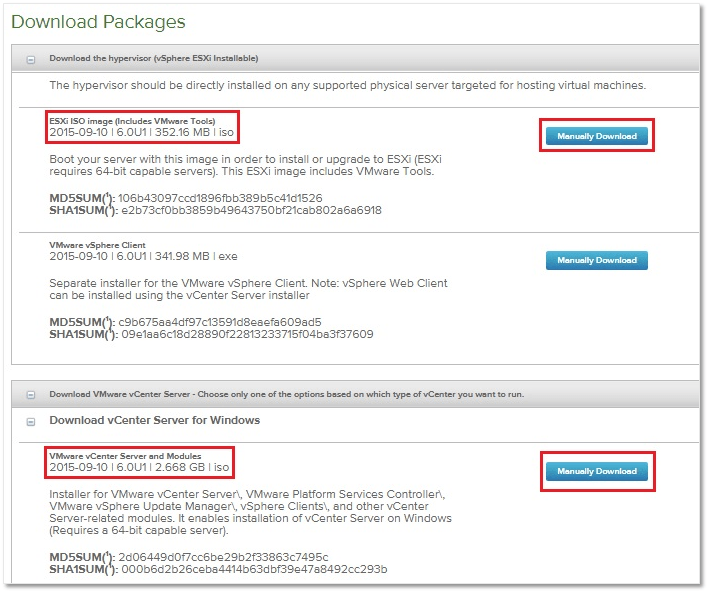
Figure 2 – ESXi and vCenter Server for Windows 6.0 downloadable ISO images
Creating the ESXi VMs
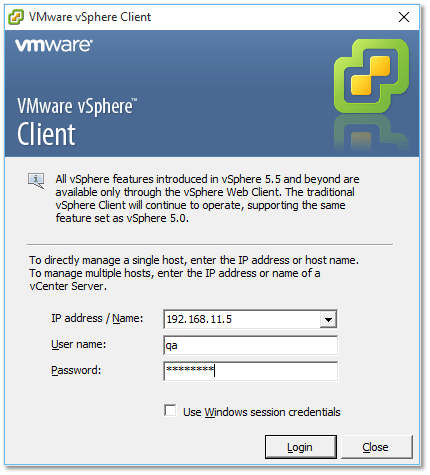
We start off by creating the VMs on which ESXi will be installed. Log in the vCenter server managing the physical ESXi host or directly to the physical ESXi host using the thick vSphere client or the vSphere Web client. I’ll be using both clients in this series just to illustrate any differences but mostly because some functionality is only exposed by the web client.
UPDATE: Since this series was written, vSphere 6.5 has been released. The bulk of what’s covered here still applies however you will not be able to connect to vCenter Server using the thick vSphere (C#) client since it is no longer supported.
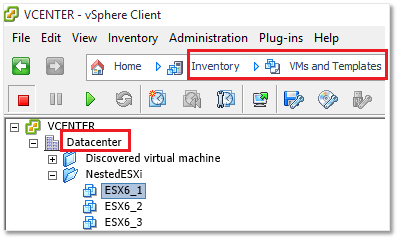
Step 1 – Log in vCenter Server with the thick vSphere client.
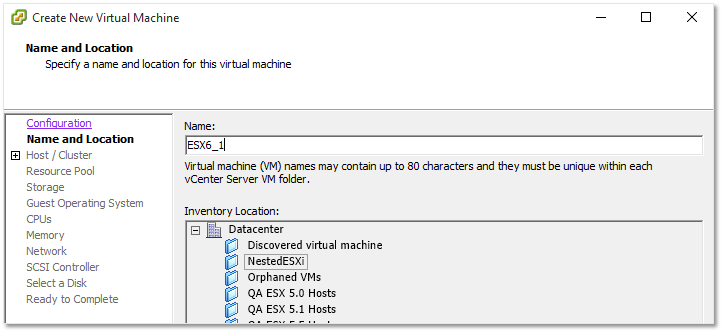
Step 2 – Switch to the VMs and Templates view. Right-click on the <datacenter> name, select New Folder and create a folder called NestedESXi.
Step 3 – Right-click on the NestedESXi folder and select New Virtual Machine.

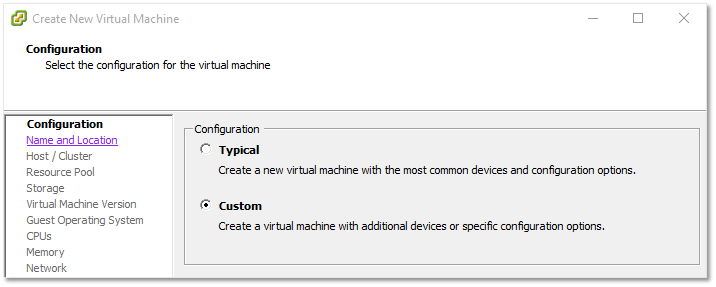
Step 4 – Choose Custom configuration and click Next.
Step 5 – Specify a name for the VM. Let’s just call it ESX6_1. Click Next.
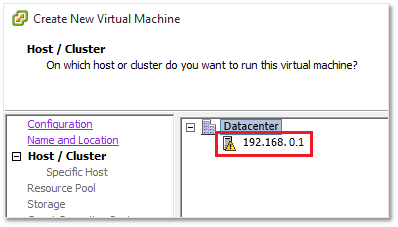
Step 6 – Select the physical ESXi host on which to create the VM and click Next.
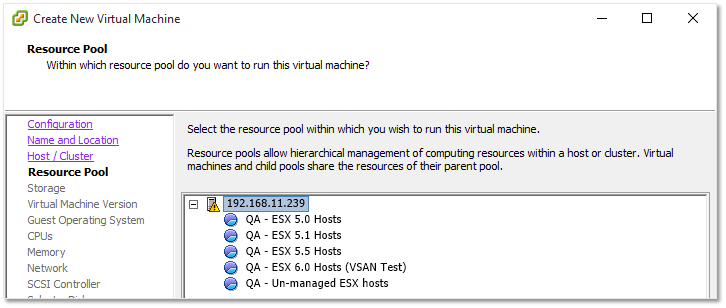
Step 7 – Where applicable, specify a resource pool, otherwise select an ESXi host instead. Click Next.
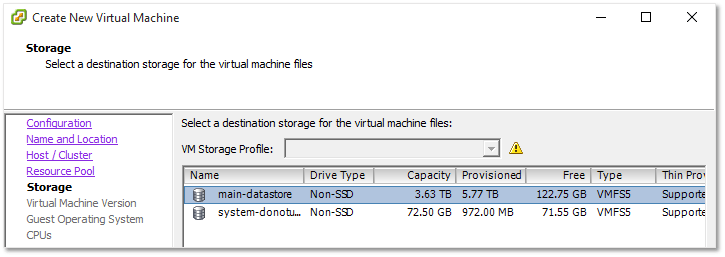
Step 8 – Pick a datastore where the VM is created and click Next.
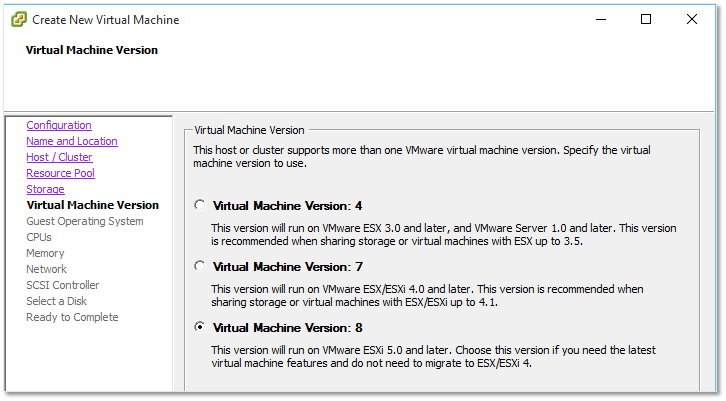
Step 9 – Select Virtual Machine Version: 8. At a later stage we will be able to upgrade the VM to version 10. Click Next.
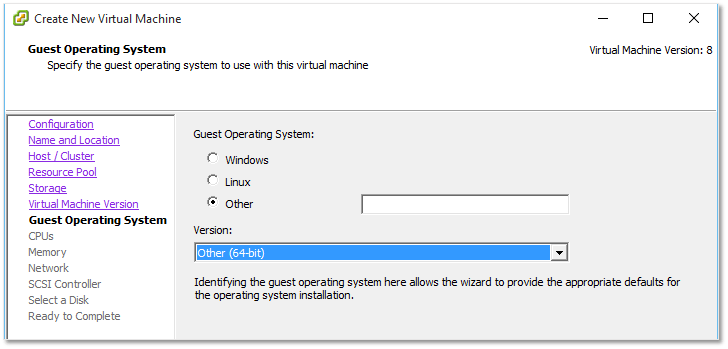
Step 10 – Select Other from the Guest Operation System list and Other (64 bit) from the Version drop-down list. Click Next.
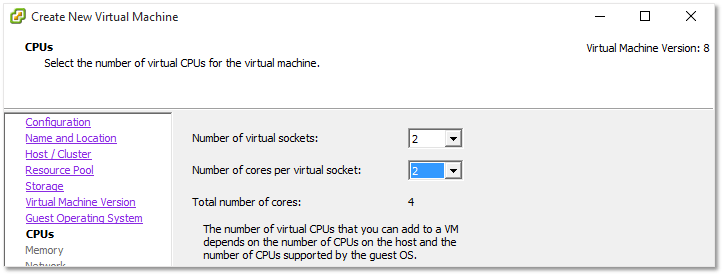
Step 11 – Set the number of virtual sockets and cores per virtual sockets to 2 each. Click Next.
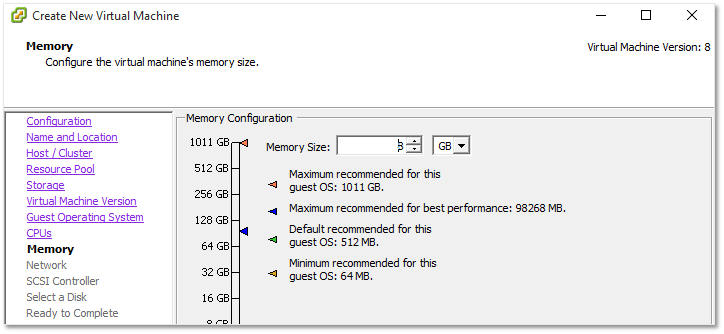
Step 12 – Assign 8GB of RAM and click Next.
Step 13 – Specify the Network the VM will connect to. This should correspond to a portgroup on the virtual switch listed under the requirements section. Also, set the adapter type to VMXNET 3 for optimal performance and tick on the Connect at Power On option. Click Next.
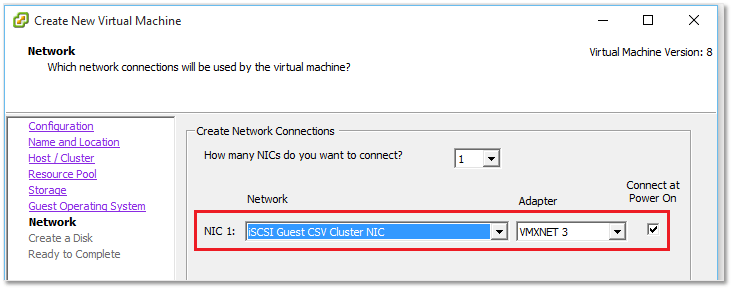
Note: Starting with vSphere 6, VMware Tools are embedded in the ESXi ISO image so you won’t need to install them manually. This also means that the VMXNET 3 adapter drivers are automatically installed.
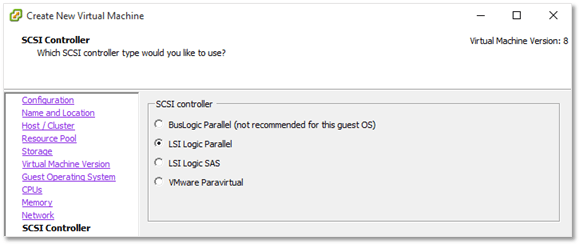
Step 14 – Make sure the LSI Logic Parallel SCSI controller is selected and click Next.
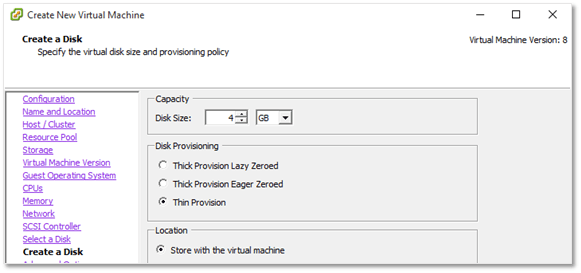
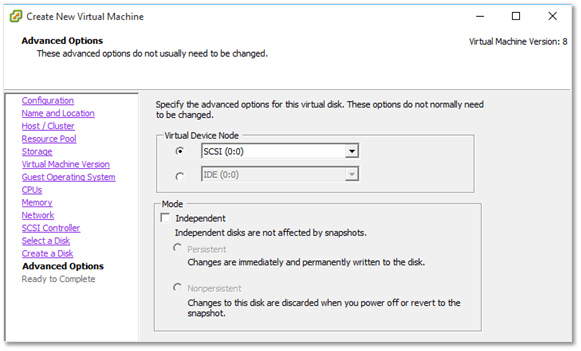
Step 15 – Select Create a new virtual disk and set its size to 4GB. Select Thin Provision from the Disk Provisioning option and leave the remaining settings as set. Click Next at the next 3 screens shown.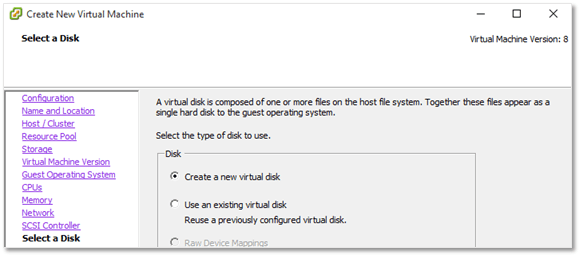
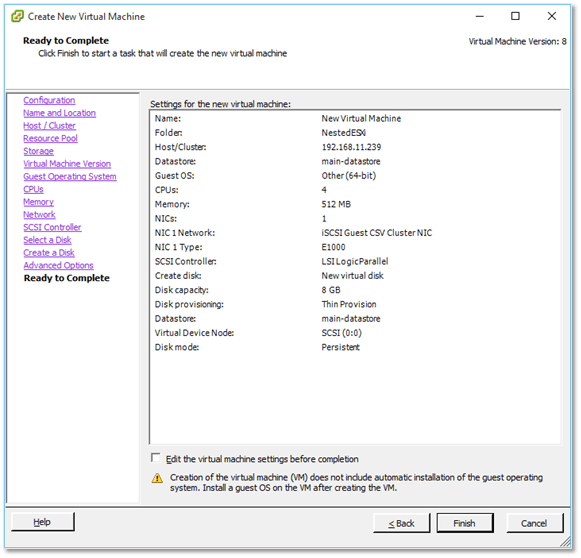
Step 16 – Click Finish to create the VM.
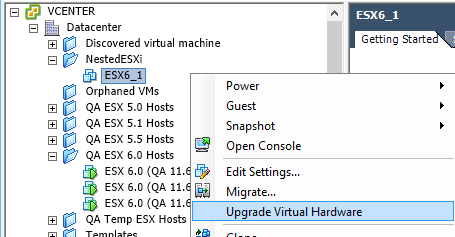
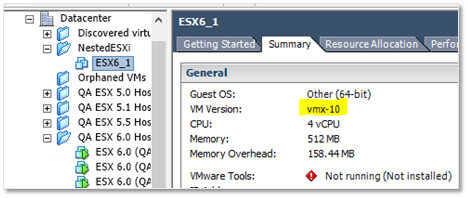
Step 17 – It’s important that the VM’s virtual hardware is upgraded. This will expose the assisted virtualization features of the physical ESXi host’s processors to the underlying guest hypervisor. Right-click on the VM just created and select Upgrade Virtual Hardware. In the Summary tab, you will notice that VM Version changes from vmx-8 to vmx-10.
Step 18 – Using the vSphere Web client, log in vCenter Server. We need to apply a few final settings to the VM before we can install ESXi. This is the reason why vCenter Server is listed as a requirement since the vSphere Web Client is available on available when it is installed.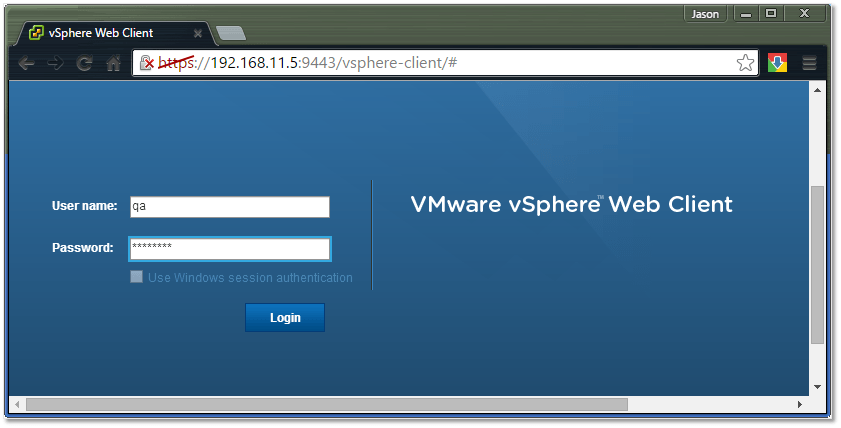
Step 19 – Right-click on the VM just created and select Edit Settings. Expand the CPU properties page and enable the Expose hardware-assisted virtualization to the guest OS option.

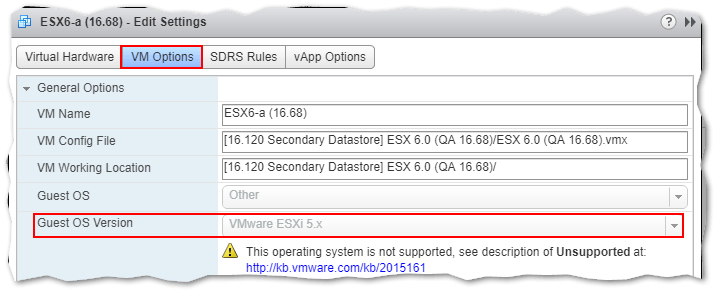
Step 20 – With the Edit Settings dialog box still open, switch to the VM Options tab and select VMware ESXi 5.x from the Guest OS Version list. If your physical ESXi host is running ESXi 6.0, a VMWare ESXi 6.x option will also be available. You can safely ignore the Unsupported warning.
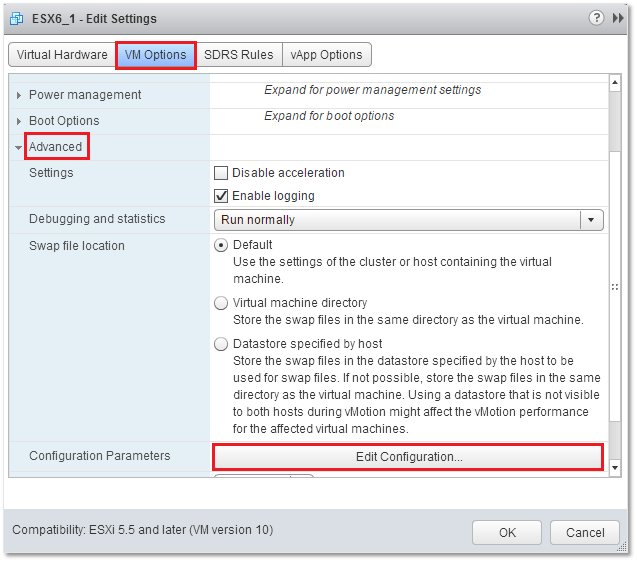
Step 21 – We also need to make sure that we can host VMs with a 64-bit guest OS on the nested ESXi hosts after we finish installing them. From the VM Options tab, expand Advanced and click on the Edit configuration. Click Add Row and add the vhv.enable = “TRUE” line.
Note: This line must also be added to the /etc/vmware/config file on the physical ESXi host(s). To do so, enable SSH on the physical ESXi hosts and SSH to it using something like putty. Run the following command;
echo 'vhv.allow = "TRUE"' >> /etc/vmware/config
This last step completes the creation and customization of the nested ESXi shell VM. We can now clone the VM as needed.
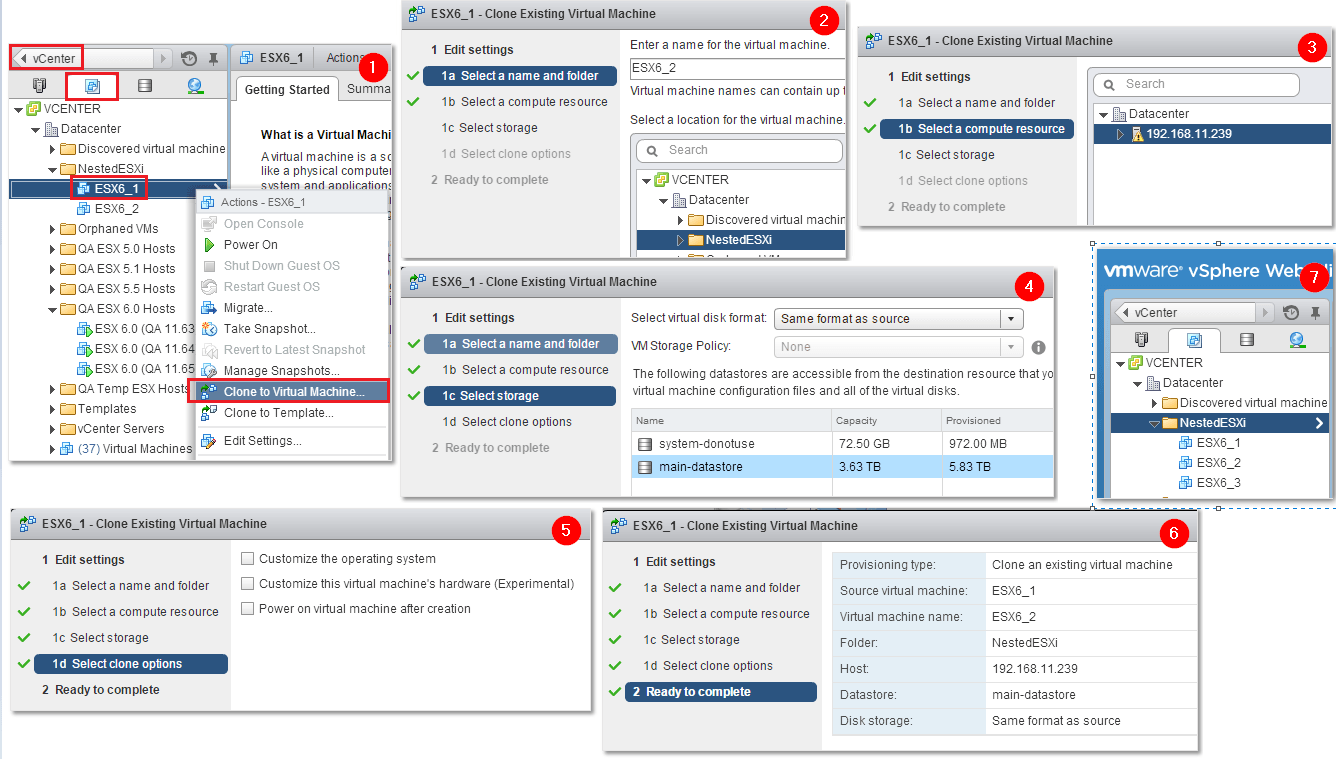
Step 22 – Locate the VM just created and select Clone to Virtual Machine. Follow the steps shown in the next sequence of screenshots to create an additional 2 VMs for a total of 3 under the NestedESXi folder.
Conclusion
This concludes the first part of this series. So far, we’ve seen how to create VMs which are then used to host our nested ESXi hosts. In part two, we’ll go ahead and install ESXi 6.0 on the three VMs just created. Make sure to stay tuned for more!
[the_ad id=”4738″][the_ad id=”4796″]


Not a DOJO Member yet?
Join thousands of other IT pros and receive a weekly roundup email with the latest content & updates!
More in this category


About the Author
Jason Fenech


40 thoughts on "How to set up a nested vSphere 6 environment – Part 1"
I make the step by step error: virtualized Intel VT-x/AMD-V
thanks
Hi, sorry but I’m not exactly sure what you mean. If you’re getting a “virtualized Intel VT-x/AMD-V” error or warning, make sure that the virtualization features on your processor(s) are enabled. Use the bios utility on your computer/server to check and if need be enable these settings.
http://kb.vmware.com/selfservice/microsites/search.do?language=en_US&cmd=displayKC&externalId=1003944
http://www.sysprobs.com/disable-enable-virtualization-technology-bios
Jason
What kind of spec could i get away with for the 3 ESXI’s and VCenter server.
I have a reasonably powerful workstation at 16GB of RAM, i5-4670k (4 Cores and 4 Threads) but i’m not 100% sure that the RAM is good enough for a lab environment. Would I only need 1 VM on each ESXI host to test out all of the features?
Thanks,
Ben
Hi Benjamin,
Thanks for your query first of all.
The short answer, I’m afraid, is that you will not be able to set up that kind of environment with only 16GB of RAM available. The reason for this is that vCenter Server 6.0 requires a minimum of 8GB failing which, it won’t even install. ESXi needs a minimum of 4GB. So the total physical RAM required for the env is 28GB. You also need a minimum of 4GB for the host operating system (assuming something like Windows 7 64bit) and other running apps, including VMware Workstation.
I’d say 32GB is the minimum you’ll need to run vCenter Server 6 3 ESX 6.0 hosts. Incidentally this is what I have at home atm.
You could still try installing vCenter Server and a single ESXi host if the aim is to experiment with the features, etc. Something else you could try, perhaps, is installing vCenter Server on a spare PC or laptop you might have lying around and set up 2 even 3 ESXi vms on Workstation.
Here’s a couple of links re. vSphere requirements;
vCenter Server 6.0
ESXi 6.0
Hope this is what you were after.
regards
Jason
Great write up! Would just like to add that the following are not needed for Nested ESXi 5.5 or higher:
vhv.enable = “TRUE”
echo ‘vhv.allow = “TRUE”‘ >> /etc/vmware/config
I have been running nested ESXi labs for quite a while and have never needed to configure these settings in order to run x64-bit guest VMs on the ESXi VMs. Just a little FYI 🙂
Hi Alex,
Thanks for the tip. I was pretty sure both settings need to be present on the physical ESXi box in order to run 64-bit vms under nested ESXi. If not, that’s two less settings one needs to worry about 🙂
Jason
Actually, let me correct myself as I may have given some inaccurate info.
If you are creating a nested ESXi VM using the vSphere Web Client, and you enable the checkbox for:
“Hardware virtualization (*) Expose hardware assisted virtualization to the guest OS”
This sets the same value as if manually adding vhv.enable = “true” to the .vmx file
So with that said, f you created a nested ESXi VM using the Web Client and enabled that option then you don’t need to add it manually. If you do it from the C# client, then you do need to add it manually on a per VM basis.
Hi,
You’re right, actually. Just to double check, I went ahead and created a test vm using the web client and pretty sure the vhv.enable = “TRUE” made its way into the vmx file.
Also the vhx.allow=true entry is now obsolete.
I’ll amend the post to make things a little more clearer.
Thanks for the feedback,
Jason
terrific write up. easy,simple,exact.
thanks a lot 😉
Much appreciated. I’m glad you found it useful.
Jason
Hey Rick,
Thanks for the reference. Love the “VCenter 6 Linked Mode” post btw.
Jason
When I try to add my ESXi VM’s to the cluster I get the message “Unable to add Datastore because of a conflict” and the only way I’ve been ale to get around it is to delete the datastore on ESXi VM, then I’m able to join it to the cluster. This happens on joining the second and subsequent hosts to the cluster, the first time it works but then the datastore conflicts with the first datastore. Have you seen thas?
Hi Mike,
Yes, I did come across this error when adding cloned ESXi hosts to the cluster. The issue is a result of the local datastore on every cloned ESXi having the same VMFS UUID. Executing the esxcli storage vmfs snapshot resignature -l=”name-of-vmfs-volume” from within an SSH session might help. If you get a “No unresolved VMFS snapshots with volume label …” error the only option I can think of is to delete the local datastore or refrain from creating it, in the first place, when preparing the ESXi image for cloning. Personally I’d prefer to install each nested ESXi host from scratch to avoid such issues.
Hope this helps.
Jason
On the step where you select the network for the Nested VMs, is that something you need to setup in an earlier state? I only have a single network, VM Network. Didn’t know if I was to use that or not?
Hi,
Yes. The default network (portgroup) or any other network will work just fine as long as the hosts are able to talk to one another.
regards
Jason
Hi,
In my case, adding
vhv.enable = “TRUE”
into /etc/vmware/config was necessary for running nested 64-bit VMs.
Cheers,
John
Hi John,
Thanks for your input. Out of curiosity, are you referring to the physical ESXi’s config file or the nested ones and which version of ESXi are you working with?
Regards
Jason
I’m currently attemtping to learn vSphere 6.0 in a home lab and the learning curve for me is quite extreme. Articles as well written as yours make it a joy to learn.
Thank you for such a well written article !
Any insights or useful reference material relating to network vswitch configurations and VLAN separation for vMotion / ISCSi traffic in the nested hosts would be greatly appreciated.
Thanks again.
Hi Jason,
I’m glad that you’re finding my articles useful. Your comment is greatly appreciated.
The easiest setup I can think of, is to add dedicated vnics on the ESXi nested hosts connected to a dedicated vswitch. You’ll also need to setup a vmkernel for vMotion on each host assigning it to a network other than that used for vms or other services. TBH, I never tried this on a nested env but in general you’d use dedicated nics / hbas on each ESXi host hooked up to a dedicated vlan set up on a physical switch. Some also choose to use physical switches entirely dedicated to running iSCSI traffic which basically means that nothing else is hooked up save for ESXi hosts and network connections to and from whichever storage solution is in place.
As for literature you can perhaps check Duncan Epping and William Lam’s blogs for further insight. Regardless, you’ll definitely learn alot much as I do to be pretty honest.
Hope this helps.
Jason
i have installed ESXi 6 Hypervisor on Physical Server , created a virtual machine as ESXi 6.0 . On ESXi 6.0 created Windows 2008 Os but it is not pinging , Kindly guide , Promiscuous mode and Forged Transmit is selected Accept on Physical ESXi Box. Kindly guide what setting will make the Windows 2008 virtual machine ping
Hi,
You have to enable promiscuous mode on the vSwitch to which the Windows 2008 VM is connected. If this still fails, check that the firewall on the Windows is disabled (temporarily at least) and that you can at least ping the gateway from the Windows box.
regards
Jason
Yes i tried enabling promiscous mode on vSwitch to which Windows 2008 and also i have enabled on Physical server Esxi Hypervisor also. Windows firewall is also disabled , I am not able to ping gateway also . i am using the ipaddress as 192.168.20.x
Re-check your network configuration. Maybe you have an invalid mask or something. If the Windows box is hosted on the nested ESXi server, you should be able to reach the outside world once you enable promiscuous mode and forged transmit on the virtual switch created on the nested ESXi host.
regards
Jason
Hi Jason, I have installed a nested ESXi 6.5 for testing purposes.
Created a Standard switch, with a VM Networking port, assigned an unused NIC to it, and changed the Security policies as you have suggested.
On the nested ESXi I have selected the newly created VM-Networking port, but cannot get the nested host connected. I have a second VM on the same Standard switch and it is fine.
Can you suggest where else I should look?
P.S This is first time I go nested install.
Thank you
Hi Arthur,
I’m not sure what you mean exactly by “you cannot get the nested host connected”, so I’m assuming that the switch port ESXi is connected to is showing up as inactive. If that’s the case, check that the vnic on the VM, on which you installed ESXi, is ticked on (connected), that you’ve used vmxnet3 and that the correct portgroup is in use. I know that this may sound trivial but it’s the simple stuff that generally throws you off course.
Also, try a network test from the ESX’s DCUI or from shell, just to confirm that your network settings are ok.
If this does not help, let me know.
Thanks
Jason
Good morning Jason,
Thank you for the reply.
I have created a vSS, a VMKernel port to handle the nested host networking.
I am using the correct VLAN number and subnet but still no avail.
I will create a vDS and try with it. I need it anyway for my NSX testing.
I shall let you know how it goes.
Kind Regards,
Hi Arthur,
I wasn’t aware that you’re using VLANs which further complicates issues. My post assumes nested ESXis connected to a standard switch on the parent ESXi host with no VLANs. If I were you, I would try and solve the standard switch issues before moving on to vDS, NSX, etc.
regards
Jason
i did exactly the way you described but when powering on the VM and opening the console i get this message “Unable to connect to the MKS:Could not connect to the pipe \.pipevmware-authdpipe within retry period.
Any help appreciated
Hi,
Most probably it’s a firewall issue. Temporarily disable any firewall you might be using and try again. Can you ping the VM’s IP address? You might also try clearing the DNS cache. If this fails, try re-registering the VM and restart the management agents from the ESXi host using DCUI. Restarting the VM or the ESXi host itself might also help.
There’s also this:
https://kb.vmware.com/selfservice/microsites/search.do?language=en_US&cmd=displayKC&externalId=2115126
Hope this helps.
Jason
After installing and configuring the nested ESXi, i have created a new VM that will run on that ESXI, but when powering on the VM it shows the error ” Failed to extend swap file from 0Kb to 2097152Kb”
Thank you in advance!
Hi,
Have a look at this -> https://kb.vmware.com/selfservice/microsites/search.do?language=en_US&cmd=displayKC&externalId=2030250
regards
Jason
Hello All,
I am very new to VMware and i have a very basic question. Kindly help me by answering below queries,
1. Can we have More than one ESXi Host on a single server?
2. If yes is the answer for the above question, Do we need to have multiple ESXi on single server on Production Environment ? or its just for Lab purpose ( To understand).
Hi,
1. Well yes you can, if you mean multiple nested ESXi hosts on one physical ESXi host.
2. Nested ESXi should not be used for Production since it is not supported by VMware.
regards
Jason