Save to My DOJO

Table of contents
ESXi implements the PAM or Pluggable Authentication Module framework which supports several authentication methods one of them being Active Directory (AD). This means that you can include AD as an authentication mechanism within your vSphere environments. The benefits are many but the ones that sticks out the most is being able to authenticate using an AD user account and using the same, including AD security groups, to grant permissions on vSphere objects. This voids the need to maintain and replicate local ESXi users and groups across multiples instances of ESXi. Single sign-on using Windows credentials is also a cool feature to have.
User management is also a breeze once AD authentication is enabled. Consider the case of a vSphere admin leaving for pastures green. With AD, it’s a simple matter of disabling his or her user account and you’re done. If on the other hand admins are sharing and using local root or similarly privileged accounts, this insecure practice would call for a password change across the board assuming security is something you cherish.
So, in today’s post, I’ll go over the process of joining ESXi 6.5 to Active Directory. My test setup consists of a single unmanaged ESXi 6.5 host and a Windows 2012 Domain Controller (DC) running DNS, a single forest / domain setup and hosting all FSMO roles.
Requirements
Time synchronization: The time on the ESXi host and the DC must be in sync. To do this, configure both to use the same NTP source or simply configure the NTP service on ESXi to use the DC as a time source. By default, a DC holding the PDC Emulator role is also responsible for keeping time for the whole forest.
DNS Resolution: The ESXi host must be able to resolve the domain and domain controller(s) DNS names. The easiest solution to this is to add the IP address of a DC which is configured as a DNS server for that domain.
Root access: Create a group called ESX Admins on Active Directory. AD users accounts assigned to it are automatically granted root access on ESXi.
Firewall access: Make sure that there is no firewall blocking the following ports both UDP and TCP:
- 88 – Kerberos authentication
- 123 – NTP
- 135 – RPC
- 137 – NetBIOS Name Service
- 139 – NetBIOS Session Service (SMB)
- 389 – LDAP
- 445 – Microsoft-DS Active Directory, Windows shares (SMB over TCP)
- 464 – Kerberos – change/password changes
- 3268- Global Catalog search
Configuring Active Directory
There’s little work to be done here. Just add A and PTR records for the ESXi host to the domain’s DNS zone as shown in Figure 1.
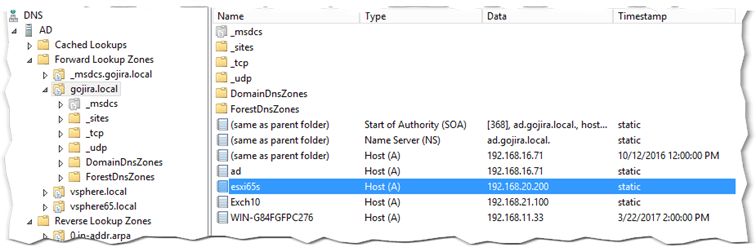
Figure 1 – Creating DNS records for ESXi on a Microsoft DNS server
Using the ADUC MMC console, create a security group called ESX Admins and add the AD users whom you want ESXi root privileges assigned to.
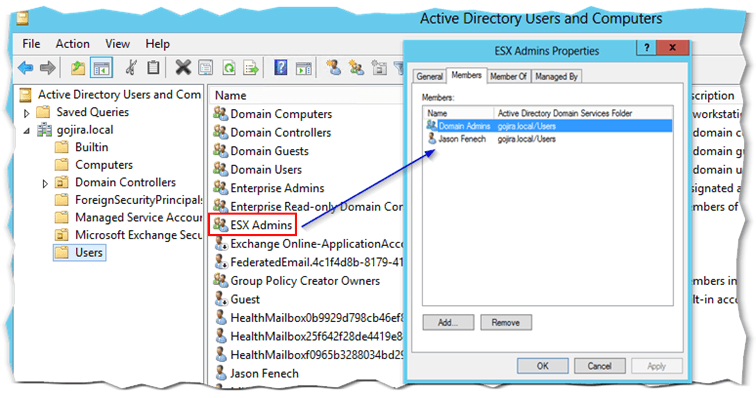
Figure 2 – Creating the ESX Admins security groups in AD
In reality, you can specify any AD group of your liking provided you amend the Config.HostAgent.plugins.hostsvc.esxAdminsGroup advanced setting as shown in Fig. 3.
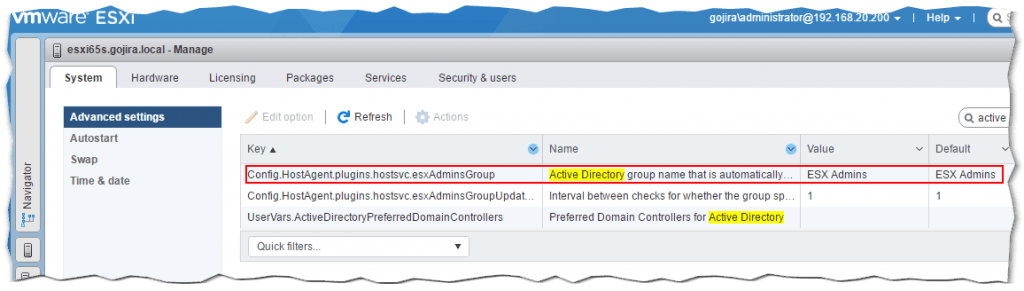
Figure 3 – Specifying an alternative AD ESXi root user group from the embedded ESXi host client
Configuring ESXi
You can configure ESXi 6.5 several ways. These include the DCUI, the ESXi command line, PowerCLI or via the embedded ESXi host or thick client.
Enable the Active Directory Firewall Rule
While writing this post, I learned that the Active Directory All firewall rule on ESXi is disabled by default. This, of course, plays havoc with the AD integration process since ESXi won’t be able to reach the DC. Using the host client, enable the firewall rule as shown in Figure 4. Highlight the rule, right-click on it and select Enable.
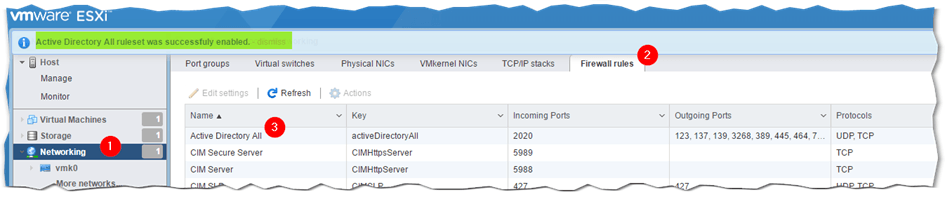
Figure 4 – Enabling the Active Directory All firewall rule on ESXi
DNS Settings
The easy way to configure DNS settings on ESXi is via the DCUI or the thick client. This is shown respectively in Figures 5 and 6. From the DCUI, log in as root, press F2 and navigate to the DNS Configuration menu option and press Enter.
On the DNS Configuration window, add the IP address of a DC running the DNS service as a primary or alternate DNS server. The Hostname value must match the DNS A record created for the ESXi host in the domain DNS zone.
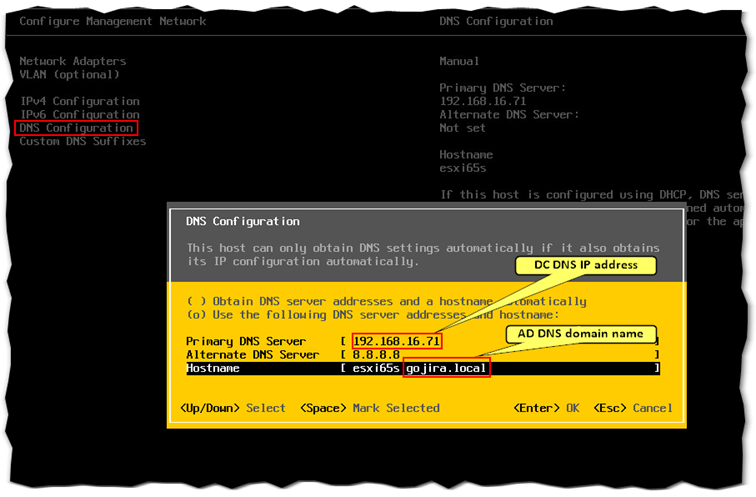
Figure 5 – Configuring the DNS settings on ESXi using the DCUI
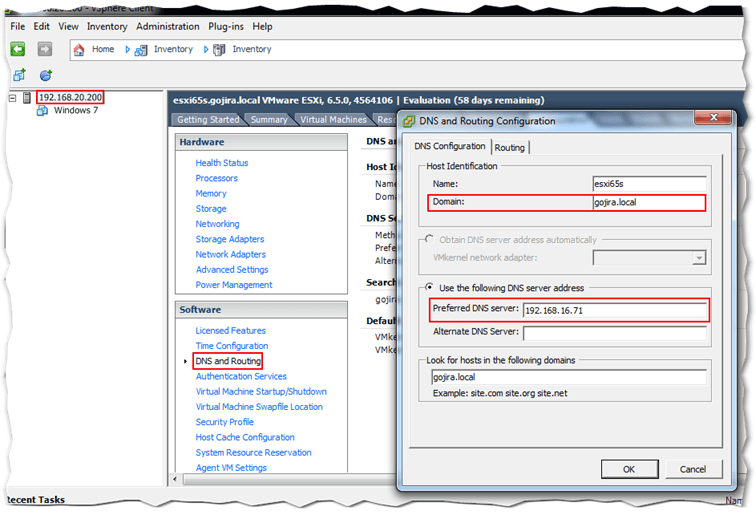
Figure 6 – Configuring the DNS settings on ESXi via the thick client
NTP Configuration
As per the requirements, ESXi must be time synced to the domain. One way of achieving this, is to add the IP address of the DC holding the PDC role to the list of NTP servers on ESXi. Figure 7 outlines how to do this using the thick (C#) client. Make sure that the NTP Client Enabled option is ticked on.
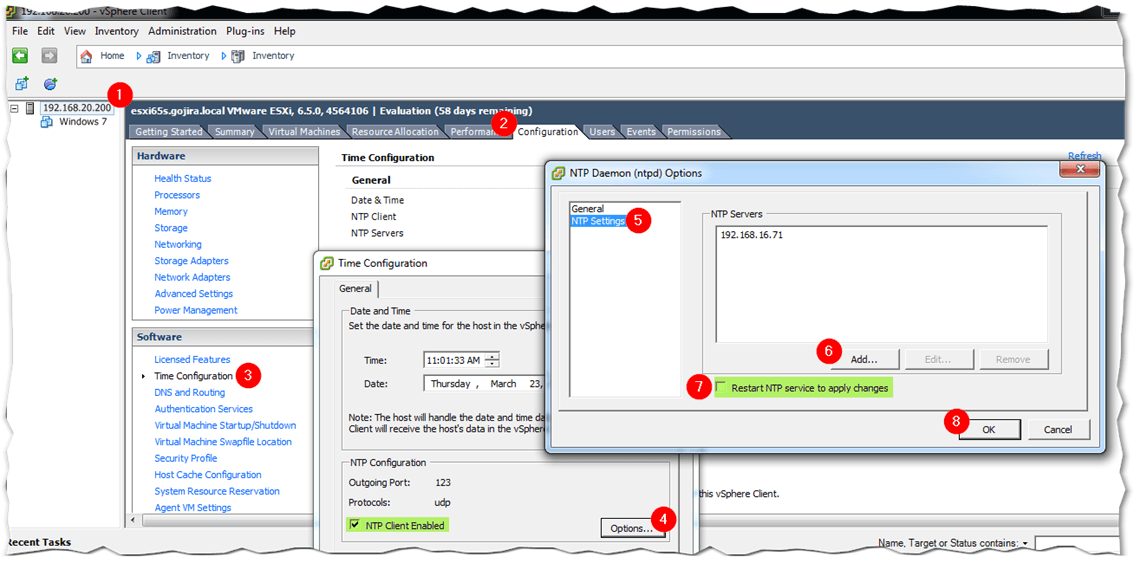
Figure 7 – Managing the NTP service on ESXi via the thick client
Alternatively, SSH to ESXi, log in as root and edit /etc/ntp.conf using vi. Add the line server x.x.x.x as shown in Fig.8 where x.x.x.x corresponds to the IP address of the NTP server you wish to use, which in my case happens to be the DC itself. When you’re done, restart the ntp service by running /etc/init.d/ntpd restart as shown in Fig. 8.
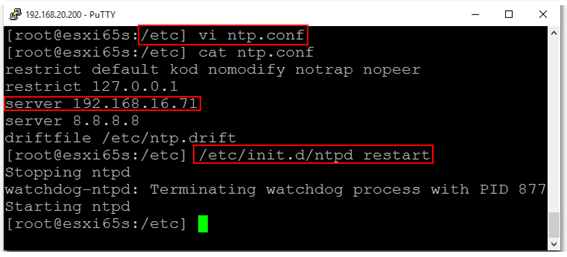
Figure 8 – Adding an NTP time source via the command line and restarting the NTP daemon
Once SSH’ed to ESXi, carry out an nslookup test to see if the AD domain name can be resolved. As per my example, the AD domain name is gojira.local which correctly resolves as shown in Fig. 9.
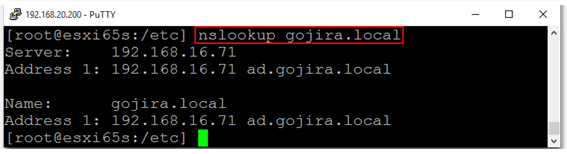
Figure 9 – Running nslookup to check if the AD domain name resolves correctly
Joining Active Directory
Now that the pieces are all in place, it’s just a matter of joining ESXi to the domain. To do this, I’ve used the embedded host client to make things a little bit interesting. If you wish, however, you can do the same via the ESXi command line or the thick client.
Using the embedded host client
- As per Figure 10, log in as root and select Manage from Navigator.
- Select Authentication (3) from the Security & Users tab (2).
- Next, click on the Join Domain button (4) and enter the AD domain name (5) and credentials (6) with the required rights to join computers to a domain. Make sure to abide by the formatting shown in the screenshot.
- Click Join Domain (7) from the Join Domain window. ESXi is added to Active Directory as per the highlighted fields in green.
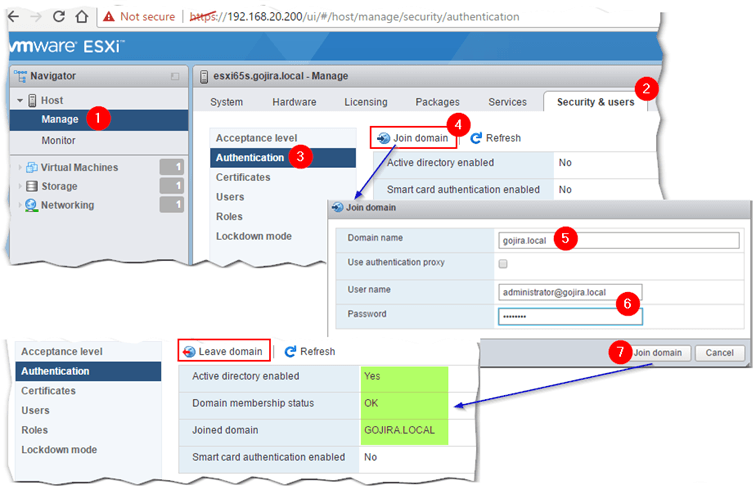
Figure 10 – Use the host client to join ESXi to Active Directory
You can leave the domain any time by clicking on the Leave domain option.
Using the ESXi command line
Later versions of ESXi include the domainjoin-cli cmdlet from the likewise-open package which is also included with many Linux distros.
On ESXi 6.5, the command is executed from /usr/lib/likewise/bin. If you haven’t enabled the AD firewall rule mentioned earlier, you must temporarily unload the ESXi firewall – assuming it is enabled – for this to work. Failing this, you will get an Error: NERR_DCNotFound [code 0x00000995] error.
The cmdlet syntax is this: domainjoin-cli join <AD domain FQDN> administrator password. You can omit the password and type it in instead. Figure 11 shows how the first join attempt failed because of the firewall while a second attempt succeeded when the firewall was temporarily disabled.
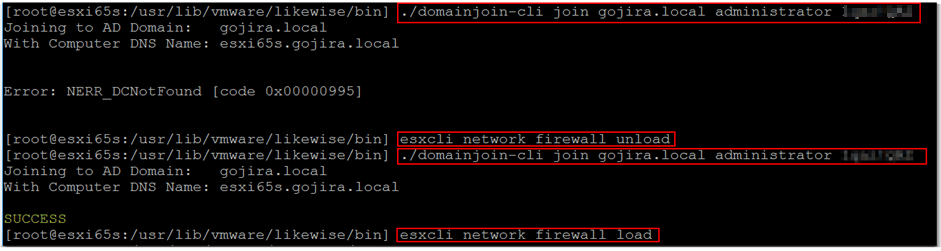
Figure 11 – Joining ESXi to AD using domainjoin-cli
As per Fig. 12, you can run domainjoin-cli query to verify that the DC is reachable.

Figure 12 – Running domainjoin-cli query to verify correct AD functionality
From the AD side of things, you should see a new computer account created for ESXi under Computers.
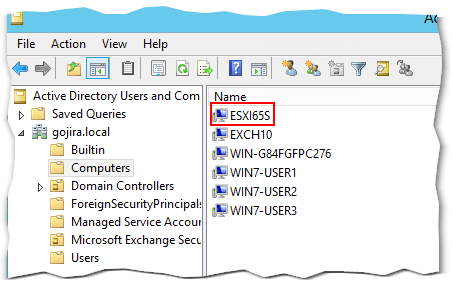
Figure 13 – A computer account for ESXi is created in AD on joining the domain
Time to test!
Single sign-on using Windows credentials
The thick (C#) vSphere client gives you the option to log in with the currently logged on Windows user provided you’re on the same domain as ESXi. Sadly, the embedded ESXi host client does not offer the same functionality, at least not for the time being. Just to be sure, I posted a comment and surely enough one of the VMware devs working on the host client project emailed be back within a few minutes. In a nutshell, it was confirmed that VMware are “aware of the gap and currently looking at how to prioritize and get it implemented”. Fingers crossed, this feature will be coming soon to a host near you!
Next up is a video that shows SSO in action when using the old vSphere client. In addition, I also show where from ESXi is be joined to and removed from an AD domain.
Granting permissions on vSphere objects
Since ESXi is now an AD resource, permissions using AD security principals can be assigned to it and the vSphere objects it holds. In this next video, I demonstrate how to grant administrator access on a single VM to a user called gojira\jason. Access to any other vSphere object or view is denied.
The same can be carried out using the embedded host client. The caveat here is that you must explicitly type in the AD user account or group as AD resources are not exposed by the client, unlike the thick client which lists them in a drop-down box. This is something else the VMware development team are currently looking into and will implement if possible.
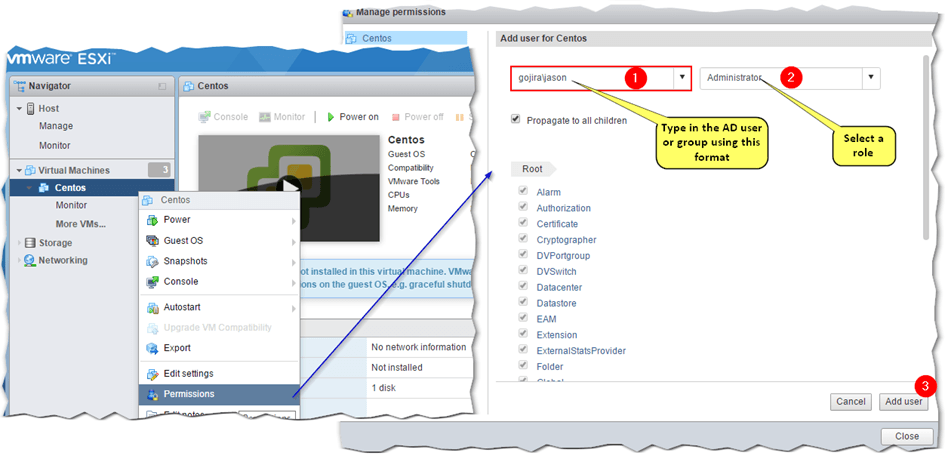
Figure 14 – Granting permissions using AD security principles via the embedded ESXi host client
Conclusion
That pretty much wraps it up for today. As we’ve seen, there are a number of advantages to joining ESXi to Active Directory. It makes user management easier while improving security across the board. In an upcoming post, I’ll go over a similar procedure this time targeting vCenter Server.
[the_ad id=”4738″][the_ad id=”4796″]


Not a DOJO Member yet?
Join thousands of other IT pros and receive a weekly roundup email with the latest content & updates!
More in this category


About the Author
Jason Fenech


58 thoughts on "How to join ESXi to Active Directory for Improved Management and Security"
Hi, is there any point in adding the individual hosts to AD when I have VCSA configured in AD? Ok, I could still add AD accounts to each host but apart from that?
Hi Daniel,
One advantage that comes to mind is the ability to change the ESXi root password if you forget it. You can then log in with root privs using an AD account that’s member of the ESX Admins group. (https://kb.vmware.com/s/article/1025569)
Jason
Thank you very much.
I has been struggling with this for a while (over a week) and had just about given up.
It wasn’t a particular step in your guide exactly, but it prompted me to check a particular setting.
Essentially, I had my ESXI server pointing to my gateway for DNS. I somehow hadn’t thought to check the networking section within the ESXI web interface (where you point out the AD firewall rules). In there I found the TCP/IP stack info where I added the additional DNS entries.
I had looked at so many pages but none of them prompted something as simple as making sure the AD/DNS server could be resolved.
So a huge thank you!
Glad to know that my post provided the solution. Thanks for your feedback!
Thanks for the detailed step-by-step manual, but especially for the hint, that AD users and groups must be explicitly typed in if the web UI is used (which seems to be the only way in version 6.7). I am able to add a single AD user using the mentioned pre-2000 format (e.g. userdomain), but unfortunately I cannot add any kind of AD group that I have created. Are there any formatting rules/name schemas which must be considered for group names so that they can be added in vSphere? As already mentioned, I use vSphere 6.7 (no vCenter). Many thanks!
Hello, I’m not aware of any reasons why it wouldn’t work. I’d have to dig in the KBs.
Hi, thanks for the reply. In meantime, I was able to solve this issue: It was just my mistake as I entered the wrong format userdomain instead of domainuser. Sorry for the confusion.