Save to My DOJO
Table of contents
I had previously covered how to deploy ESXi 6.0 in an article titled How to install ESXi 6.0 on bare-metal servers. To be honest, very little has changed since then, at least not in terms of deploying this latest ESXi 6.5 hypervisor from VMware. So for today, I will limit myself to outlining the deployment procedure making reference to the points listed in Figure 1, something I put together for this post as a quick ESXi deployment reference of sorts.
I’ll finish off this post with a video that takes you through the process of installing ESXi. The video shows how to deploy ESXi to a VM which incidentally reminded me to share the latest features related to nested ESXi. As per William Lam’s article these include Paravirtual SCSI Support, GuestOS customization, pre-vSphere 6.5 enabling on vSphere 6.0 U2 and NVMe support.
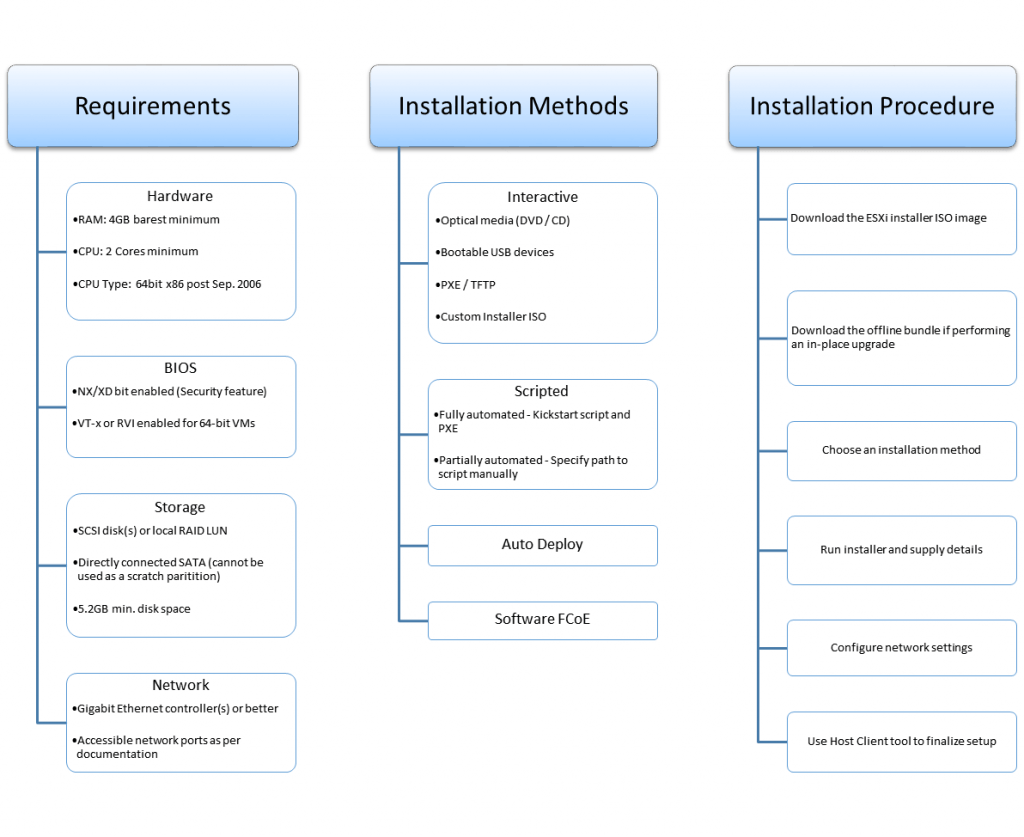
Figure 1 – ESXi 6.5 deployment workflow
Requirements
The requirements are exactly the same as those for ESXi 6.0. So as mentioned, nothing has changed on that front.
Hardware
- The minimum amount of RAM required is 4GB with 8GB being the recommended minimum.
- A minimum of 2 CPU cores from any AMD or Intel 64-bit x86 processor, released after September 2006.
Note that the actual hardware requirements are of course primarily dependent on the number and type of VMs the ESXi host will be running.
BIOS Settings
- From a BIOS perspective, the Intel VT-x and AMD RVI virtualization hardware extensions must be enabled, as always, to let you run 64-bit VMs.
- You must also enable the NX/XD bit, short for No Execute (AMD) and eXecute Disable (Intel). This enforces a security feature that prohibits the execution of code in specific areas of memory. This enacts an extra layer of defence against malicious code and buffer overlflows.
Storage
- A minimum of 1GB for the boot device and 4GB for the scratch partition is required. If booting from a local disk, SAN or iSCSI LUN, 5.2GB is the minimum required for the VMFS volume and scratch partition.
- The choice of hard drives really depends on whether or not local datastores are used, use of vSAN and so on. In general servers come with SCSI/SATA drives. Also note that SAS drives while supported will be treated as remote storage.
- You should also reserve a minimum of 200MB for logging based on a log rotation quota of 10.
Network
- On the network side of things, make sure that the server(s) comes equipped with Gigabit nics. 10Gbps is recommended when running features such as FT and vSAN.
- The following network ports must also be accessible.
Compatibility
- As always use the VMware Compatibility Guide to double check that your hardware supports ESXi 6.5.
- You can also use the CPU Identification Utility to verify 64-bit VMware support. Just download the tool and mount it as a drive and boot off of it as shown in Figure 2.
- Also make sure that the server is running the correct data and time.
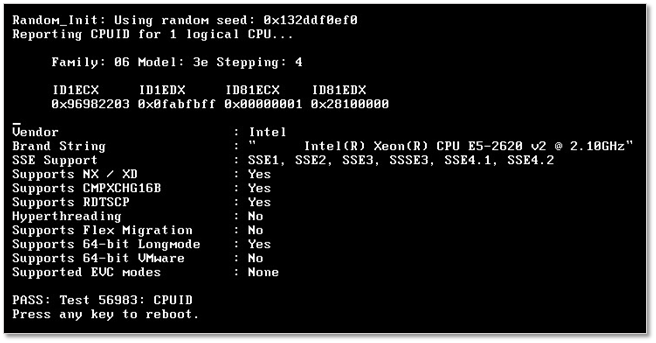
Figure 2 – Using the VMware CPU ID Utility to verify ESXi hardware compatibility
Installation Types
The installation methods remain pretty much identical as well.
- Use the manual method when you have a single or perhaps a handful of ESXi hosts to install. A path to a configuration kickstart script can be specified at the boot options screen to automatically supply the information required by the ESXi installer as opposed to typing it in.
- If you have a substantial number of hosts (>5), the auto-deploy method is probably the preferred method seeing how it fully automates deployment while ensuring that newly commissioned ESXi servers will strictly conform to any applied standards.
- The PXE boot method is another deployment method where DHCP & TFTP are used to offload and install an ESXi image on servers equipped with PXE-enabled network cards. A kickstart script can similarly be used to fully automate the process.
- One final option necessitates of an FCoE (Fiber Channel over Ethernet) LUN. Using VMware software FCoE adapters in conjunction with network adapters with FCoE offloading, ESXi may be installed and booted up off an FCoE LUN.
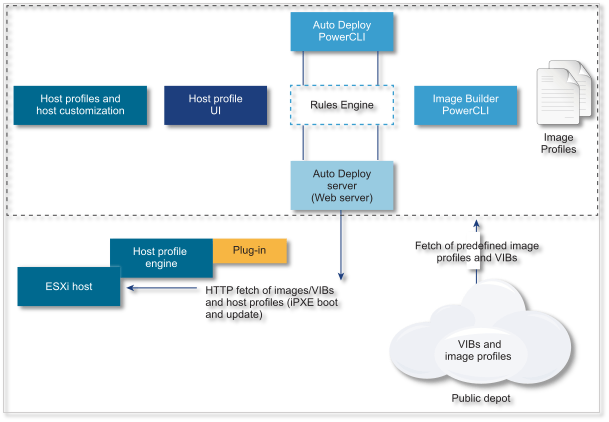
Figure 3 – Auto Deploy architecture diagram (Source: VMware)
Installation Procedure
Typically, you’ll first install ESXi manually before moving on to more complex deployment methods. These latter methods are generally used in enterprise environments more than anywhere else due to the size and complexity of the infrastructure used.
The procedure that follows outlines an interactive ESXi installation on a bare metal server. By interactive I mean one where the details asked for by the installer are entered manually by the user as the installation progresses. The steps are as follows;
- Download the ESXi Installer ISO Image (VMware-VMvisor-Installer-6.5.0-4564106.x86_64) from my.vmware.com.
- Burn the ISO image to a bootable CD/DVD or create a bootable USB stick using Rufus.
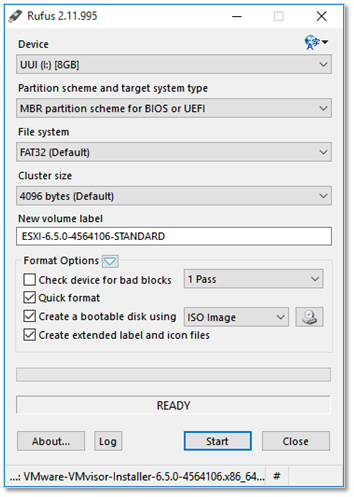
Figure 4 – Using Rufus to create a bootable USB stick
- Create the DNS A and PTR records for the ESXi server(s).
- Insert the bootable medium and power on the server.
- Enter the BIOS setup and enable both the virtualization hardware extensions and NX/XD bit. Set the device boot option to USB or CD/DVD.
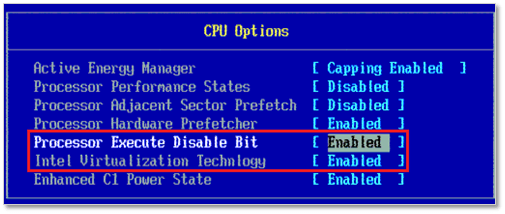
Figure 5 – Enabling virtualization settings on an Intel server
- Save the changes made and exit the BIOS setup. The server should restart and boot off the bootable medium created.
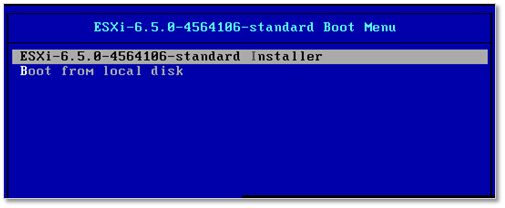
Figure 6 – Landing screen for the ESXi 6.5 installer
- Press Enter to start.
- Press F11 to accept the EULA and continue.
- Press Enter to install ESXi on the selected disk.
- Select a keyboard layout and press Enter.
- Type in the root password and press Enter.
- Press F11 to commence installation. Alternatively, press F9 to revisit previous settings or Esc to exit.
- Remove the bootable medium and press Enter to reboot the server.
- After the server reboots, press F2 and log in as root.
- Select Configure Network Management followed by IPv4 Configuration. From the IPv4 Configuration screen, enable the Set static IPv4 address and network configuration option and type in the IPv4 address, subnet mask and default gateway. Press Enter.
- Select DNS Configuration and enter the IP addresses for the primary and secondary DNS servers and specify the FQDN for the ESXi host. Press Enter.
- Press Esc followed by Y to confirm the changes effected and restart the management network.
- Optionally, you can enable ESXi Shell and/or SSH from the Troubleshooting Mode Options menu.
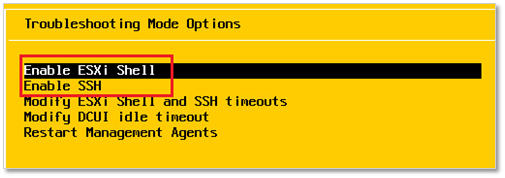
Figure 7 – Enabling Shell and SSH access on ESXi 6.5
At this point you should be able to access the newly provisioned ESXi host via SSH or the VMware Host Client.
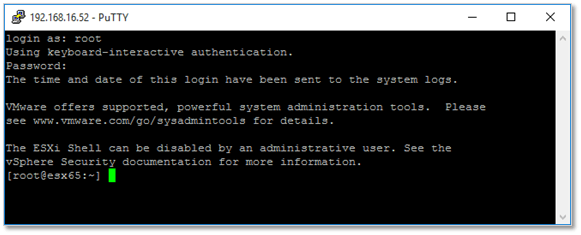
Figure 8 – Connecting to an ESXi 6.5 host using SSH
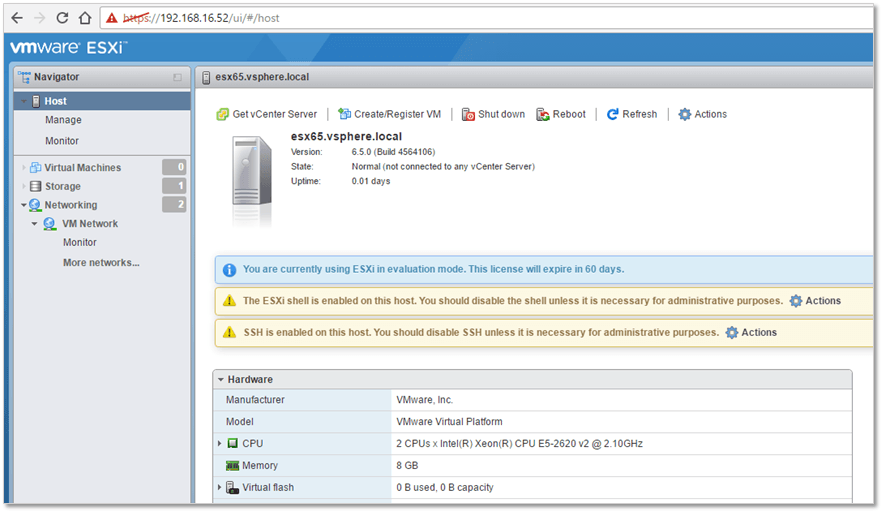
Figure 9 – Connecting to an ESXi 6.5 host using the VMware Host Client
And to conclude, here’s a video outlining the installation process and basic setup.
That’s all there is to installing ESXi 6.5. I hope you found this post useful and as always feel free to drop me a line in the comments box down below. For more interesting VMware posts, have a look at The complete list of VMware posts.
[the_ad id=”4738″][the_ad id=”4796″]


Not a DOJO Member yet?
Join thousands of other IT pros and receive a weekly roundup email with the latest content & updates!
More in this category


About the Author
Jason Fenech


7 thoughts on "Deploying vSphere ESXi 6.5"
Thanks for the great step by step procedures.
Thanks. You’re welcome!
Awesome forum site
Thanks!
Great job!!!!
Thanks!