Save to My DOJO

Bringing a physical operating environment into Hyper-V can be a challenging task, especially without a tool like Microsoft disk2vhd. It is recommended that you use some application-level migration rather than trying to convert a physical operating system installation directly. However, some systems do survive the transition well. With the Sysinternal’s Disk2VHD, organizations have a freely available tool to convert physical hard disks to the VHD and VHDX formats supported by Microsoft Hyper-V.
What is Disk2VHD?
Sysinternals Disk2VHD is a software solution provided by Sysinternals. It reads the boot information, partition information, and data regions of a physical hard drive and produces a corresponding VHD or disk2vhd VHDX file. It is very important to understand that this is not a true physical-to-virtual conversion. The operating system is not prepared to run inside a virtual environment, nor is any cleanup work done on the source system to improve the odds of a successful migration.
Download the Hyper-V Sysinternals Disk2VHD Hyper-V P2V
Sysinternals offers this tool as a free download, allowing an easy way to download disk2vhd. Please read their overview and warnings. There is no actual “installation” of this product. Simply extract the “disk2vhd.exe” file from the ZIP archive and place it on the system whose drives you wish to convert. You can also extract the “Disk2vhd.chm” file; this is the software’s help manual.
Jeffery Hicks has also written a PowerShell script that will retrieve and update the entire Sysinternals catalog.
Pre-Flight Checks and Procedures
It’s a hard fact that physical to virtual conversions are fraught with peril. The older the operating system, the greater the risk. A few things that you should do to prepare:
- Perform a complete backup to a safe location.
- Verify that there aren’t any problems with the system. Check event logs, etc. Run CHKDSK.
- Remove any unnecessary software and drivers, but do not make any changes to the system’s vital configuration that cannot be easily redone. If the P2V fails, you don’t want to be left with an unusable source system. RAID drivers are a common paint point but removing them will render your system unusable.
- Optional: Remove the system from the domain. This will avoid post-conversion issues.
- Stop as many services as possible, especially any that run databases. Disk2VHD essentially captures an application-consistent backup, but it will have superior results if all applications are closed when it runs. This also prevents anyone from using those services. Anything that happens to the system after the Disk2VHD process begins will be lost.
How to use Disk2VHD
Once you download disk2vhd, there are two ways to use the Disk2VHD tool for P2V in Hyper-V. The first is in interactive GUI mode. The second is via disk2vhd command-line, which is useful if you need to use scripting for such things as handling large batches.
Before starting, shut down all applications and stop any vital services especially if the machine to be converted runs any databases. I/O is paused for the conversion (if you choose the option for VSS) but many applications won’t know to flush active buffers.
Using Disk2VHD in GUI Mode
Copy the “disk2vhd.exe” file to the computer whose drive(s) is/are to be converted and double-click on it from that computer. You’ll be presented with a screen similar to the following:

Disk2Vhd Main Screen
That screenshot was taken from a Windows 2012 R2 computer; some older operating systems will not have the “System Reserved” partition. If the system that you’re creating a VHDX from has this partition, you’ll need to include it if you wish for the VHDX to be bootable.
You’ll first need to select a destination in the “VHD File Name” text box. The button at the end of that line with the triple dots serves as a browse button. If keeping the option for VSS snapshots, it’s perfectly acceptable to create the VHDX(s) on the same drive that you’re copying as long as there is enough room.
Unless you know that you’ll be using the generated file on Windows/Hyper-V Server 2008 R2 or earlier, check the box to Use Vhdx. It does not matter if the guest operating system is older than 2012.
Once you’re satisfied with all of your selections, click the “Create” button. The software will first indicate that it is creating the VSS snapshot. After that, it will begin the process of copying out the data. If you make any changes to the drive’s data after that, they will not be saved. You can continue to use the system during the copy process.
Disk2VHD command line examples
The primary purpose of using the command-line version would be if you need to script this. For instance, if you have purchased Software Assurance for all of your Windows 7 desktops and want to move them into a VDI environment, you could craft a specialized computer login script that relied on “Disk2vhd” to capture the physical Windows 7 systems in your organization.
The help file shows the usage syntax: disk2vhd [-h] <[drive: [drive:]…]|[*]> <vhdfile>
There is one optional setting and two required ones.
| Setting | Required? | Purpose |
| -h | No | If the drive to be converted is attached to a Windows XP or Windows Server 2003 system, this prepares its hardware abstraction layer |
| Drive: or * | Yes | You can enter drive letter designators separated by spaces OR you can use an asterisk to indicate all drives. You must use the asterisk for the “System Reserved” partition to be included. |
| vhdfile | Yes | Enter the full path and file name of the VHD[X] to be created. UNCs are acceptable. |
Output
Both methods will result in the same type of output: one VHD file will be made for each disk in the source. If there is only one VHD to be created, it will be exactly the file name you specified. If there is more than one, each VHD will be the filename you specified with a hyphen and the disk number appended.
Sample drive layout:

With all drives checked, running the above system through Disk2VHD produces:

Demo-0.VHD contains the System Reserved and C: volumes, Demo-1.VHD contains the D: volume, and Demo-2.VHD contains the E: and F: volumes.
Test the VHDX
On a system with Hyper-V 2012 or later installed, run the following, substituting in your actual path:
Test-VHD -Path C:LocalVMsVirtual Hard Disksdisk2vhded.vhdx
This testing isn’t overly comprehensive, but it can identify any immediate red flags that would prevent it from being usable with Hyper-V.
Create the Virtual Machine
All that the Disk2VHD Hyper-V P2V tool does is prepare the VHDX files. It does not create a virtual machine. You’ll need another tool for that. The following steps will demonstrate using Hyper-V Manager to create the VM using the VHDXs that were output by Disk2VHD in the steps above.
- Copy the created VHD files to a location that your Hyper-V host can access them. If you need some guidance on this, open Hyper-V Manager and ensure that the host you want to work with is selected. In the right pane, click on “Hyper-V Settings…” In the dialog box, click on “Virtual Hard Disks” in the “Server” section. The right pane of the dialog will show the folder that the host is currently set to access VHDs from. It isn’t required that you place them in that folder, but you can be certain that the Hyper-V host will be able to access VHDs there.

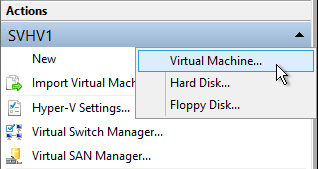
- Once you have placed the files where you want them, go to the Actions pane at the right. Click New, then Virtual Machine to start the wizard.
New VM: Start the Wizard
- The first page of the New Virtual Machine Wizard is purely informational. Click Next when ready.
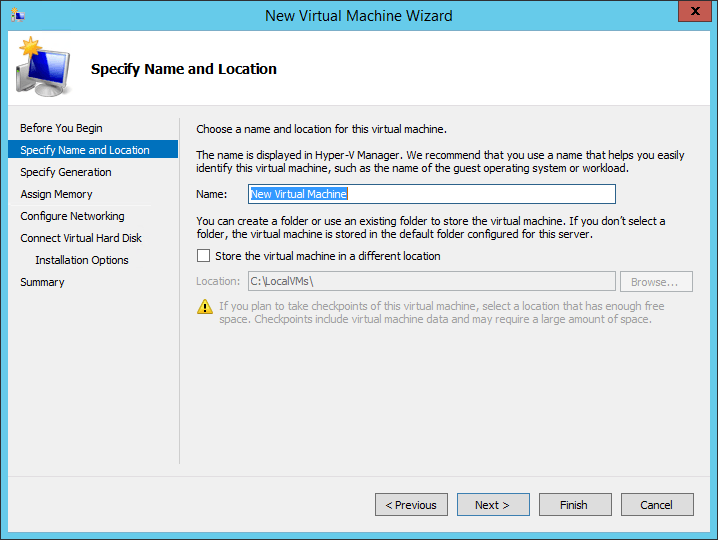
- The first data screen asks for the name of the virtual machine and the initial location. The name that you choose will be used as a label in all virtual machine tools, including Hyper-V Manager, Failover Cluster Manager, and PowerShell. The name of the guest operating system that you’ll eventually install will not be automatically set to this, and does not need to be the same.
If you do not check the option to Store the virtual machine in a different location, then all of the virtual machine’s metadata (XML, BIN, VSV, and second-level paging files) will all be placed in the host’s default location. This path will be visible in the greyed out text box. Checking the box allows you to override this location. If it’s never held a virtual machine before, a subfolder named “Virtual Machines” will be created in the path that you specified. Whether that folder is new or existing, another subfolder will be created underneath it that will have the name of the automatically-generated GUID that represents the virtual machine. Security will automatically be configured for you.
New VM: Name and Location
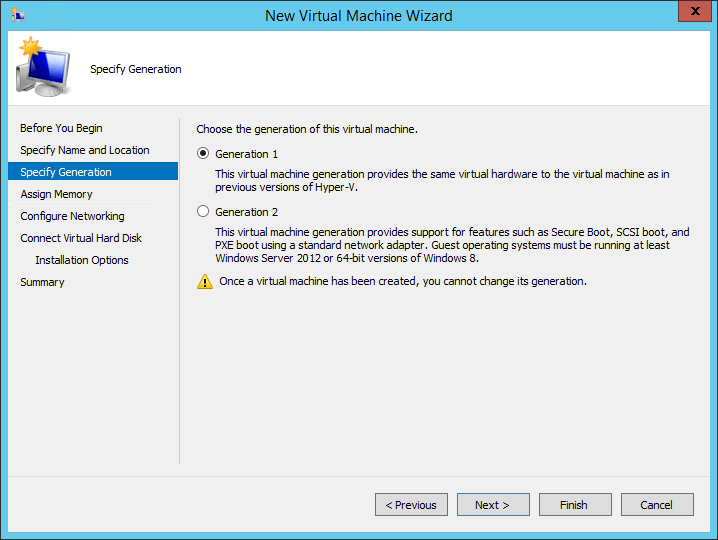
- On the next screen (2012 and later), you’ll be asked to choose the Generation of the virtual machine. What you choose here will depend on the source physical machine. If the source ran in the traditional BIOS mode, you must choose Generation 1. If the source was operating in the newer UEFI mode, you must choose Generation 2.
New VM: Generation
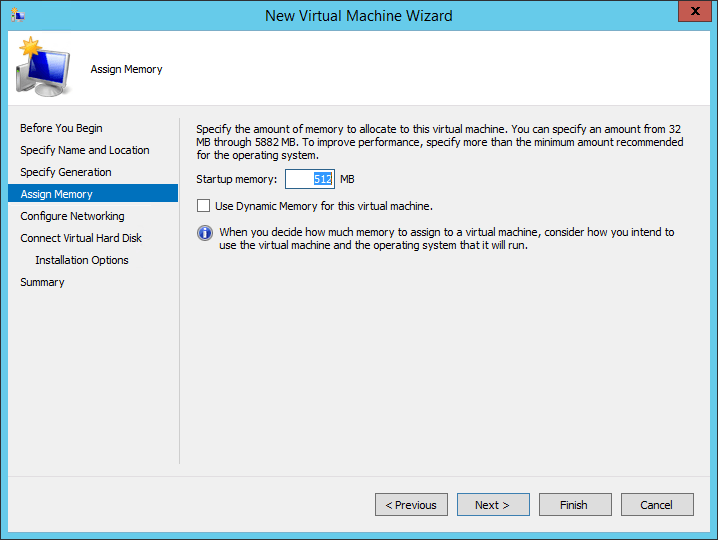
- On the next screen, you set the preliminary memory settings for the virtual machine. You only have two options: the amount of Startup memory and whether or not you wish to Use Dynamic Memory for this virtual machine. If you do not wish to use Dynamic Memory, leave the box unchecked and set the startup memory to the amount of memory that you wish the virtual machine to have. If you do wish to use Dynamic Memory, you’ll have to configure the minimums and maximums later. They will be automatically set to 512 and 1TB, respectively.
New VM: Memory Settings
- Next, you’ll need to determine how to connect the virtual network adapter. You can leave it at Not Connected, which means the virtual machine will begin its life without any network connectivity. Otherwise, you can connect it to a virtual switch right away. Be aware that you can’t set any advanced options such as the VLAN here. Whatever you choose, this adapter is always the newer synthetic adapter, which cannot be used to PXE boot a Generation 1 virtual machine. If you need that functionality, it is granted on a later screen.
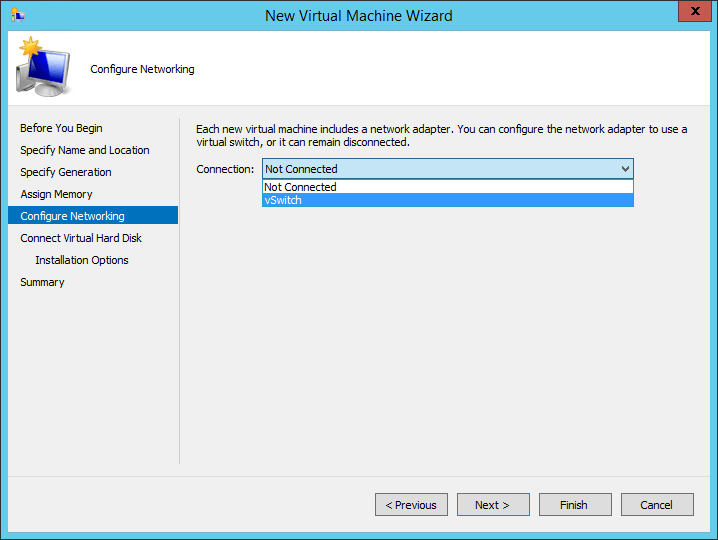
New VM: Network Connection
- After networking, you’ll be asked to configure the first virtual hard disk for the virtual machine. The second option allows you to connect an existing virtual hard disk. Browse to the VHDX file that you created with Disk2VHD:
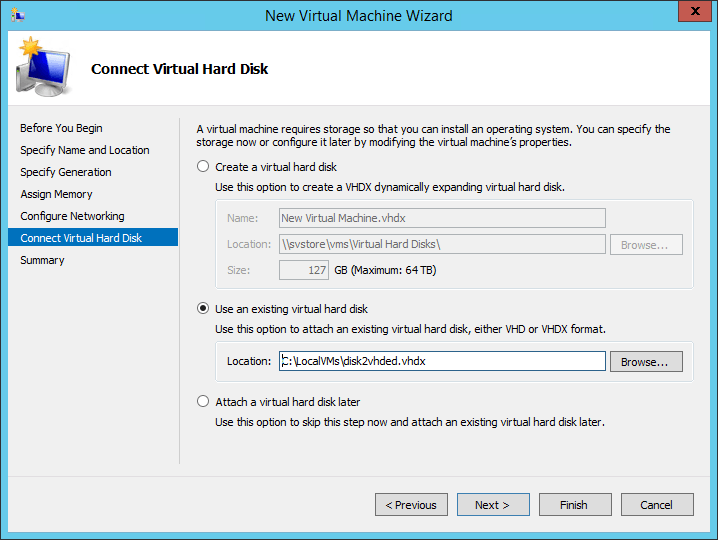
VHDX Selection
- The final screen is simply a confirmation and your last opportunity to go back and make any necessary changes.
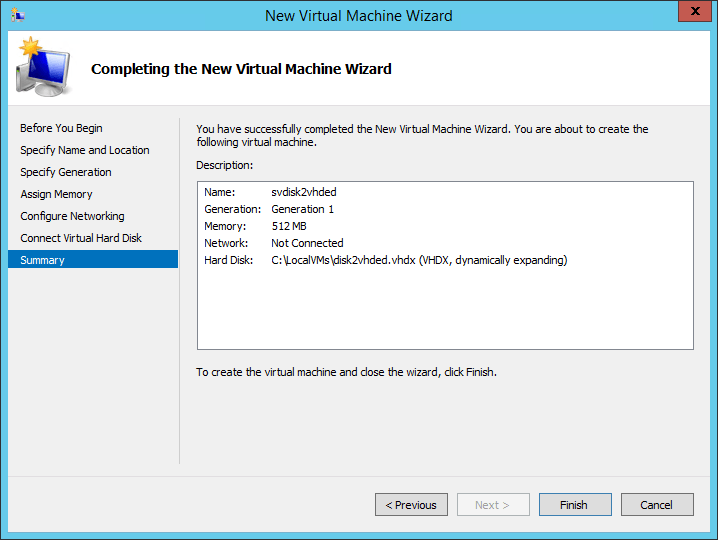
New VM Confirmation
- Once you click Finish, the wizard undertakes all of the options that you selected and creates the virtual machine. The wizard does not turn the virtual machine on, so you have an opportunity to make any desired modifications beforehand, such as to vCPU count or memory allocation.
- Start the VM in Hyper-V Manager. The operating system will go through a hardware detection phase; how problematic this is will depend on the operating system and the hardware involved. Also, the VHDs have been left in a “crash-consistent” state, meaning that they will act as though the machine they are attached to was shut down improperly. This might not mean anything more than answering the “Shutdown Event Tracker” dialog and perhaps restarting once or twice to finalize hardware changes, but you’ll want to validate any application data just to be certain.

(note: the comment was added for the screenshot, not by the Disk2VHD software)
To properly protect your Hyper-V virtual machines, use Altaro VM Backup to securely backup and replicate your virtual machines. We work hard perpetually to give our customers confidence in their Hyper-V backup strategy.
To keep up to date with the latest Hyper-V best practices, become a member of the Altaro DOJO | Hyper-V now (it’s free).
Wrap-Up
Test your new VM thoroughly. Some software that requires hardware-based activation may need to be reactivated. Some software may be hardware-dependent and won’t run in a virtual environment. If you didn’t connect the network adapter during VM creation, you’ll need to do so before attempting to utilize it. If you are working with a machine that is a domain member, be warned that there will be a name collision; the typical approach is to remove the new VM from the domain and then rename it prior to attaching it to the network. Once it is able to communicate with a domain controller, re-add it to the domain. Nonetheless, the disk2vhd utility is a tool that conveniently allows converting disks into the VHD and VHDX format.


Not a DOJO Member yet?
Join thousands of other IT pros and receive a weekly roundup email with the latest content & updates!
Frequently Asked Questions
What is Disk2vhd?
What is VHDX?
How do I run Disk2vhd?
What is the difference between VHD and VHDX?
What does Scvmm do?
Is Disk2VHD safe?
What is the latest version of Disk2VHD?
More in this category


About the Author

Eric Siron


54 thoughts on "Using Disk2VHD for Hyper-V P2V (Physical to Virtual) Conversions"
I was just looking for this information for a while and found it here. But everything was ok with me, when I came at number 8* I’ve got bit confused about operating system issue. Can you please tell me that, which operating system is very suitable for this disk2vhd software? and what hardware needed. Thanks
Addy
?? “If you are working with a machine that is a domain member, be warned that there will be a name collision; the typical approach is to remove the new VM from the domain and then renaming it prior to attaching it to the network. Once it is able to communicate with a domain controller, re-add it to the domain”
This is not consistent with my purpose or understanding of this procedure.
My intent is to move an existing Hardware installed OS to a virtual existence and KEEP the machines domain name OS and application configuration. Reason for the move is to keep the machine active but retire the old/ailing hardware platform it runs on.
If I didn’t want to keep the machine name and configuration, I would just go ahead and create a new VM and install a clean copy of the OS.
The warning should be to disconnect the physical computer from the network before activating the VM to replace it.
Then rename the old physical computer before adding back to the domain if you want to keep using it for some other purpose.
Other than that, thanks for the post. The step by step is clear and this utility will be helpful for moving a workstation i have with an application registered to the OS installation to a virtual environment before the box dies on me.
That’s a good observation and you’re absolutely right. I’ve done it that way myself. Perhaps I was thinking of cloning when I wrote that.
Thanks!! It helped me getting everything in place and backed up as a vhd
Great article . Learned about conversion using-disk2vhd-p2v
Using Disk2VHD for Hyper-V P2V
Thank you for the guide and sorry for my poor english…I hope you’re able to understand me!!
I have this big problem : I followed the guide with an XP machine and everything goes fine.
Now I’m in a disaster recovery situation : the RAID controller of one of my two domain controllers (with exchange server 2010 on it) stopped working correctly…after thousands of tries I was able to restart the OS and immediatly I tried to virtualize it from the operating system to an USB disk (as I did with the xp machine). Disk2VHD finished correctly so I detached the usb drive and I copied the VHD from it to my vhd location in the other windows server 2008 r2 machine with hyper-v (C:userspublicdocumentshyper-v virtual harddisks). But when I try to create the vm and attach the vhd it stops beacuse of no permissions (and the vhd files shows a lock icon on it)…any suggestion?
Stop: If this is one of two domain controllers, is the other one functional? If so, then why are you trying to recover the dead one? It is much, much, much easier to build a new domain controller and join it to an existing domain that it is to recover a dead or dying domain controller.
I am not certain exactly what is preventing you from attaching to the VM. The file should have received the proper permissions once you copied it to the destination location. Try accessing the security page on its property sheet and forcing it to inherit permissions.
I am trying to use the command line to automate this task, my issue is that I have an external HDD plugged in which I would like to exclude however I need the System Reserved Partition. I understand without the external HDD I could do the following:- disk2vhd * ShareSBS.vhd or specify the drive C: D: E: etc however there is no way to specify the System Reserved Partition or to exclude the External if using *. Am I missing something?
I don’t think you’re missing anything. The command-line portion of Disk2VHD is not well-developed.
Good Article, thanks Eric. One question: Have you ever had success running Disk2VHD from some sort of bootable media, like a USB in an ‘offline’ mode? I know you listed the Command Line functionality above, but have you ever tried creating some sort of bootable stick (with DOS, or some other environment) that you could then run disk2VHD from a command line to .vhd an existing Hard Drive to a different existing hard drive on the machine, while outside of the host OS?
I have a specific need to do this, but can’t find an tried and true way to do this.
Thanks!
I’ve never tried. I’m not sure what the exact mechanism is that Disk2vhd uses to do its business. It may need functionality from the Windows OS that you won’t have in a stripped-down boot environment.
Not sure if it changes your scenario any, but I’ve never had problems using Disk2vhd to save the output VHD files on an internal drive in the same machine, even if I’m including the target drive in the capture. It works through VSS so there’s no strange issues.
For offline things, I’m actually a big fan of Clonezilla. I wrote this article for V2P, but there’s no reason it wouldn’t work for P2V as well.
Hi Eric,
I fix PCs. I want to make copies of HD before I work on them. Here is what I am trying to do. I attach a customers HD to my laptop. I want to make a VHD of this drive. I have another external drive, 1 TB also attached. This is where I want to store it, and other clones I make. I want to test this. I used the Disk2vhd to make a .VHD file of the drive which is 232 GB, and only a folder on it with 10 GB of data, that’s it, so it says space required was approx. same size as folder. I then go into the source drive and erase the 10 GB folder. I want to restore the original contents I just made a virtual drive of. I am going around in circles trying this. I tried the VHD machine create/attach that win 7 has, it makes the .vhd, but I don’t know how to restore it. What am I missing, I need another program I suspect. I don’t want a bootable drive, just put back what I cloned. Any advice would be much appreciated.
Thanks,
Dave
If you just want a folder, is it necessary to clone the entire disk?
I’m a little confused by your symptoms. Are you saying that the mount doesn’t work? I’ve never worked with a drive that large, but I’ve heard that Disk2Vhd doesn’t like big disks. I’m not sure if that problem is restricted to Virtual PC deployments.
You might look at this blog post. At the very end are ways they fixed it for VPC. Maybe you just need to shrink the virtual disk down to something smaller.
I used disk2vhd and found one extra partition which is unallocated gets created every time. The network card issue as well as there is team in to the physical server.
Please suggest me best process i am doing something wrong.
It’s going to bring over whatever it finds. It’s not going to magically uninstall drivers or reconfigure any hardware for you.
I need to P2V my Avaya CC Server running on an old HP ML Rackmount unit. My question is if perform a P2V using disk2VHD and just mount the drives as a bootable drive on a VM inside Hyper-V .. then what happens to the drivers from the HP Server that are already a part of the Disk image that i previously created ? Also – anything changes OS Licensing wise (windows 2003 R2) ?
The entire contents of the disk come over as they are. Hopefully the drivers just go dormant when the underlying hardware doesn’t show up. I try to clean off all non-essential drivers before a P2V just to be sure.
Licensing is the same. The hardware that you install to must have an available Windows Server 2003 license. It will attempt to re-activate on first boot after being virtualized.
Do you have any experience when using this tool with encrypted drives? We currently have BitLocker on all physical disks. We followed this guide but get a MBR error when starting from Hyper-V. Any help would be much appreciated.
I do not have any such experience, but it does not surprise me that it fails. Even if you’re performing this for legitimate reasons, this is one scenario that BitLocker is designed to prevent.
Yup, that’s what I figured. I am going to try to suspend BitLocker and clone it again to see if it resolves my issues.
Thanks a lot, I learned about Hyper-V and Disk2VHD.
It really works!!!!
Hi,
I did P2V with Disk2VHD and SCVMM 2008, it goes through fine without error.
I try to boot VM Windows 2003 (not R2) SP2 and I get to chose Windows 2003 at the OS identifier menu. It goes to the next screen as it would boot into Windows but instead is just stays in a black screen with blinking cursor in the upper left-hand corner.
I tried to do fixmbr, fixboot, bootcfg /rebuild, still no go.
Any idea?
Thanks
2003 P2V has always been troublesome in Hyper-V. I’d imagine it’s tripping up on some piece of hardware.
You can look over the article I have on my own blog and see if that works. It’s time-consuming, but I was personally able to get every P2V 2003 system of mine to work by doing all that.
Hi Eric, do you recommend a solution as describred in your article for a Exchange 2010 migration from physical to a virtual Microsoft Hyper-V 2008 R2 environment?
Thank you
I don’t think I would P2V Exchange. Migration would likely result in a smoother overall experience.
But, as long as you have all the Exchange services stopped, Disk2VHD would probably move it as successfully as any other P2V application.
Great procedure !
Had to use Oracle Virtual Box (as Virtual PC doesn’t support 64 bits).
Hi I have used disk2vhd successfully before. Now I have a Windows Server 2000 box I need to virtualize and when I run the Disk2vhd executable I get an error message about a missing vssapi.dll file. When I copy a version of that file form another server – I get past this error message – however – after the Disk2VHD application allows me to enter the volmes I need virtualized – it just dissappears form my screen – so it does not work… Any ideas where I can get a good vssapi.dll or how can I fix this issues? Thanks in Advance
Not without access to a Win2k ISO, no, I’m not sure where else you’d get it.
Before doing the Disk2VHD again, try running system file checker to see if it corrects that problem.
Thank you for the article.. I didn’t know there was a newer version until I ran into this article.
Works great with all Windows but running into problem with 2012 R2..
When I bring over the VHD files and start up the machine, all I get is the blinking underscore..
Server is a physical server running on Intel 6 core with 16 gb ram and mirrored 146 gb hd..
Windows 2008 r2 works fine on same machine.
I thought maybe Win 2008 r2 hyper v doesn’t support Windows 2012 r2 so change that and installed Win 12 r2 with Hyper v and tried to bring over the Win 12 r2 vhd file.. Doesn’t work.
Then tried VHDX. That didn’t work
Tried creating VHD and VHDX disk with and w/o volume shadow copy. That didn’t work either.
Any suggestions? Thanks.
It is somewhat common for it to choke on translating the old storage drivers and configuration into the new system. I don’t know of any great ways to fix this. I usually start with the typical system repair techniques I’d use if a physical system did it.
Thanks for the article. Very helpful info! But, I’m running into problems with one of our systems. Here is what is happening:
I have a Windows Server 2003 sp2 server that is mirrored. When I run disk2vhd, the program creates 2 vhd files:
data-0.vhd
data-1.vhd
The first one (data-0.vhd) is only 6MB
The second one (data-1.vhd) is 19GB
I don’t know why 2 files are created. The second vhd file (data-1.vhd) matches the size of the data on the disk, but the first vhd file is a mystery.
When I move these files into a Hyper-v environment (running on Windows Server 2008 r2) and create a virtual machine using them I get the following error message when I start up the VM:
A disk read error occurred
Press Ctrl Alt Del to restart
The error message occurs no matter which of the files (data-0.vhd or data-1.vhd) I use as the boot vhd.
Any help is appreciated.
Thank you!
James
I’m not entirely certain what’s going on here. I would start by loading Integration Services in the original system before running Disk2VHD. After that, it’s probably going to come down to editing the boot.ini file on the small partition.
Great article thank you for someone just about to get into VMs.
Just one issue I have I believe:
I am trying to virtualise some of my older legacy workstations. I keep these in order to remain familiar with different operating systems, versions of Office etc. so that I can best support my clients.
The two oldest of these a running Adaptec SCSI and Windows XP.
From what I gather, this requires Hyper-V generation 2 for SCSI to be possible but that does not support Windows XP vms which require generation 1.
Is there anything I can do to get around this?
Thanks
David
I was able to bring over a great number of Windows Server 2003 hosts that were using SCSI and RAID successfully, although not without pain. If you can take a good backup first, I would pre-install the integration services and see if a straight Disk2VHD works.
If it breaks on you, this procedure might work: https://etechgoodness.wordpress.com/2011/03/10/problems-with-p-v-of-oem-windows-server-2003/.
Eric,
How do you pre-install the integration services. I just tried on Win7x64 and it told me I could not install them until the machine was VM’d. Are you suggesting to slipstream them into the VHD after it has been created with Disk2VHD?
You could slipstream them, if you want. This is a line from my script that installs it into a mounted VHDX:
Add-WindowsPackage -PackagePath $IntegrationServicesCabPath -Path ($DriveLetter ":")