Save to My DOJO
This series has talked at very great length. Now it’s time to actually get something done. What I’m going to do in this piece is show you how to connect to storage.
Part 1 – Hyper-V storage fundamentals
Part 2 – Drive Combinations
Part 3 – Connectivity
Part 4 – Formatting and file systems
Part 5 – Practical Storage Designs
Part 6 – How To Connect Storage
Part 7 – Actual Storage Performance
How you connect depends on entirely on how the storage is presented. You can use either PowerShell or the GUI. Since this post is likely to be long anyway, I’ve decided to show only GUI methods. I’ve asked Jeffery Hicks to write a matching post that shows the PowerShell equivalents. That work is in progress and will be published at a later date.
Notice: All of the screenshots and procedures in this post are from 2012 R2. 2012 shouldn’t be dramatically different, but I did not compare this to a 2012 system.
Internal/Direct-Attached Disks
In this section, I intend to show you how to connect to and use local disks. However, once you’ve connected to a LUN on Fibre Channel or iSCSI storage, it is treated the same way.
You have the option of using the Disk Management MMC console, but this is the 2012 era, and Server Manager is the current tool. Server Manager can’t control CD/DVD drives or MPIO policies (unless I missed something) but it can do everything else. As you probably know, the systems I use for all the things I do in this blog are from our sub-$2000 cluster document. Two machines are running Hyper-V Server. The third is running a GUI version of Windows Server and hosts the storage for the cluster. In the following screenshot, I’m looking at the Disks tab on the File and Storage Services section of Server Manager on that Windows Server. It is also connected to both of the nodes (using item 2, Add other servers to manage on the welcome screen of Server Manager). Server Manager also comes in the RSAT tools for Windows desktops. You must use Windows 8.1 to manage 2012 R2 servers.
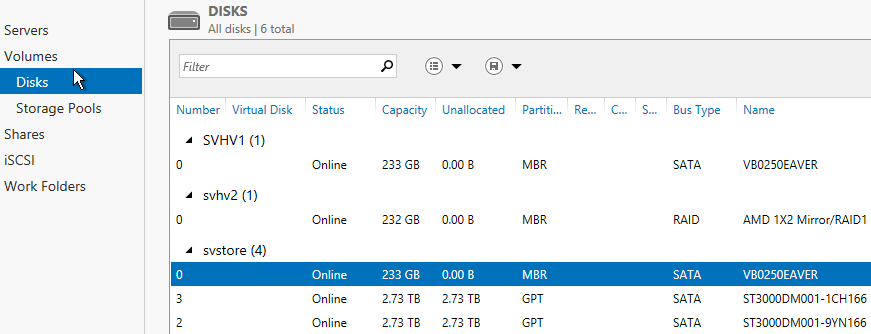
As you might have expected, I’ve modified the builds somewhat from the document. SVHV1 is still exactly as described in the document. In SVHV2, I’ve purchased another 250GB drive and converted it to a RAID 1 using the BIOS (I’ve got another for SVHV1 as well, I just haven’t gotten around to rebuilding that system yet). SVSTORE has the drives from the document, but I’ve also picked up a pair of 3 TB drives (the 2TB drive didn’t make it into the screenshot).
The 3TB drives are completely fresh, with no data. I want them to be in a mirror for the virtual machines. This will give them superior read performance and, more importantly, protect them from drive failure. If this system were intended to host virtual machines locally, I’d want this to be in a hardware RAID-1. That’s because any software mirroring takes processing power, and you really shouldn’t be stealing CPU time from your VMs. Unfortunately, I learned that the N40L’s RAID processor just can’t handle drives of this size. Apparently, I can buy an add-in card, but I just don’t want to deal with it. So, I’m going to use Storage Spaces to create a mirror. Before I get into that, I’ll show you how to set up a single disk.
Prepare a Local Disk for Usage
This section will use a local Storage Spaces virtual disk for its example. These are example the same steps you’d use for a single internal disk, another type of virtual disk (provided by an internal hardware RAID system), or an iSCSI or Fibre Channel disk.
I’m only going to show you one way to do this. There are quite a few others, even in the GUI. The way most of us are used to doing it is through Disk Management, and that process has not changed. I’m going to use Server Manager, because this is the new stuff.
In the File and Storage Services section of Server Manager, go to the Disks sub-section under Volumes. In the Disk list at the top, find your new disk. If it’s freshly installed, it’s probably Offline. If it’s online, it may show an Unknown partition.
To get started, right-click on the disk to work with and click Bring Online. You’ll get a warning message that lets you know that onlining a disk that is currently being used by another server might cause data loss. Acknowledge the message (I’m assuming, for this section, that the disk isn’t being used by another server). From this point, you’d traditionally Initialize the disk, then create a volume. With Server Manager, you can now get it all done in a single wizard. Right-click on your freshly onlined disk and choose New Volume. This will kick off the New Volume wizard. The first screen is informational, so click Next.
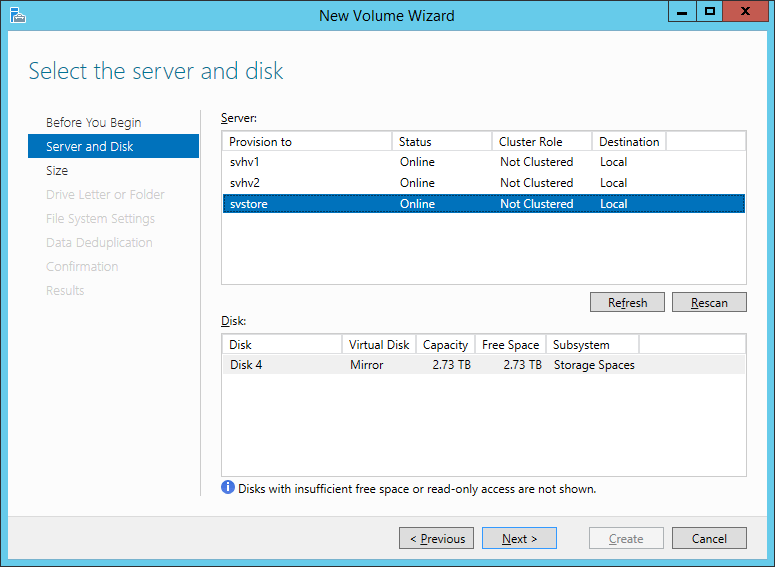
The second screen has you choose the server and disk to work with. Since you specifically started by right-clicking on a disk, you should already have the correct disk selected:
Disk and Server Selection
Once you click Next, you’ll get a pop-up dialog. This occurs because we did not take the Initialize step. It’s just telling us that it’s going to initialize the disk as a GPT. This shouldn’t be a problem, since our system is already bootable and Windows Server 2012+ has no issues with GPT. If you prefer the MBR method for any reason, you’ll have to use something other than Server Manager to initialize the disk. Click OK to proceed or Cancel to find another way.
The next few screens are modernized versions of Disk Management’s screens: capacity of the new volume, drive letter/mount selection, and format/label/allocation unit specification.
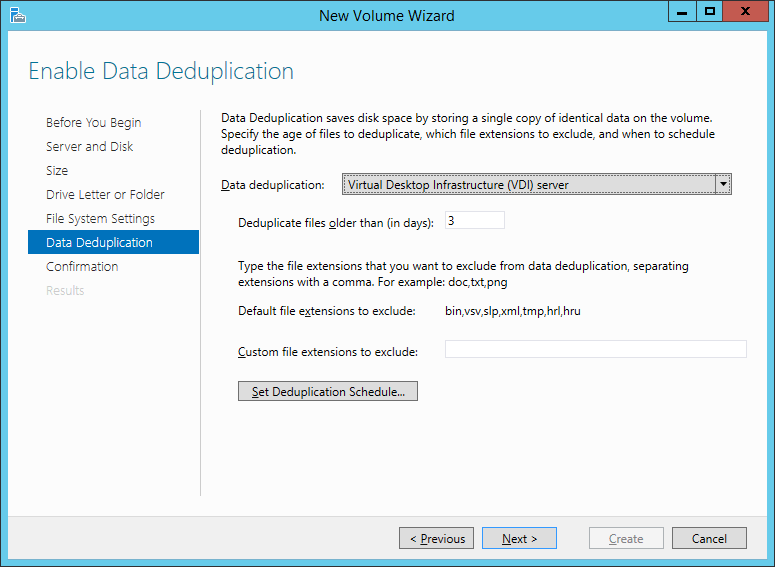
Depending on the options you have available/installed, the next screen will be for Deduplication. I don’t want to spend a lot of time on this, but the short introduction is that for Hyper-V, this is most appropriate for VDI. You can use it for hosting servers, but you’re sort of on your own if performance suffers or you don’t get the space savings boost you expect. Remember that Microsoft’s deduplication does not occur inline in real time. It occurs on a set schedule.
New Volume Deduplication Settings
After this, it’s the Confirmation and Results screens, where you can watch your disk get created. Unlike Disk Management, Server Manager’s wizard only performs quick formats, so this shouldn’t take long regardless of disk size. Once it’s done, your disk is ready to use.
Prepare a Storage Spaces Volume for Usage
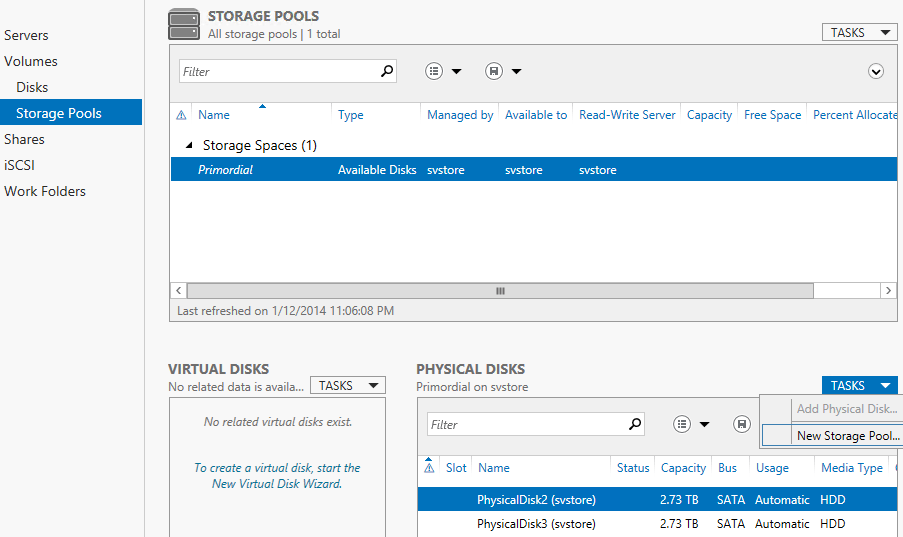
The disk(s) that you want to use can be online or offline (right-click option on the Disks tab), but they must have at least some space that’s not already claimed by a volume or partition. For this demo, I’m going to use completely clean disks. To get started, go to the Storage Pools section in File and Storage Services. In the lower right, under Physical Disks, make sure that the disks you want to use appear. You can use the Tasks menu on the Storage Pools section at the top to Refresh or Rescan Disks if some are missing (why these aren’t on the Physical Disks Task menu is beyond me). To get started, open either of these menus and click New Storage Pool.
Storage Pool Screen
On the first screen of this wizard (not shown), you give the new Storage Space a name and, optionally, a description. I just called mine “SVSTORE Space”, because I’m not very creative. Click Next when you’re happy with the name (or at least accepting of it).
On the second screen, you select the disks you want to be part of the new Storage Space. On the right, each disks has a drop-down for Automatic, Manual, or Hot Spare. Automatic allows Storage Spaces to figure out the best way to use the disks. I haven’t spent any real time researching what Manual does, but using it allowed me to specify the interleave size during the creation of a virtual disk (that part comes later) . Hot Spare does just that, makes the disk available as a hot spare. If you’re not familiar with this term, a hot spare disk sits empty until an array disk fails. The data from that disk is copied to the hot spare and it then comes online in place of the failed disk. I’ve never seen this used in a two-disk system and not sure how it would work, perhaps active/passive. Usually, hot spares are used in a parity system or as a +1 for mirrors or RAID-10 configurations. I selected Automatic for both my drives. Click Next once you’ve set the selections as desired.
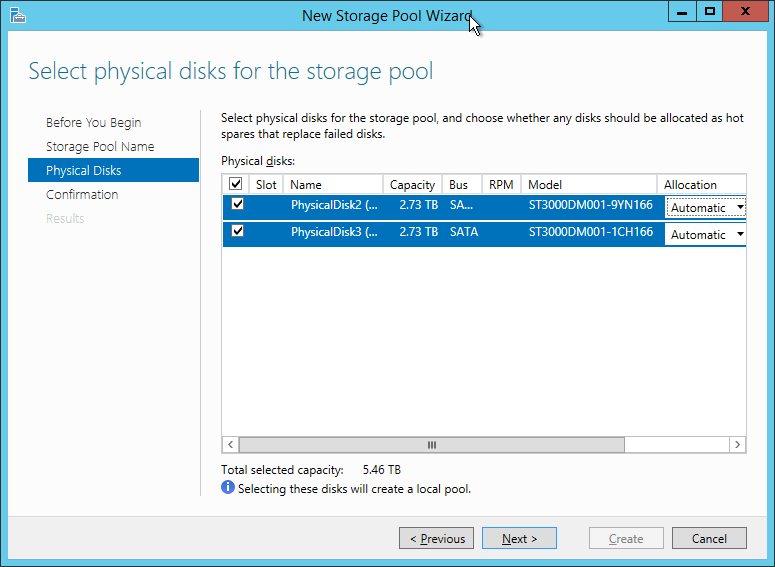
Storage Pool Wizard Disk Selection
Your hard work will be rewarded with a summary screen. If you click it, click Create. If you don’t, click Back or Cancel. These directions will assume you went with Create. In that case, you’ll get a screen with a few progress bars. Once they’re done, hopefully none of them turn red. These directions will also assume they stayed blue. Once the process completes, you can Close. Before you do that, you might want to check the box for Create a virtual disk when this box closes. If you don’t, then you’ll have to right-click on the new storage pool you just created and select Create Virtual Disk…, which is an entire extra click.
The first two screens of the virtual disk wizard are pretty easy. The first is just explanatory welcome text and the second has you choose your pool. My box only has one pool so it didn’t take me long to decide. On the third screen, you have to give your new virtual disk a name and, optionally, a description. I just called mine “Mirror”, because, well, there’s definitely a reason I write technical material and not popular fiction. You’ll notice there’s a checkbox to tier the storage. Mine is grayed because I have only spinning disks; you need both spins and solids in the same batch for tiering to work. Click Next when this page is good enough.
It’s on the fourth screen that you get your first real choice: Simple, Mirror, and Parity. These are effectively RAID-0, RAID-1, and RAID-5/6, respectively. As I understand it, there are some differences between these and the industry-standard versions, but I don’t know what all of them are. I know that Storage Spaces mirroring has the ability to create a three-way copy if you add a third disk. You can read part 2 of this series if you need a refresher on the various RAID types.
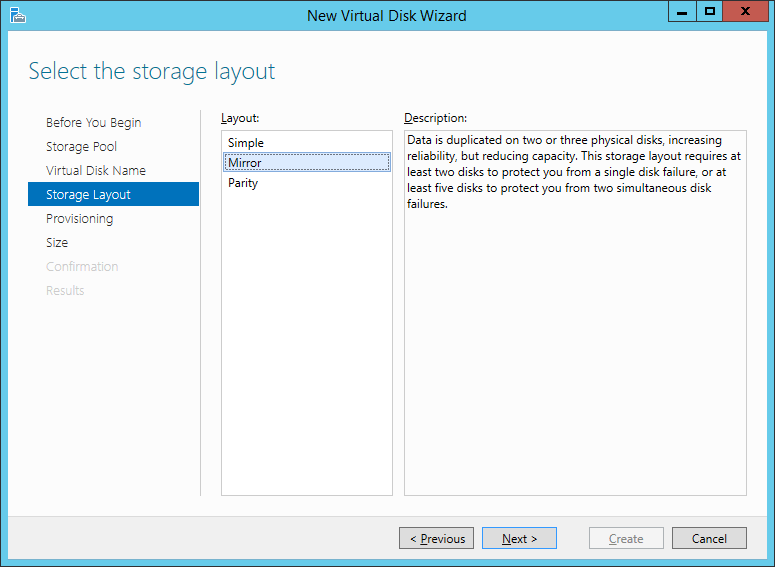
Virtual Disk Layout
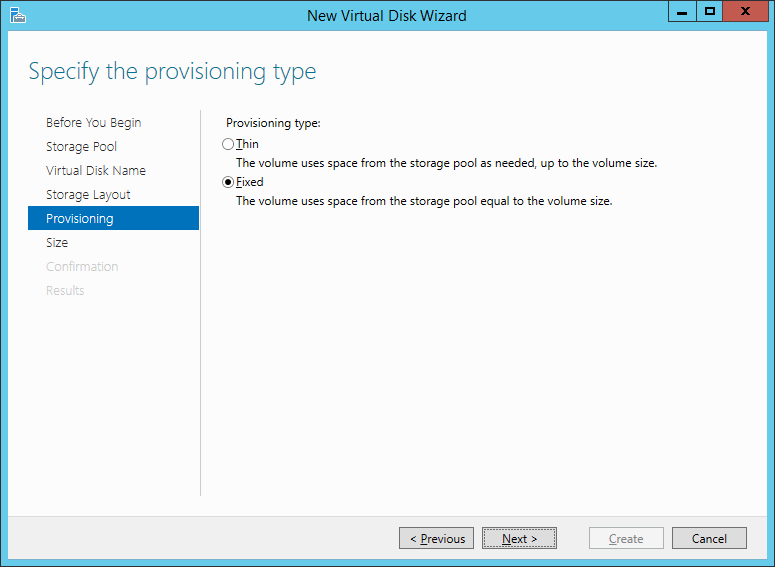
The next screen has you choose between thin (dynamic) or fixed (thick) provisioning. I have done plenty of virtualization on thin-provisioned storage in the past, including thin-provisioned virtual disks (VHDs) on thin-provisioned SAN LUNs. The upside is that things like volume creation can be a lot faster and snapshots can be a lot smaller (on actual SANs, I don’t know about SS). The downside is fragmentation and other performance hits when the space is expanded. In larger storage systems with many spindles, the cost of these operations is usually lost in other latencies and is irrelevant to all but the most demanding systems (or neurotic administrators). In a two-spindle system, the hit is more noticeable… although the load is usually a lot lighter, so it still probably doesn’t really matter. But, I’ll never use this space for anything else, so I don’t really have a great reason to use thin provisioning.
Virtual Disk Provisioning
The final screen you can make changes on is the size screen. I’m just going to use it all. I’ve heard rumors that having a single VM on a CSV and keeping both owned by the same node improves performance, but I’ve never seen a published benchmark that corroborates that. If that’s the sort of thing you like to do, then feel free to split your Spaces up. You might also want to have separate Spaces so you can have some for Hyper-V storage and others for regular file shares or SOFS storage.

Virtual Disk Size
After this, there’s nothing left but to review the Confirmation screen and watch the progress bars on the Results page. Well… actually, there is more. I would definitely check the Create a volume when this wizard closes checkbox before clicking Finish. Otherwise, you’ll have to jump over to the Disks or Volumes tab to start the wizard, and that’s a lot more than just one extra click. It’s at least three.
I’m not going to talk you through the New Volume wizard again. Read the Prepare a Single Disk for Usage section if necessary.
Fibre Channel
I would really like to post a nice how-to guide on FibreChannel connections. Unfortunately, it’s really vendor-driven. The basic process involves loading drivers and software for your host bus adapter (HBA), then masking and connecting World Wide Names. Work with your storage vendor.
iSCSI
iSCSI works in a client/server configuration, but it uses the terms “initiator” instead of “client” and “target” instead of “server”. Perform any necessary configuration on the target. As with Fibre Channel, configuration of the target is determined by the storage vendor. The target needs to be set up first.
Before you get started configuring Windows or Hyper-V Server as an initiator, there are a few things you need to sort out. Don’t team NICs to be used in iSCSI. You can use vNICs that are connected to a Hyper-V virtual switch that is hosted to a team, but dedicated physical NICs are faster. The initiator and target should be in the same subnet(s) if at all possible. Routed iSCSI traffic can be noticeably slower.
There is a connection GUI for iSCSI on all modern versions of Windows and Hyper-V Server. It exists whether or not the GUI is installed. At any command or Run prompt, just type iscsicpl.exe. If you’ve never run it before, you’ll be presented with the following dialog:
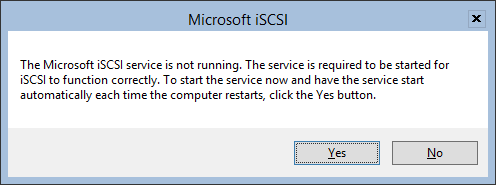
iSCSI Service Message
You could answer No if you like, but you might find it difficult to connect to iSCSI targets if you do. For our purposes, Yes is the correct answer. Once you that’s done, you’ll be presented with the iSCSI Initiator Properties dialog. This is a busy dialog, and there is a lot going on. I want to first jump over to the Configuration tab, because it contains valuable information that usually gets skipped in iSCSI discussions.
iSCSI Initiator Configuration Tab and iSCSI Security
Let’s take a look at the Configuration tab:
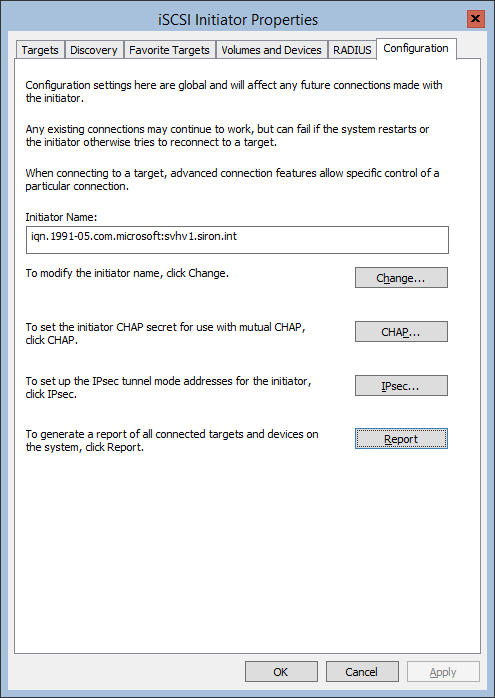
iSCSI Configuration Tab
The vital data here is the Initiator Name. When this computer requests to connect to a target, this is the name it’s going to present. You’ll notice you can change this. I hope you’re asking, “Then, is it possible for me to lie and pretend I’m an entirely different computer?” The answer is yes, absolutely you can. All Microsoft initiators, by default, start with iqn.1991-05.com.microsoft: and then the FQDN of the computer. You could change the initiator in an attempt to confuse a potential attacker, but this is an approach called “security by obscurity” which is rightly derided because it’s only going to fool the laziest and most incompetent attackers. However, most targets do allow you to restrict access to specific initiators and IP addresses. IP addresses are a bit tougher to spoof than initiator names, since the network behaves poorly and has blatantly obvious problems when two systems try to use the same IP address at the same time, but this is still not a good security measure.
If iSCSI security is really a concern, then you have three choices. The first is CHAP (challenge-handshake authentication protocol). This is a simple security method that involves a pre-shared key. The CHAP button you see on the dialog above is used only for mutual or reverse CHAP. For this, the target will present a password to the initiator, because it’s just as easy to spoof a target as to spoof an initiator. Here is where you set that password. It is important to understand that the only security this provides is at the moment of connection. If CHAP fails, no connection is made. If CHAP succeeds, everything sends back and forth in the clear without further verification, at least until the next connection attempt.
The second iSCSI security method is IPSec. I’ve used IPSec just enough in my career to really hate it. What IPSec gives you is a completely encrypted communications chain, but at a high overhead cost, and that’s before you get into the administrative nightmares. I’m not going to talk about IPSec any further except to say that this is where you configure it on the initiator side. If you’re thinking about IPSec, I highly recommend you also consider iSNS as it might reduce your headaches a little. iSNS will be briefly revisited in the next section.
The third method is to isolate iSCSI onto its own network. We’ve already talked about using a dedicated subnet for performance reasons, but it’s also an easy way to get some security for the traffic. If you don’t put any gateway devices in your iSCSI network, then an attacker will be forced to compromise your network at the layer-2 level, which is difficult, to say the least. You can employ VLANs to add a bit more security. The best approach is to use dedicated switches and switch ports.
The Reports button needs a GUI edition of Windows Server to run. Otherwise, it just goes from gray to blue and back to gray. Neat!
iSCSI Initiator Discovery Tab
Discovery should be self-explanatory, but there is, unfortunately, a lot of confusion with it. Discovery merely finds out what is available on a given target. You provide the target IP address (or name, but of course, it will be resolved to an address), and Discovery goes to see what disks are there. Just because an initiator can discover disks doesn’t mean that it can connect to them!
Here is a shot of the Discovery tab with some portals added:
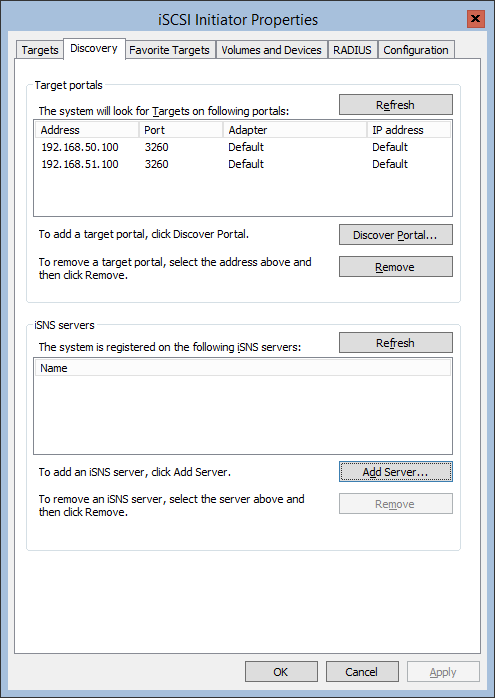
iSCSI Initiator Discovery Tab
Use the Discover Portal button to enter the portals you want to connect to. When you click, you’ll be given a small dialog that will allow you to enter the IP or DNS name of the target as well as the port to connect on. It is recommended that you use the IP, or your iSCSI infrastructure will be dependent upon DNS. It is also recommended that you not change the target’s port number without a compelling reasons (security by obscurity is not a compelling reason). You can click the Advanced button on this small dialog to configure more security options. This dialog will be shown and discussed in the next section, as it is the same dialog you see when connecting to a disk. However, the context is very important. This page is just for connecting to the discovery portal. Settings here are completely distinct from disks. Most initiators do not secure their portals against discovery attempts, so setting things here might actually cause unnecessary problems. The only thing I set here is ensuring that the source addresses for each portal is on the same subnet as the target, but that’s not strictly necessary. Once you’ve entered information for a portal, it will be displayed in the dialog as shown above. Please be aware that you can completely mangle the information and it will still be accepted, although it’s not going to be useful.
Unfortunately, there is no way to modify the settings for an existing portal item. You have to remove it. This will pop up a warning dialog about the item being on the Favorites tab. I’d deal with that before trying to re-add a portal, or you might be in for some confusion. Look to the relevant section below for more information.
The lower portion of this dialog is for iSNS settings. It requires an iSNS server, obviously. What you can do with such a thing is preconfigure just about everything, including IPSec settings, and manage them from a central location. I have never used an iSNS server, nor have I ever talked to anyone who has. However, its feature list is fairly compelling if you’re looking at a complicated iSCSI deployment.
iSCSI Initiator Targets Tab
The Targets tab is the first you see when you start the applet. Here is what one looks like after a target has been added (and maybe with a click of the Refresh button):
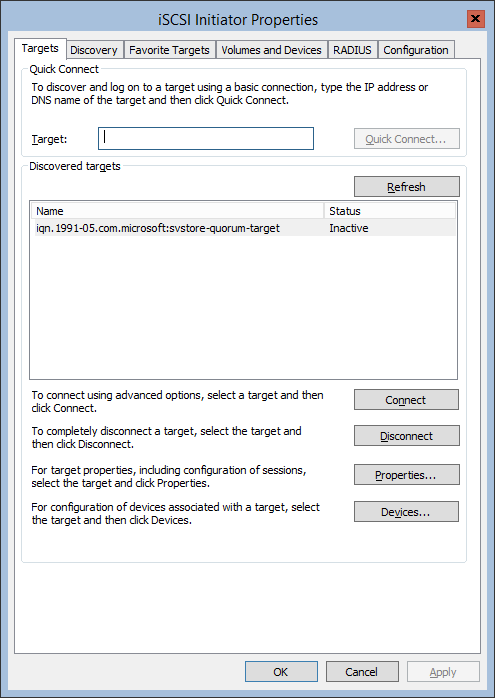
iSCSI Targets
The Quick Connect button is for attaching to a new portal and target, not one that’s already in the Discovered targets box (I imagine this button is why people get confused about the purpose of discovery). It doesn’t allow for any modifications to security or the port, which is why I don’t usually guide people toward using it.
Target Tab’s Properties Sub-Dialog
By highlighting an item on the Discovered targets list with a status of Inactive, you might be able to use the Connect button to jump right onto it. However, you won’t want to do this if there are any special needs, such as multiple source and destination IP paths. This is because you’re only going to get one shot to create connections. Some initiator software may intervene and build up all the necessary IP paths, so this may not matter. For most of us, we’ll use the Properties button. You’ll get this box:

iSCSI Session Properties
If there are any active connections to the disk, the list box at the top will contain entries. Your ultimate goal is to have one session per path to storage. For the system I’m using, my initiator has IPs 192.168.50.10 and 192.168.51.10, while my target has IPs 192.168.50.100 and 192.168.51.100. So, I want two sessions, one on 192.168.50.0/24 and the other on 192.168.51.0/24. I start by clicking Add session, and I get the following (this is the same dialog you get when clicking Connect on the Targets tab):
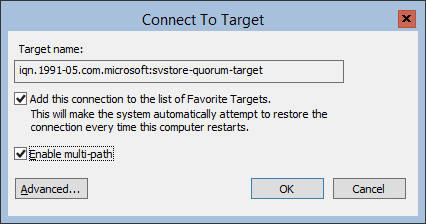
iSCSI Connect to Target Dialog
In this screen capture, I’ve already selected the Enable multi-path box, because I intend to use two paths. But, I want to define the paths myself, because I find that Windows usually doesn’t figure out the connections. Click the Advanced button to set that up. You’ll be presented with the Advanced Settings dialog (which is the same dialog you get when adjusting Advanced Settings on the discover portal):
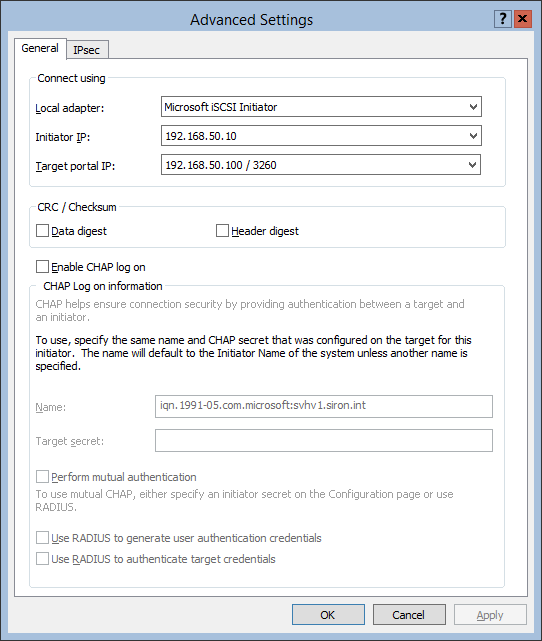
iSCSI Advanced Settings
I’ve already set the options here in accordance with my first connection. Don’t just arbitrarily select either Data digest and/or Header digest because they sound important. If the target isn’t configured to use them in the exact same pattern you select here, your connections won’t work at all. What they do is verify data validity at the expense of a bit of overhead. The boxes indicate whether you want to calculate a checksum on the data portion of the iSCSI TCP/IP packet or its header, or, of course, both.
The lower portion of this screen is for CHAP security. You need to make sure that this is configured the same way that your target is. The Target secret refers to the password that the initiator is expecting for this disk, NOT the discover portal. As mentioned elsewhere, mutual authentication is the password that the target will attempt to send back to the initiator and is set on the Configuration tab. Your target may refer to this is Reverse CHAP. The lower two boxes are for RADIUS authentication. I have never used RADIUS in an iSCSI context, but the basic approach is to ensure that both your target and initiator can contact the same RADIUS system. As an aside, I would highly recommend that you don’t use a RADIUS server that lives on a VM that is on this iSCSI target. I hope I don’t have to explain that.
Once I have this screen the way I like, I can click OK twice. I’ll be back at the Properties screen, and if all is well, I’ll have an entry in the list box with an undecipherable identifier made up of two gigantic hexadecimal numbers. Now, I’ll go back through the Add session dialog and repeat my earlier steps to set up a connection from initiator IP 192.168.51.10 to target IP 192.168.51.100.
The Devices button allows you to look at some connection details for this disk. Much of it will probably be pretty cryptic. However, there is an MPIO button that, as you will see, can be quite useful.
At the very bottom of the Properties dialog is the section on MCS (Multiple Connected Session). I never use this. Instead, I use MPIO. This will be discussed on the next section. For now, let’s go to the next tab in the iSCSI dialog.
iSCSI Initiator Favorite Targets Tab
I won’t include a screen capture of this tab because there’s not much to it. When the system reboots, it will try to connect to every iSCSI disk listed here. If you’re using multiple paths, then each path will be listed twice. The Details button will show how you’ve configured the connection. Connections you’ve made from anywhere else in this applet will automatically be placed here. If you don’t ever want to connect to a disk again (or if you want to reconfigure it), remove it from here.
iSCSI Initiator Volumes and Devices Tab
I’ll be perfectly honest: I’m not entirely certain what the practical use of this tab is. Maybe some apps benefit from it. Hyper-V Server will function just fine if you never use it or if you fill it all in. Use the Auto Configure button if it makes you feel better, but don’t expect fireworks.
iSCSI Initiator RADIUS Tab
This is for informing the initiator about RADIUS servers it should use if it’s going to participate in RADIUS authentication to targets. I won’t spend any time on this either; if you know how to set up RADIUS, this page will be easy for you.
iSCSI Additional Points
Once you have everything configured, you’re connected. Windows will now treat the disk as though it were local. Just look in Disk Management or DISKPART or Get-Disk if you don’t believe me. Read the Internal/Direct Attached Disks section above to continue.
The issue with iSCSI is it really doesn’t have a good “reconnect” mechanism. If it loses connectivity, it’s supposed to try to reconnect on its own. I couldn’t say how often that works, but I know it doesn’t always work. If there is a way to get it to reconnect after you’ve manually disconnected or determined that a disconnect occurred, I have no idea how to get it to reconnect without restarting the server (not the service) or rebuilding the connection from scratch. If you have an iSCSI connection made that is idle for a very long time, it seems like it quietly drops the connection but thinks it’s still active (this could be a target issue, for all I know). When does this happen? With Cluster Shared Volumes, mostly. There are a lot of people out there that will tell you to run one VM per CSV. I’ll investigate whether or not that’s good advice at some point in the future. But, the point to be aware of is that if you do that, and the VM sits on only one node for a very long time, the other node may disconnect from the disk underneath that CSV. If you’re lucky, the CSV will just go into Redirected Access mode if you try to move a VM to it. Otherwise, the VM won’t be able to talk to its disk. This condition seems to be very rare, but it’s something to be aware of.
Multi-Path I/O (MPIO)
Multi-path I/O is a topology-neutral technology for establishing more than one connection from the same host to the same storage across unique pathways. Whew, big mouthful that is. The key words are: multiple paths, multiple pathways, and topology-neutral. It’s mostly talked about in terms of iSCSI, but it’s absolutely not limited to that. If you have two internal SAS controllers and your internal disks have two SAS connectors, you can use MPIO. If you have two controllers to connect to your external storage device and it has two or more connections, you can use MPIO for that.
If you have multiple connections established, but don’t use MPIO, Disk Management will show the disk twice. One of them will report: “Offline (The disk is offline because it has a redundant path with another device)”. If the disk is formatted, Server Manager’s disk console will show it twice, with one of them having Unknown for Status and Partition. Get-Disk is much more terrifying, giving one of the two disks a status of Failed. Only DISKPART is happy with it, but it will show zero-bytes of capacity on one disk. Interestingly enough, I wrote about fixing this on my personal blog over two years ago, and it is continually among my most-visited articles.
MPIO is in all flavors of Windows Server and in Hyper-V Server. No additional charge. Isn’t that nice? But, you have to install it. If you’re using the Add Roles and Features wizard, it’s on the Features page:
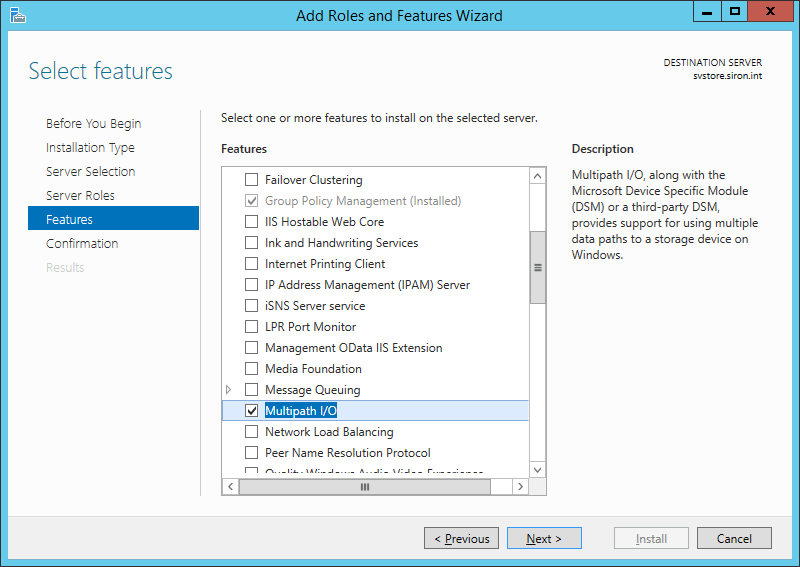
MPIO Feature
You do not need to restart after installing. You will need to restart after the first time assigning it to a disk system.
I’m only going to talk about iSCSI disks here because that’s the only use I’ve ever had for MPIO. Be aware that many vendors have their own method of setting up MPIO, so read the manual! What follows is for a generic iSCSI target.
After you’ve installed MPIO, run MPIOCPL.EXE at any command or PowerShell or Run prompt. As with ISCSICPL.EXE, this will work whether you are on a GUI server or not. The first tab you’ll see is MPIO Devices. It’s pretty much useless at the beginning. It will show an item named “Vendor 8Product 16”. This is a meaningless placeholder for developers to see how it’s done. What you want to do is flip over to the Discover Multi-Paths tab. Since we’re talking about iSCSI, tick that checkbox. If you’re here for SAS, tick that one. Then, click the Add button:
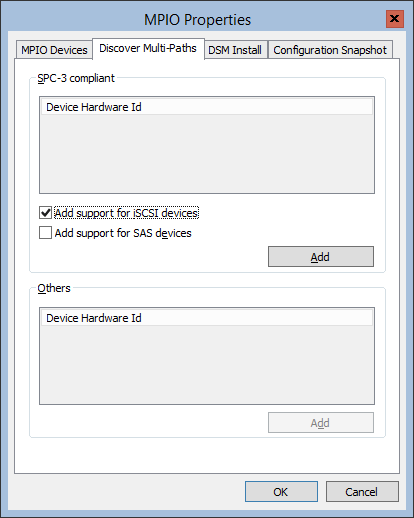
MPIO Discover Paths
Now, you’re going to have to reboot. When it comes back, everything will be fine.
The other tabs in the MPIO dialog box aren’t really that useful unless your vendor documentation indicates that they are.
In case you’re curious, no, you can’t set up MPIO path discovery before you make the connections to storage, nor can you avoid the reboot. You could opt to make only one connection from storage, add MPIO support, then add another connection, if you wish. But, that doesn’t really do anything for you, so I’d skip it.
By default, MPIO works in load-balanced configuration with round robin. That means it will send sequential requests down the other path. Because, just like any other I/O request, this can get imbalanced, you may wish to use a different load-balancing algorithm. On a local system, Disk Management allows you to modify MPIO settings on the property sheet of an MPIO disk. Unfortunately, Disk Management cannot set MPIO policy on a remote server. For a GUI-less or remote system, you can use PowerShell. If you must, MPCLAIM.EXE still works. For iSCSI disks, you can find an MPIO button on the Properties sheet for a disk in ISCSICPL.EXE (read the iSCSI sections above if you don’t know how to find this).
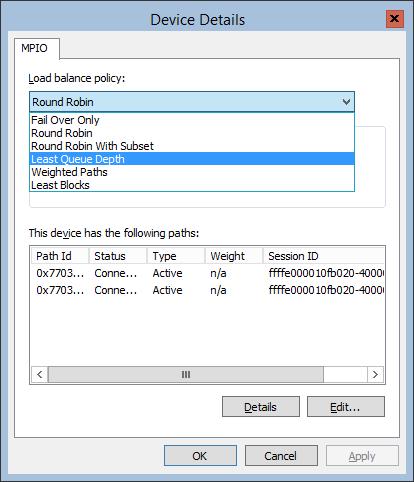
MPIO Disk Policy
When you select an option from the drop-down, this will show a details pane that explains the setting you’ve picked. Making a selection here configures the policy for all connections to that disk, but does not affect other connections to other disks.
SMB 3.0
This will be easy: as long as the share and NTFS permissions are configured properly, all you have to do is point Hyper-V to it.
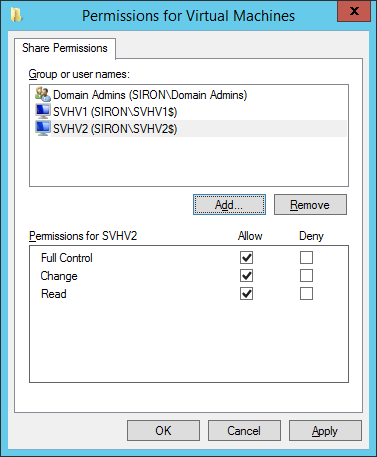
SMB 3 Share Permissions
The really nice thing is that this is, by default, shared storage. It works right away for standalone and clustered systems alike.
Storage for a Hyper-V Cluster
Aside from SMB 3 storage, there are two specific ways to use storage in your cluster. The first, the Cluster Disk, is the oldest, and the one that works for every single application that can be covered by Microsoft Failover Clustering. A cluster disk can only be owned by a single node at any given time, and only that node can access the disk’s data. If another node, or any other system, tries to access it, the data will be corrupted. So, when a virtual machine on a cluster disk is Live Migrated to another node, disk ownership moves with it. For this reason, if you use a standard cluster disk for Hyper-V, only one virtual machine can be stored on it. This is because you can’t Live Migrate two virtual machines in precise lockstep.
Standard Cluster Disks
The first step is to connect each node to storage. For direct-connected systems, this is probably just a matter of plugging it in. For iSCSI, read above. For Fibre Channel, read your manufacturer’s instructions. For bringing it online and formatting it (as described in the Prepare a Local Disk for Usage section), do this on only one node (it doesn’t matter which). Leave it Offline everywhere else.
Once the disk is connected to all nodes, access Failover Cluster Manager, expand the Storage node, and click Disks. In the right pane, click Add Disk:
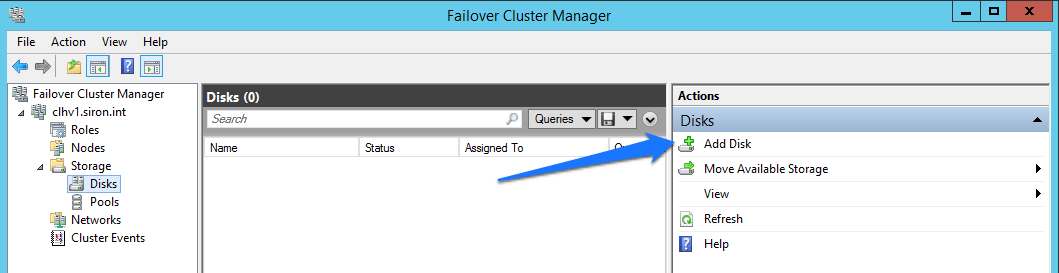
FCM Add Disk
A progress bar will show while storage is scanned on the nodes for disks that can be used in clustering: anything that’s not local storage, is formatted as NTFS or ReFS, is visible from all nodes, and is online on one node.
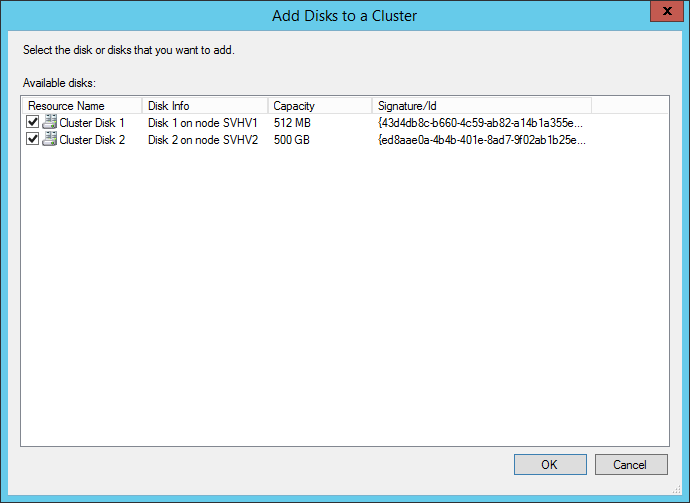
Clusterable Disks
Be aware that the disk # on node # header might be the easiest way to identify which disk you’re actually looking at. The Capacity might be of assistance, as well. Select the disks you want in your cluster and click OK. The disk(s) will now be in the list of disks in Failover Cluster Manager. If you’re not especially taken with the name Cluster Disk 1, you can double-click it and change the name in the Properties sheet. You might also want to flip through the other tabs of this dialog, although most people won’t want to change it. You can now set about using the disk. Cluster disks are optimal for the disk witness in a quorum. Personally, I never put VMs on plain cluster disks. Instead, I convert them to CSV.
Cluster Shared Volumes
A Cluster Shared Volume (CSV) is only owned by one node at a time, but all nodes in a cluster have direct read/write access to CSVs, provided they have their own connection. If a node can’t directly connect to the storage underlying the CSV, its I/O is redirected through the node that currently owns the CSV. This is called Redirected Access Mode; the owner node is called the Coordinator Node. Metadata operations (file open, close, rename, etc.) are always handled through the coordinator node and transmitted throughout the cluster over the cluster network(s). Redirected I/O also moves over the cluster network(s). Despite a common misperception (likely due to some confusing early documentation on the subject), there is no dedicated CSV network. The benefit of the CSV is that multiple VMs can be stored on the same CSV.
In order to create a CSV, first follow the steps to create a standard cluster disk. Then, still in the Disks node of Storage in Failover Cluster Manager, right-click on the disk and click Add to cluster shared volumes. All done. As with the cluster disk, you can rename it by double-clicking it. You’ll notice there are fewer options for a CSV than for a standard cluster disk. The cluster really handles the care and feeding of its CSVs.
Your CSV is accessible through a Symbolic Link (I think it’s technically a Junction if refers to a folder, but that’s probably just trivia). If you look inside the ClusterStorage folder on the system drive of any node, you’ll find a “folder” named Volume1. This folder can be renamed, and you can put data in it. Don’t let the familiar view fool you though, this is actually a direct connection to the root of the volume that was a cluster disk just a few moments ago. When you create new virtual machines, target them to this folder, they’ll automatically be on highly available storage (but that doesn’t mean the VM is highly available — a discussion for another topic).
Summary
This post was devoted to the various ways you can connect to disk storage in current iterations of Windows and Hyper-V Server. In order to qualify, the disk must be formatted.
Our next, and final, article in this series will perform some performance testing.


Not a DOJO Member yet?
Join thousands of other IT pros and receive a weekly roundup email with the latest content & updates!
More in this category


About the Author

Eric Siron


80 thoughts on "Storage and Hyper-V Part 6: How To Connect Storage"
I am interesting is deploying cluster shared volumes. I usually use adaptec RAID controllers. Microsoft has a technet document about how to allow bus type RAID, but even after doing that the cluster validation fails. I can disable the RAID controller piece on the controller by setting it to HBA. I wonder, though, if there is a way to still use my trusty hardware raid arrays along with microsoft’s cluster shared volumes ?? My attempts to gain knowledge about this have failed so far.
Cluster validation fails with what message? What, specifically, does it not like?
The port driver used by the disk does not support clustering. Disk partition style is GPT. Disk type is BASIC. The required inquiry data (SCSI page 83h VPD descriptor) was reported as not being supported.
Well, I can’t say for certain if either adapter actually supports the 83h VPD descriptor and might just be reporting it in a way that the validator doesn’t like. If that’s the case, it would be OK. But if they don’t support that descriptor, then they don’t provide identification that Microsoft failover clustering expects. I don’t know for certain what problems that would cause, but I assume there’s a very good reason that Microsoft flags it. I suppose you could check with Adaptec and see if they really do support that VPD descriptor, but other than that I wouldn’t expect it to be usable.
But, if these controllers are in a commodity computer, I’d install Windows Server and use SMB 3 shares instead of CSVs.
I haven’t yet read up on how to use SMB 3 shares. Are you talking about an SMB 3.0 cluster ? Can you do it without the VMM component of System Center ?
Don’t overthink it. If your storage is connected to a single system, then it’s not an SMB 3 cluster. It might help me if I had a better idea of your total physical configuration.
I am attempting to follow this guide:
https://technet.microsoft.com/en-us/library/jj822937.aspx#BKMK_Step2
That’s the guide that I used when I built my first SMB 3 deployment.
I should have quit right here by responding as such:
The docs say you can’t run Hyper-V and SOFS role on same host.
Is there a way to do that, or do you simply have to have more physical hosts ?
My goal was 3 nodes made up of quad Xeon boards with loads of ram and Adaptec RAID controllers with a large number of 3.5″ hot swap bays.
Built-in tools will not allow any sort of a loopback configuration for a cluster. There are third-party software solutions that will. Look for “virtual SAN” or “VSAN”. I think a few still market under “VSA”.
That is the exact message in the cluster validation report. This message happens whether I use an older 3805 adaptec controller or a brand new 8805 with current driver.
I want to build 3 “nodes”/hosts. I want to use locally attached storage on each node to create clustered storage with smb 3.0. I also want to create a hyper-V fail-over cluster on the same nodes. I started out thinking that I could use RAID controllers to serve up the physical disk that the nodes used for the clustered storage. That apparently won’t work. Now I am looking to find a compatible SAS HBA to use for the clustered storage, which I think I can find, but even after that I will still be stuck with running hyper-V role and file server role on the same host.
I have question here, my manager wants to connect two hyper-v with their physical storage to one network he doesn’t want them to be connected to a one shared storage, is there any way possible for that? if there then what are the steps?
thanks
I don’t think I understand your question. Two separate hosts connecting to two separate storage locations? Nothing fancy about that.
I have question here, my manager wants to connect two hyper-v with their physical storage to one network he doesn’t want them to be connected to a one shared storage, is there any way possible for that? if there then what are the steps?
thanks
Do we need VSS hardware providers for backing up Hyper – V on SMB3 Shares ?
No.
Thank You for the reply
Ok I understand VSS hardware providers to be only required for iSCSI which I am not using.
I have a problem when trying to use Altaro backup in my Hyper-V environment where the VHDX files are stored on an SMB3 share on a EMC VNXe file system. The backup starts by taking a VSS shadow copy which succeeds but then before the backup proper can start, the shadow copy (avhd) vanishes.
Any help is highly appreciated.
VSS hardware providers are not required for iSCSI, either. Things just work faster and more smoothly if they are there.
I don’t actually work for Altaro so troubleshooting that process is not something you want me to help you with. I’d recommend e-mailing their support team ASAP. I will also alert my contacts that you need some assistance.
Thank You Eric
Hi Eric, great article, however I think there is a small typo: “The next screen has you choose between thick or fixed (thin) provisioning.” I think you meant thin or fixed (thick) provisioning? Cheers
You are correct! I fixed the text. Thank you!
HP MSA2040 for Storage.
Setting up a new File Server on Hyper-V. 40gb LUN for OS running Windows 2012 Server. This part is done. I have a few other virtual machines running the same way, such as AD, DHCP, DNS.
Now I have a 4tb LUN. Do I give this a Drive Letter on the Hyper-V host? Do I attach this as an SCSI Disk to the File Server setup?
A little lost here.
Any guidance is appreciated.
What do you want to do? The most portable long-term solution is to connect the LUN to the Hyper-V host as a standard drive and create a VHDX on it for the file server. That way, you’ll be able to easily migrate to whatever device eventually replaces this SAN. But, if you want to connect it directly, that’s an option as well.
HP MSA2040 for Storage.
Setting up a new File Server on Hyper-V. 40gb LUN for OS running Windows 2012 Server. This part is done. I have a few other virtual machines running the same way, such as AD, DHCP, DNS.
Now I have a 4tb LUN. Do I give this a Drive Letter on the Hyper-V host? Do I attach this as an SCSI Disk to the File Server setup?
A little lost here.
Any guidance is appreciated.
Can I deploy a high availability fail over Hyper-V cluster with two nodes and use internal storage (decicated hard disks for vm’s). I have only 2 servers, and have enough and identical hard disk space inside they. I have seen examples with 2 nodes and external iSCSI or other types of external storage. That make me need 1 or 2 (for ha) more servers. Thanks in advance.
You will have to find 3rd party software solutions if you do not have shared storage. Search for “virtual SAN” and Hyper-V.
Hi Eric
I have a 2 node cluster with an iSCSI SAN containing 2 CSVs. I need to add an additional disk to one of my VMs which has all its virtual disks on CSV1. I do not have enough space left on CSV1 for the additional virtual disk, will I be OK creating the new virtual disk on CSV2 which will mean I have a VM with virtual disks on 2 different CSVs?
Thanks.
Yes, that works fine.
Hi Eric
I have a 2 node cluster with an iSCSI SAN containing 2 CSVs. I need to add an additional disk to one of my VMs which has all its virtual disks on CSV1. I do not have enough space left on CSV1 for the additional virtual disk, will I be OK creating the new virtual disk on CSV2 which will mean I have a VM with virtual disks on 2 different CSVs?
Thanks.
Hi Eric,
I am trying to setup a failover cluster using built in shared storage of Dell VRTX server. Virtual disk create from this builtin dell storage are mapped to both balde servers and added as disk to both hyper v vm’s after doing so when I run cluster validations its failing with error list disk reror.
I also tried installing fail-over clustering directly on my blades to see if it works but still the cluster validations is failing..
If it fails validation then either it is not a suitable device for failover clustering or there is an issue with drivers/firmware. It is my understanding that the VRTX does not meet the minimum requirements for a proper failover cluster but Dell would know better than I would.
Hi Eric,
I am trying to setup a failover cluster using built in shared storage of Dell VRTX server. Virtual disk create from this builtin dell storage are mapped to both balde servers and added as disk to both hyper v vm’s after doing so when I run cluster validations its failing with error list disk reror.
I also tried installing fail-over clustering directly on my blades to see if it works but still the cluster validations is failing..
For Hyper-V Server I’d like to see a good tutorial how to configure disks using PowerShell. Including changing driveletters! The internet doesn’t tell much about this.
PS: Great articles!
Vincent
Can you elaborate on what you mean by changing drive letters? Moving a VM’s storage?
For Hyper-V Server I’d like to see a good tutorial how to configure disks using PowerShell. Including changing driveletters! The internet doesn’t tell much about this.
PS: Great articles!
Vincent
I am just trying to get clarification. This is a good article. I am trying to configure a new hyper v cluster using a SAN. All three of the servers have the MPIO and iSCSCI configured correctly. I have created a 1 TB PArtion for all three to use. I have two questions:
1: Do I need to create the hyper V clusters first or go about the Hard drive connections to the servers themselves.
2: Am I only bringing up the hard drive on one server and leaving the others offline?
It is a very good idea to use multiple LUNs. If all your storage is bound up in a single LUN, I would reconsider that now before you go into production. http://www.altaro.com/hyper-v/19-best-practices-hyper-v-cluster/
I am just trying to get clarification. This is a good article. I am trying to configure a new hyper v cluster using a SAN. All three of the servers have the MPIO and iSCSCI configured correctly. I have created a 1 TB PArtion for all three to use. I have two questions:
1: Do I need to create the hyper V clusters first or go about the Hard drive connections to the servers themselves.
2: Am I only bringing up the hard drive on one server and leaving the others offline?
It is a very good idea to use multiple LUNs. If all your storage is bound up in a single LUN, I would reconsider that now before you go into production. https://www.altaro.com/hyper-v/19-best-practices-hyper-v-cluster/
Great article :))) Now the questIon.
I have 2 server with 4 sas cad. I create iscsi connectIon And The failover test passed. But when the resource are owned from cluster
The disks are offLine in cluster And in disk management.
In the iscsi target are always on ‘reconnecting’
Why?
I don’t know why. There is something wrong with your iSCSI connection.
Great article :))) Now the questIon.
I have 2 server with 4 sas cad. I create iscsi connectIon And The failover test passed. But when the resource are owned from cluster
The disks are offLine in cluster And in disk management.
In the iscsi target are always on ‘reconnecting’
Why?
Just can’t grasp it:
Setup
2012r2 std running HyperV (4 onboard nics)
#1 V Mgmt #2 Nic for VM’s (External) (#3/#4 use for iSCSI own segment)
HP MSA60 Storage connected to the 2012 server…
Created test EXCH VM on same server using local disks.
Now i want to add iSCSI disk (MSA60) to the VM but route through 35650g “dumb” switch. (10.10.10.XX)
I have this running now on another system but not with VM’s on the same box as my storage. I can’t grasp what I need to get the disk added to the VM
Do I take say #3 and add it into the OS server as 10.10.10.xx address and connect it to switch… If so how do I get traffic back to the virtual?
I want to try and set it up this way so I can still attach to the storage if needed to other stand alone servers later.
Again .. I can get disk to show up if I leave out the 3560g and just use the IP address of the local server (target) and my VM (scsi initiator points to it.)
Maybe i’m overthinking it…
Pass-through adds no value in this scenario. Connect to the management OS and use a VHDX.
Just can’t grasp it:
Setup
2012r2 std running HyperV (4 onboard nics)
#1 V Mgmt #2 Nic for VM’s (External) (#3/#4 use for iSCSI own segment)
HP MSA60 Storage connected to the 2012 server…
Created test EXCH VM on same server using local disks.
Now i want to add iSCSI disk (MSA60) to the VM but route through 35650g “dumb” switch. (10.10.10.XX)
I have this running now on another system but not with VM’s on the same box as my storage. I can’t grasp what I need to get the disk added to the VM
Do I take say #3 and add it into the OS server as 10.10.10.xx address and connect it to switch… If so how do I get traffic back to the virtual?
I want to try and set it up this way so I can still attach to the storage if needed to other stand alone servers later.
Again .. I can get disk to show up if I leave out the 3560g and just use the IP address of the local server (target) and my VM (scsi initiator points to it.)
Maybe i’m overthinking it…
Hi
I’m struggling to find an article which explains whether or not you can use a single server with the iSCSI target server role and also Hyper-V role installed on the same Windows 2012 R2 server. Do you know if this is supported?
Thanks
It is not supported. It would be partially functional.
What are you attempting to accomplish? There is probably a better way.
Hi Eric.
In your experience what is the best way to work hyper v with a san unity, create a large disk for the host and then inside the host create small volumes through disk mangement
Or create small disks from the san and show them to the host for there to save the different vhd of the vm
Thank you.
Split the difference. Two or more moderately sized LUNs connected to the host. VMs use VHDX inside them. One LUN could do the trick, but multiple LUNs give you flexibility.
I have a Hyper-V cluster directly connected using 10G-E to a Unity 300 cluster. It seems to work well with either type of migrations, or manual moves. The only imperfection I would like to eliminate is the error on validation of the cluster. It complains that the IPs of the nodes connected to the storage cannot communicate with each other. But since they are directly connected to the storage on different SPs, it is expected that they can’t talk to each other. I also have dedicated direct network connections for the “Private Heartbeat”, and “Live Migration”. There are only two hosts/nodes in the cluster and they can ping each other on the LAN connection, of course. So should I just ignore the network errors since everything seems to work fine, or can you think of a way to eliminate the errors. One might say, “just get a switch”, but it is more complicated when dealing with government contracts. TIA
Adapters used specifically for storage do not belong to the cluster anyway. The validation wizard does not know that, though. You can safely ignore these errors.
You do need to ensure that you have excluded the storage adapters from all cluster traffic (in the networks node of Failover Cluster Manager).
Hi Again,
Using HyperV 2019 Server. Via remote Server Manager, I’ve created a storage pool (1xSSD,2xSpins) and a VD with Volume from the pool.
1. How do I go about connecting the Volume to my Guest OS as a shared disk? Link if I’ve overlooked your write-up on it.
2. I’ve installed my HyperV and Guest OSs on the same partition on the SSD (remaining space to the storage pool above). Other than the ‘Installing HyperV on SSD has no benefits other than faster boot-ups’, is this a bad practice?
Thanks. Your contents are great!
Thanks