Save to My DOJO
Table of contents
- Determining What to Connect To
- How to Connect an ISO in PowerShell Using Declarations
- Exploring the Ways to Connect an ISO to a Virtual Machine with PowerShell
- Using Array Notation to Connect a Single ISO to a VM In PowerShell
- Avoiding the Pipeline
- PowerShell Array Notation Explained
- Using PowerShell to Disconnect an ISO from a Virtual Machine
In a previous article, we covered the GUI methods for connecting ISOs to virtual machines. Using PowerShell for the same task can be a little bit tougher at first. In order to follow along, you’ll need to have an ISO. If you’re going to be mounting the ISO from remote storage, you’ll also need to have configured security appropriately. The previous article covered both of these topics, and they will not be repeated here.
Determining What to Connect To
The very first thing you must is decide what to connect the ISO to. If you’re accustomed to using a GUI, this seems obvious; you want to connect it to a particular virtual machine. In truth, there is always one step after that. You have to find out where the virtual DVD drive is connected on the virtual machine. When opening the virtual machine’s property dialog, the location of the virtual drive is blatantly obvious.
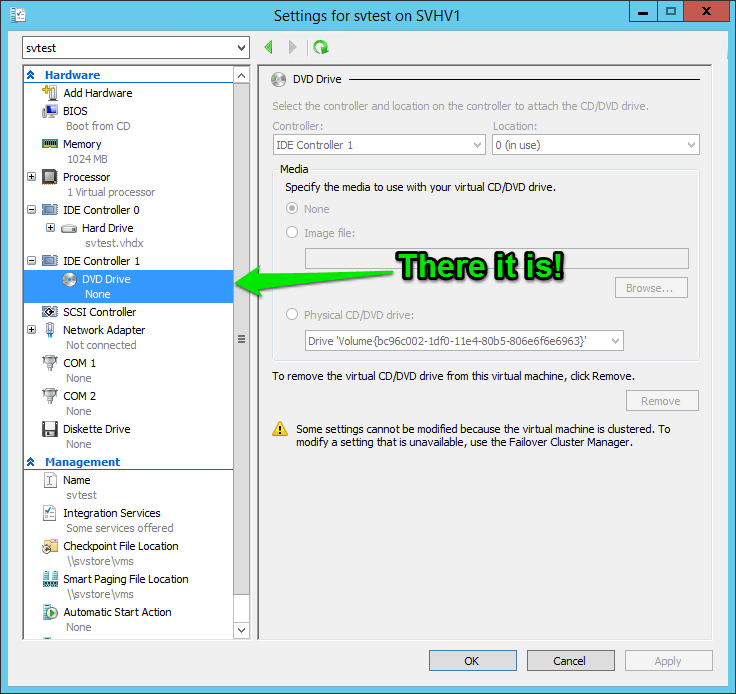
Identifying Virtual DVD Drives in the GUI
In PowerShell, you don’t just pop open a dialog and scan it for the items in question. Well, sometimes you can, but it’s much less efficient. Worse, if that’s how you approach items in PowerShell, you’re likely to become overwhelmed and fatigued quickly. One of the rules of most high-level programming and scripting languages is that there is likely to be a command or a tool to provide exactly what you need — if only you can find it. In this case, there is one.
Get-VMDvdDrive [-VMName] <string[]>
I’m going to take you through what I believe to be the most common and easiest usage of this cmdlet, but you can read the full details with Get-Help or online. I displayed the most basic usage above, which involves providing the name of the virtual machine in question. You could also use the pipeline to retrieve one or more virtual machines and send them to Get-VMDvdDrive like this: Get-VM “*web*” | Get-VMDvdDrive but it’s not very useful in most cases because Get-VMDvdDrive accepts all the same selectors that Get-VM will take. What might be useful is starting with Get-VM when you’re not entirely certain of the name of the virtual machine in question to narrow down your options. Once you know exactly which virtual machine you want to work with, it is easier to only work with Get-VMDvdDrive.
Let’s begin by examining the output of this cmdlet:

Basic Usage of GetVMDvdDrive
For easy comparison, this is the same virtual machine as shown in the GUI screenshot in the beginning of this article. The output of the cmdlet defaults to a table view. The significance of this is that a single virtual machine can easily have more than one virtual DVD drive. That’s not a very common occurrence, but it is plausible. Next, pay attention to the columns ControllerType, ControllerNumber, and ControllerLocation. Now you know where to connect the ISO image.
How to Connect an ISO in PowerShell Using Declarations
If you’ve worked with PowerShell very much, you can probably predict the name of the cmdlet used to connect an ISO just by knowing the cmdlet that shows the DVD drive: Set-VMDvdDrive. If you used Get-VMDvdDrive on a VM already, then you have most of the information that you need to in order to connect an ISO.
Before proceeding, take a moment to run Get-Help Get-VMDvdDrive and check the SYNTAX region:
SYNTAX
    Set-VMDvdDrive [-VMName] <String> [[-ControllerNumber] <Int32>] [[-ControllerLocation] <Int32>] [[-Path] <String>]
    [-AllowUnverifiedPaths] [-ComputerName <String[]>] [-Passthru] [-ResourcePoolName <String>] [-ToControllerLocation
    <Int32>] [-ToControllerNumber <Int32>] [-Confirm] [-WhatIf] [<CommonParameters>]

    Set-VMDvdDrive [-VM] <VirtualMachine[]> [[-Path] <String>] [-AllowUnverifiedPaths] [-Passthru] [-ResourcePoolName
    <String>] [-ToControllerLocation <Int32>] [-ToControllerNumber <Int32>] [-Confirm] [-WhatIf] [<CommonParameters>]

    Set-VMDvdDrive [-VMDvdDrive] <DvdDrive[]> [[-Path] <String>] [-AllowUnverifiedPaths] [-Passthru]
    [-ResourcePoolName <String>] [-ToControllerLocation <Int32>] [-ToControllerNumber <Int32>] [-Confirm] [-WhatIf]
    [<CommonParameters>]
Is anything missing? Is there a parameter that you expected to find that isn’t there? Here’s a hint: how do you specify whether the virtual DVD drive is on an IDE controller or a SCSI controller? The answer is: you don’t. A generation 1 virtual machine can only attach virtual DVD drives to IDE controllers. A generation 2 virtual machine cannot even have an IDE controller, so the only option is SCSI. So, while the controller type is not what I would classify as trivial knowledge, it is something that you don’t need to tell Set-VMDvdDrive about.
You do need to know the path to the ISO file, but that’s something I can only give you a little bit of help with, since that sort of thing requires knowledge about your environment. Be aware that tab completion works quite well for paths. As an example, I keep all of my ISO files on a share called “\\svstore\ISOs”. So, I can type in that much and then press [Tab] to cycle through all of my ISO files. If I know the first few characters of the file name, I can type them to only cycle through file names that begin with the same characters. For example, I tend to rename my ISOs so that the product name is first. If I were looking for a Windows ISO, I would seed the -Path parameter with “\\svstore\isos\win” and use tab completion to narrow it down to the exact image file.
So, with all the information from above. the resulting command to attach an ISO to a virtual machine would be something like this:
Set-VMDvdDrive -VMName svtest -ControllerNumber 1 -ControllerLocation 0 -Path '\\svstore\isos\Windows 2012 R2 Server Eval.ISO'
I use tab completion to set up all of my parameter names so I’m not really typing them, but to save a few keystrokes the command could be simplified to:
Set-VMDvdDrive svtest 1 0 '\\svstore\isos\Windows 2012 R2 Server Eval.ISO'
The second technique is just fine for interactive usage (typing things directly in to the PowerShell prompt) but is absolutely horrible for scripting as the 0 and the 1 are just hanging out there in space in a fashion that would be non-obvious to anyone reading your script that wasn’t intimately familiar with the cmdlet.
Exploring the Ways to Connect an ISO to a Virtual Machine with PowerShell
The above process isn’t really difficult to perform occasionally, but it does lead to an obvious question: is it necessary to bring up that table before connecting an ISO every time? What you could do is just specify values for all of the fields in one shot because, in theory, they are predictable. A generation 1 virtual machine should always have a virtual DVD drive on IDE controller number 1 at location 0 and a generation 2 virtual machine should always have a virtual DVD drive on SCSI controller number 0 at location 1. I admit that I haven’t consulted any experts on this, but I strongly doubt that any of them would ever recommend modifying the defaults without some truly compelling reason. I have never encountered any such reason.
So, while you could do that, it’s not what I would call safe. You’d also have to make assumptions about what generation the virtual machine is. I suppose that you could do something like the following:
function Connect-ISOtoVMAsMessilyAsPossible
{
    param
    (
        [Parameter(Mandatory=$true)][String]$VMName,
        [Parameter(Mandatory=$true)][String]$Path
    )

    throw 'This is horrible script that should never be used by anyone, anywhere, at any time, for any reason.'

    try
    {
        Write-Verbose 'Just assume that the VM is generation 1 and try to connect to IDE 0 1'
        Set-VMDvdDrive -VMName $VMName -ControllerNumber 0 -ControllerLocation 1 -Path $Path -ErrorAction Stop
    }
    catch
    {
        Write-Verbose 'That failed, so just assume that the VM is generation 2 and try to connect to SCSI 1 0'
        try
        {
            Set-VMDvdDrive -VMName $VMName -ControllerNumber 1 -ControllerLocation 0 -Path $Path -ErrorAction Stop
        }
        catch
        {
            throw 'I give up. I have no idea why this does not work. The following is our only clue: ' + $_.Message
        }
    }
}
While probably functional, this script is a terrible approach. For one thing, it’s a great deal of work just to get around what is truly a very simple problem, and it still makes unsafe assumptions.
Remember Get-VMDvdDrive? As I said before, it has all the answer that you need. Of course, you can object that you don’t want to look at that table every single time you want to attach an ISO. That is a perfectly acceptable objection and I agree. The good news, is you don’t have to ever look at that table if you don’t want to. For the aims of this article, the only value that it really has is to tell you if there’s already an ISO attached. Truthfully, for our uses, the output of Get-VMDvdDrive is far more useful to the computer than to us. This is where PowerShell really shines; running the cmdlet by itself shows some text on the screen, but if we can intercept the output before it gets to the display, there’s an object in there. PowerShell just loves to work with objects. The object being tossed around here contains all the data necessary to leverage Set-VMDvdDrive’s third parameter set. If you take a close look at that, you don’t need to specify the controller number or location. That’s because they’re already in the VMDvdDrive object.
Here’s one possible, although still not truly appropriate way, to leverage that knowledge:
throw 'This script is for illustrative purposes only. Please do not use.'

Get-VMDvdDrive -VMName svtest | Set-VMDvdDrive -Path '\\svstore\isos\Windows 2012 R2 Server Eval.ISO'
Important note: While specifically naming the -VMName parameter in the above sample is optional, you must specifically name the -Path parameter when using Set-VMDvdDrive in this fashion. Otherwise, it will assume you are naming a virtual machine and the cmdlet will fail.
So, what’s wrong with this one? In this case, absolutely nothing. However, that’s only because the virtual machine in question only has a single virtual DVD drive. What if it had more? What if it had, say, five?:
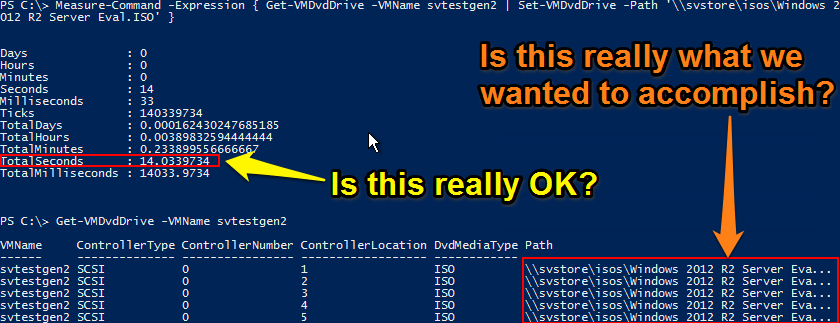
Accidentally Attaching One ISO to Multiple DVD Drives
Just for the sake of clarity, the items in the above screenshot are probably your only concern. ISO images are attached to virtual machines in shared read-only mode, so the same virtual machine can be connected to the same ISO multiple times and it should all be OK. If the virtual machine starts automatically running items from all of them, you might have a mess on your hands, but it’s probably a manageable mess. Preferably though, we’d never make any messes at all.
Using Array Notation to Connect a Single ISO to a VM In PowerShell
The “problem” with matching the output of Get-VMDvdDrive to the input of Set-VMDvdDrive isn’t a big problem at all, although it might not be obvious.
To lead into this section, let’s talk about PowerShell’s arrays. One the things about PowerShell that alternates between being a blessing and being a curse is its automatic handling of arrays. Remember how the default output format of Get-VMDvdDrive is a table? That table could have one item or more than one item. For a virtual machine that only has a single DVD drive, only one item is produced which you can see with GetType():

Get-VMDvdDrive with One Drive
But, when there is more than one, the exact same cmdlet shows this:

Get-VMDvdDrive with Multiple DVD Drives
PowerShell behaves this way because arrays can be very confusing, so it tries to take on all the heavy-duty parts of working with them. Likewise, Get-VMDvdDrive handles items of the Microsoft.HyperV.PowerShell.Drive type gracefully whether they are presented as a single item or in an array. That’s why the same command produces the behavior as illustrated above.
Is there a way around this? Of course there is. But, I know that if it were difficult, people would just take their chances and use the command as shown at the end of the previous section. Realistically, you’ll be OK every time. But, at the cost of only five more characters, you can guarantee that you’ll never attach more than one image in any situation. Do this with array notation:
(Get-VMDvdDrive -VMName svtestgen2)[0] | Set-VMDvdDrive -Path '\\svstore\isos\Windows 2012 R2 Server Eval.ISO'
What I did was encapsulate the Get-VMDvdDrive portion in parenthesis so that its output becomes a singular object that I can work on in the same line of script — those are the first two additional characters. Next, I appended [0] to that new object. In array notation, that means: “the first item in the array”. Here’s the result:

Only One DVD Drive Filled
The only possible ways that this command can error are:
- The specified virtual machine doesn’t exist
- The path is invalid or the Hyper-V host that owns the virtual machine does not have sufficient permissions to access it
There are no complicated checks or nested trys or anything else. It just works, and does so with a minimal amount of script. Remember that you don’t need to type out –VMName if you don’t want to, saving a few more keystrokes. If you’re putting this inside a script file that you’re going to save, then you’d want to test for the three conditions that I mentioned, but you don’t have to be as concerned with whether or not the virtual machine has multiple DVD drives. Of course, there’s always the chance that the reason a virtual machine has multiple DVD drives is because there’s some application that always requires one or more particular DVDs to always be present, but hopefully the virtual machine’s architect ensured that the contents of the first drive could always be changed.
Important note: The shown script will not error if the virtual machine does not have any virtual DVD drives attached at all. This is also because of PowerShell’s automatic handling of arrays.
Avoiding the Pipeline
What if you need to know if the connect didn’t work because there is no virtual DVD drive? You could follow up the preceding cmdlet with a call to Get-VMDvdDrive. You could also do nothing; it will be pretty obvious when you try to use the DVD image inside the virtual machine that something is really amiss. There is a more foolproof way, although it’s a little more daunting:
Set-VMDvdDrive (Get-VMDvdDrive -VMName svtest)[0] -Path '\\svstore\ISOs\Windows 2012 R2 Server Eval.ISO'
What this line of script does is execute the Get-VMDvdDrive portion first and then it executes Set-VMDvdDrive, just like the pipelined version. What’s different is that this script will generate an error if the specified virtual machine doesn’t have a virtual DVD drive. In the pipelined version, a single returned item before the pipeline will send a single item to the pipeline. In any other case, it will send a multiple-item object with an implied foreach. When using foreach, everything inside its code block is executed once for every item inside the supplied multi-item object. If the multi-item object has zero items, then the script inside the foreach block is executed zero times. Therefore, in the pipelined version, the part after the pipeline is never executed at all if no items are retrieved from the portion before the pipeline. It is literally never given the opportunity to error. In the script that doesn’t use a pipeline, the Set-VMDvdDrive portion is always executed, so it will tell you if the supplied object is empty.
In practice, I would use the pipelined version when working interactively because it’s easier to type and remember. If scripting, I would use something similar to the non-pipelined version because it will always throw an error if there’s a problem (remember to use -ErrorAction Stop inside a try block). However, because I subscribe to the notion that readable script is superior to short script, I would write it like this:
function Connect-VMISOtoFirstDVD
{
    param
    {
        [Parameter(Mandatory=$true)][String]$VMName,
        [Parameter(Mandatory=$true)][String]$Path
    }
    $FirstDVDDrive = (Get-VMDvdDrive -VMName $VMName -ErrorAction Stop)[0]
    Set-VMDvdDrive -VMDvdDrive $FirstDVDDrive -Path $Path -ErrorAction Stop
    # ErrorAction Stop isn't necessary on the final line, but helps if this script is called by another script or if anything is ever added past this point
}
This is readable, maintainable script that will throw clear errors in the event of a problem. Be aware that the Get-VMDvdDrive line will not error if the virtual machine does not have a virtual DVD drive. It will only error if the virtual machine doesn’t exist or if you don’t have sufficient privileges to query it. One example of this script being easily maintainable is that you could easily modify it to accept a different parameter set that allows you to submit a virtual machine object instead of a virtual machine name, and it could be done without modifying either of the existing code lines.
PowerShell Array Notation Explained
Practically, you know everything that you need to in order to use Get-VMDvdDrive and Set-VMDvdDrive together effectively. Academically, you might still not know what [0] actually does. The bracket characters themselves are nothing more than an arbitrary convention chosen by the authors of PowerShell. Of all the scripting and programming languages that I know, square brackets are the most commonly used characters for array notation, although they’re not the only ones. Visual Basic, for instance, uses parenthesis characters. For this part, you just have to remember that square brackets are PowerShell’s array notation characters.
The zero, on the other hand, is not arbitrary. Within the square brackets you will find a number or, in more complicated scripts, a parenthesis-enclosed expression that evaluates to a number (for example $arrayobject[($n – $m)]. This number must be an integer (whole number) and positive (greater than zero). This number is known as the index of the array item that you wish to work with. These index numbers start at a common point and then add upward sequentially in increments of one. That big mouthful of words just means that the first item in the array has a particular index, then the next item is the previous item’s index plus one, on and on until the array runs out of items. In PowerShell, as with most other languages, arrays are zero-based, which means that their first number is always zero. There are a handful of languages that used one-based indexes, but they are extremely uncommon. Some languages even allow for indexes with arbitrary starting numbers, but that’s well beyond anything useful for the day-to-day scripter.
The reason for zero-basing cuts right to the heart of binary computing. Humans start counting at 1 because for most of our history, that was the lowest possible counting number. Zero was invented long after mathematics were established, making it something of a special case number as far as humans are concerned. Since computers were invented after the seventh century, zero is the lowest counting number that they are aware of and it has always been a normal part of reality for them. So, they count 0, 1, 2, 3, etc. Actually, they count 0000000000000000, 0000000000000001, 0000000000000010, 0000000000000011, etc., which, for many people, actually makes it a bit easier to understand why zero-based indexes make more sense in computing than one-based.
Unfortunately, the usage of zero-based indexes commonly lead to what are infamously known as “off-by-one” errors when humans try to match up their one-based thinking against the computer’s zero-based arrays. For a simple explanation, an index of 4 represents the last item in an array with 5 entities. Put another way, an array with five entities does not have a [5]. You shouldn’t get into any trouble with what I’ve shown you in this article, but it really doesn’t take long for newcomers to arrays to fall into an off-by-one trap. That’s one of the reasons that PowerShell was designed to shield you from array operations wherever possible.
Using PowerShell to Disconnect an ISO from a Virtual Machine
I would be remiss to show you how to connect an ISO without showing you how to disconnect one. First of all, do not use Remove-VMDvdDrive. Yes, it will disconnect the ISO image, but it will also remove the virtual DVD drive from the virtual machine entirely, making things unnecessarily difficult for the next administrator that tries to attach an ISO image. Also, on generation 1 virtual machines, it will error if the virtual machine isn’t off because drives cannot be attached/removed on the IDE chain while the VM is on. If you used the PSHyperV module with 2008 R2 and earlier, then this cmdlet had a -DiskOnly parameter. The official cmdlets with 2012+ do not have this parameter.
Instead, continue using Set-VMDvdDrive, but set the -Path to $null:
(Get-VMDvdDrive -VMName svtestgen2)[0] | Set-VMDvdDrive -Path $null
You must use $null; an empty string or a zero or anything else will cause the cmdlet to throw an error.
Forgoing array notation is probably safer with this cmdlet as well, so the following is likely to be almost universally acceptable:
Get-VMDvdDrive -VMName svtestgen2 | Set-VMDvdDrive -Path $null
This will empty all DVD drives on a virtual machine.


Not a DOJO Member yet?
Join thousands of other IT pros and receive a weekly roundup email with the latest content & updates!
More in this category


About the Author

Eric Siron


3 thoughts on "PowerShell and Hyper-V: Using ISOs and Arrays"
What if you have an ISO mounted to a VM, it was not shared but copied to the VM and after you dismount the VM you also want to delete the ISO file from the VM’s folder as well?
I would be reluctant to script that. The output of Get-VMDvdDrive has a .Path property that could be saved and fed to a delete command, but there is no way for it to really know that the image is a duplicate and not the very last of its kind.
I’d be more inclined to modify the processes that led to the creation of throw-away copy of a DVD image. Either use ISOs from a remote location or bring the necessary items to a common local location where they can be reused.