Save to My DOJO

Table of contents
- What is Microsoft Virtual Machine Converter (MVMC)?
- Pros and Cons of Microsoft Virtual Machine Converter
- How to Download Microsoft Virtual Machine Converter
- How to Install Microsoft Virtual Machine Converter
- How to use Microsoft Virtual Machine Converter’s GUI to Perform P2V
- How to use Microsoft Virtual Machine Converter’s PowerShell Cmdlets to Perform P2V
- Post-Conversion Fix-Up and Notes
Up through version 2012 of Microsoft’s System Center Virtual Machine Manager, the product included a physical-to-virtual (P2V) conversion tool for Hyper-V. It was taken out of the 2012 R2 version, and as most anyone could have predicted, the customer response was a general revolt. The capability was later added to the Microsoft Virtual Machine Converter (MVMC) product when it released as version 3.0.
[thrive_leads id=’16356′]
The good news is: That particular product is provided free-of-charge, so you do not need to purchase any System Center products.
The bad news is: It’s really not that well-developed.
This article contains a how-to guide, but I strongly recommend that you read through the entire thing, especially the pros and cons, before you start. With some of the caveats, you might find that you’d rather not use this tool at all.

What is Microsoft Virtual Machine Converter (MVMC)?
Microsoft Virtual Machine Converter, currently at version 3.1, is a freely-available tool provided by Microsoft for the purpose of converting VMware virtual machines and physical computers to Hyper-V virtual machines. If you prefer, you can also use MVMC to create VHD or VHDX from the source disks without converting the entire system. It includes both a GUI tool and a set of PowerShell functions so you can graphically step through your conversions one at a time or bulk transfer them with only a few lines.
During P2V, an agent application is temporarily installed on the source system.
You can convert desktop operating systems running Windows Vista and later. You can convert Windows Server operating systems running version 2008 or later. No Linux systems are supported by the P2V module. Your hypervisor target can be any version of Windows or Hyper-V Server from 2008 R2 onward.
Pros and Cons of Microsoft Virtual Machine Converter
I was not very impressed with this tool and would be unlikely to use it. Overall, I feel that Disk2VHD is better suited to what most people are going to do.
Cons:
- MVMC needs a temporary conversion location, even if you installed on the target Hyper-V host. So, you need enough space to hold the source system twice. MVMC does use dynamic VHD by default, so plan for the consumed space, not the total empty space.
- MVMC only creates VHD files, not VHDX. It appears that what Microsoft really wants you to use this for is to convert machines so that they can be used with Azure, which still can’t work with VHDX. So, you must have enough space for initial VHD and the converted VHDX.
- MVMC creates one VHD for each volume, not for each physical disk. So, for modern Windows OSs, you will have that tiny 350MB system disk as its own VHD and then your boot C: disk as a separate VHD.
- MVMC operates from the broker’s perspective, so paths may not line up as you expect on the target system.
It’s not all doom and gloom, though. Pros:
- MVMC can convert machines in bulk via its PowerShell module. That module is one of the poorer examples of the craft, but it is workable.
- Aside from a tiny agent that is installed and almost immediately removed during the discovery change, nothing is installed on the source system. Contrast with Disk2VHD, which requires that you run the app within the machine to be converted.
How to Download Microsoft Virtual Machine Converter
Virtual Machine Converter is freely available from the Microsoft download site. That link was the most current as of the time of writing, but being the Internet, things are always subject to change. To ensure that you’re getting the latest version:
- Access http://www.microsoft.com/downloads.
- In the search box, enter Virtual Machine Converter.
- From the results list, choose the most recent version.
The download page will offer you mvmc_setup.msi and MVMC_cmdlets.doc. The .doc file is documentation for the PowerShell cmdlets. It is not required, especially if you don’t intend to use the cmdlets. The .msi is required.
How to Install Microsoft Virtual Machine Converter
Do not install MVMC on the computer(s) to be converted. You can install the application directly on the Hyper-V host that will contain the created virtual machine or on an independent system that reads from the source physical machine and writes to the target host. For the rest of this article, I will refer to such an independent system as the broker. During the instructions portion, I will only talk about the broker; if you install MVMC on the target Hyper-V host, then that is the system that I am referring to for you.
If you use a broker, it can be running any version of Windows Server 2008 R2 or onward. The documentation also mentions Windows 8 and later, although desktop operating systems are not explicitly listed on the supported line.
Whichever operating system you choose, you must also have its current .Net environment (3.5 for 2008/R2 or 4.5 for 2012/R2). If you intend to use the PowerShell module, version 3.0 of PowerShell must be installed. This is only of concern for 2008/R2. Enter $PSVersionTable at any PowerShell prompt to see the installed version. If you are below version 3.0, use the same steps listed above for downloading MVMC, but search for Windows Management Framework instead. Version 3 is required, but any later version supported by your broker’s operating system will suffice.
The BITS Compact Server feature must also be enabled:
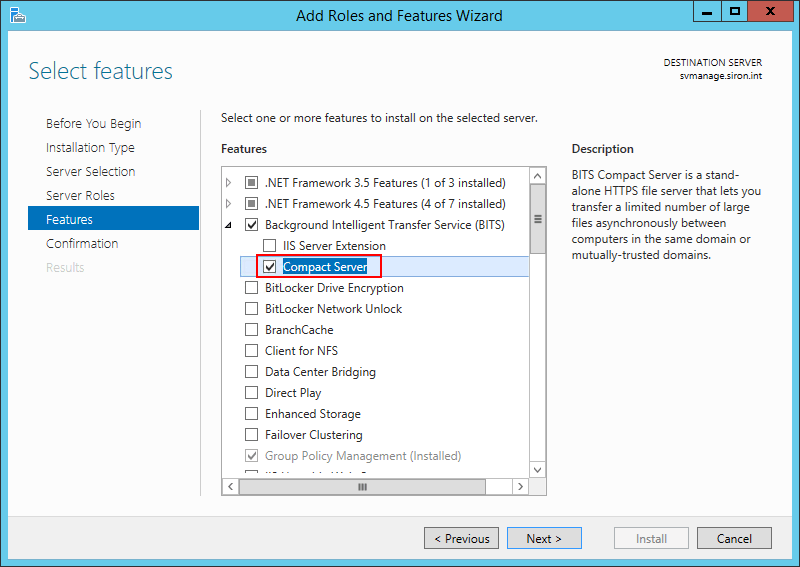
BITS
Installing MVMC is very straightforward. On the broker system, execute mvmc_setup.msi. As you step through the wizard, the only page with any real choice is the Destination Folder. Once installed, it will have its own entry for Microsoft Virtual Machine Converter on the Start menu/screen.
How to use Microsoft Virtual Machine Converter’s GUI to Perform P2V
Before you start, the source system must be online and reachable via network by the broker. The broker will temporarily hold the converted disk files, so it must have sufficient free space; it will not accept an SMB path. You must also know a user name and password that can act as an administrator on the source system and the destination Hyper-V host.
When ready, start MVMC and follow these steps:
- The first screen (not shown) is simply informational. If you don’t want to see it again, check Do not show this page again. Click Next when ready.
- The next screen asks if you wish to convert from a virtual or physical source machine. This article is only about P2V, so choose Physical machine conversion and click Next.
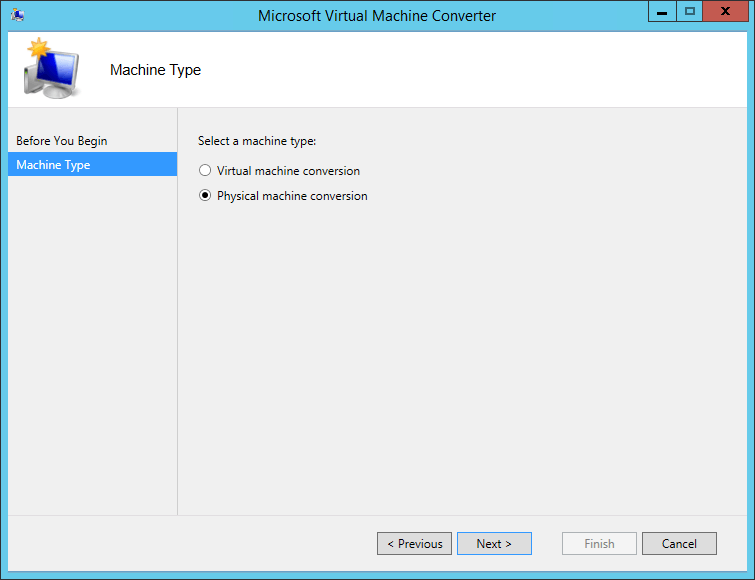
MVMC Physical Source
- Now, enter information about the source computer. You’ll need a resolvable name or IP address as well as an administrative user account. Upon clicking Next, MVMC will attempt to connect to the source system using the credentials that you specify.

MVMC Source System
- If the connection from step 3 is successful, you’ll next be asked to install the agent and scan the source host. Press the Scan System button and wait for the middle screen to display the results (do not be thrown off by the appearance of a Hyper-V adapter in my screenshot; I didn’t have a suitable physical system to demonstrate with):
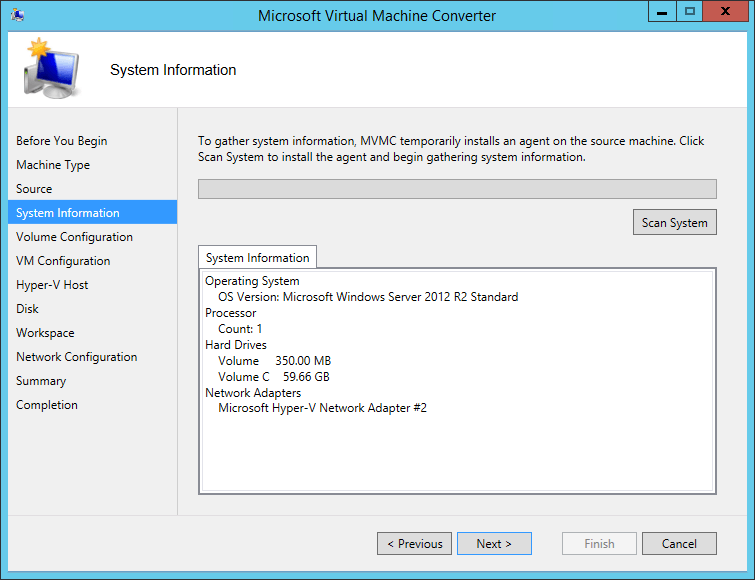
MVMC Source Scan
- Each volume in your system will be detected and converted to an individual VHD. You can deselect any volume that you don’t want converted and you can choose to create a Fixed VHD instead of a Dynamic VHD if you prefer. Be aware that every line item will create a unique VHD.
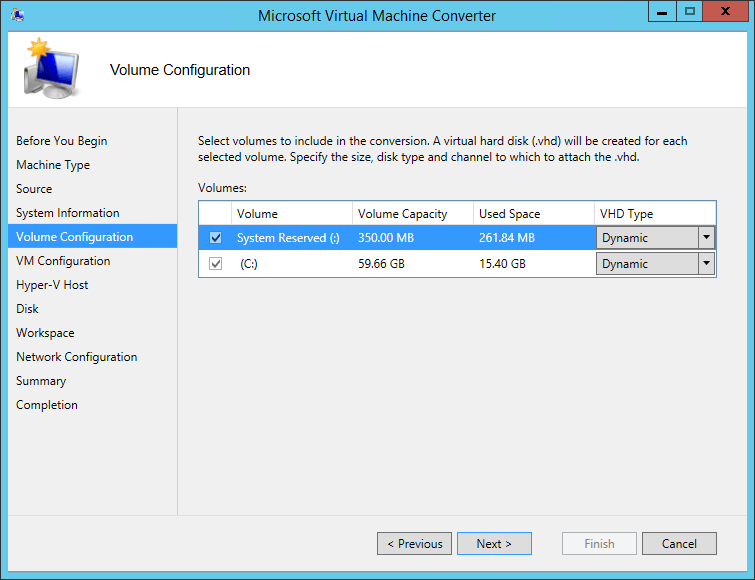
MVMC Disk Selection
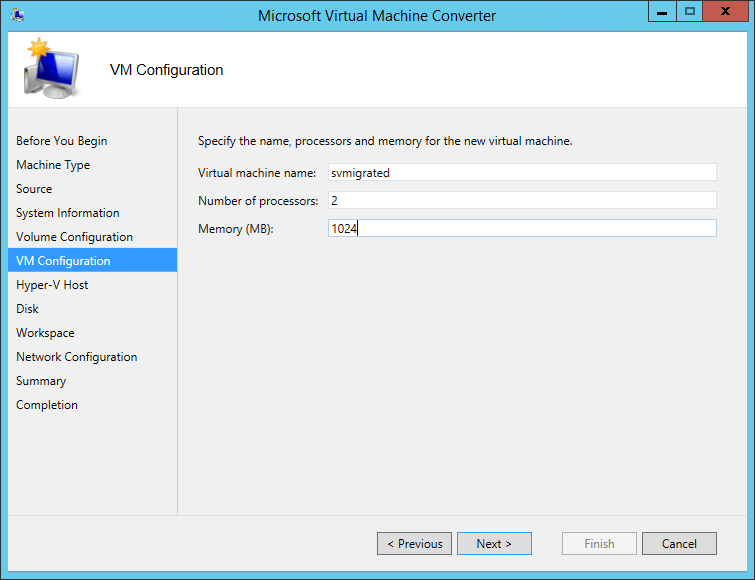
- Enter the specifications for the target virtual machine. You’ll need to provide its name, the number of vCPUs to assign, and the amount of memory to assign.
MVMC Target VM Specifications
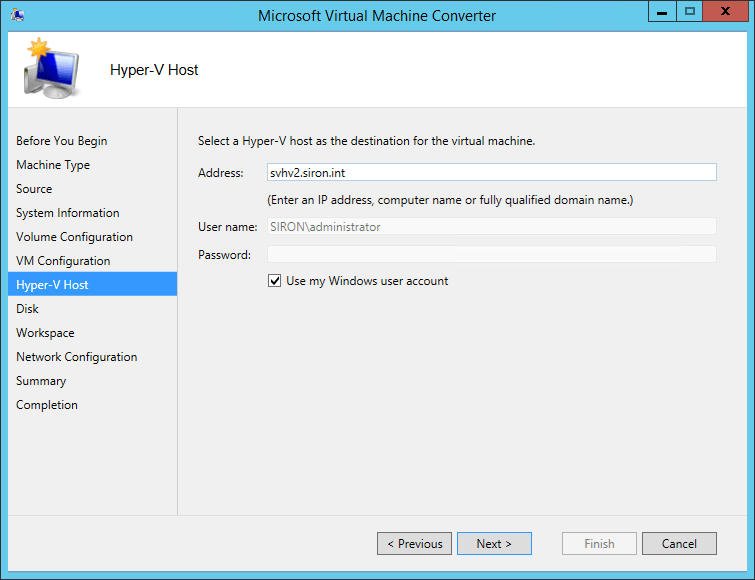
- Enter the connection information for the target Hyper-V host. You’re given the option to use the credentials of your currently-logged-on user. If that will not work, clear the checkbox and manually enter the correct credentials.
MVMC Target Host
- Next, you’ll be asked where to place the files. The location that you specify is from the viewpoint of the broker. So, if you enter C:VMs, the files will be placed on the broker’s C: drive. Unless you’re placing the virtual machine’s files on an SMB 3 share, you’ll need to fix this all up afterward.

MVMC Target File Location
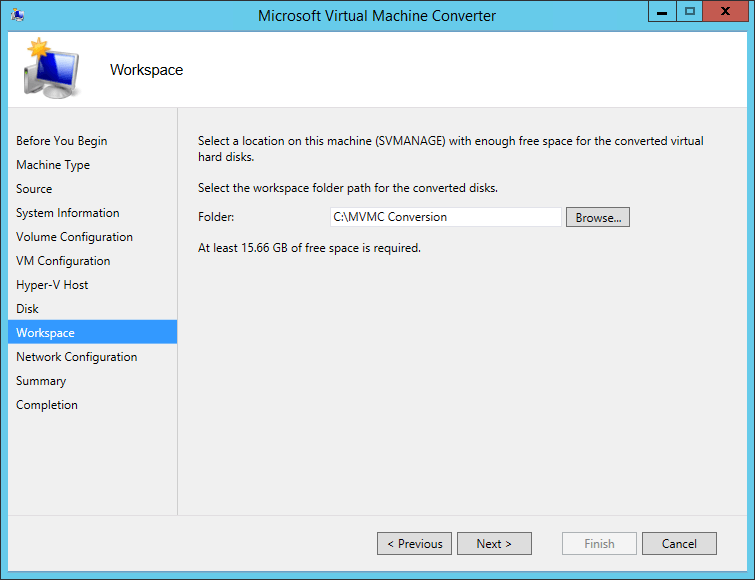
- Choose the interim storage location, which must be on the broker system.
MVMC Interim Storage
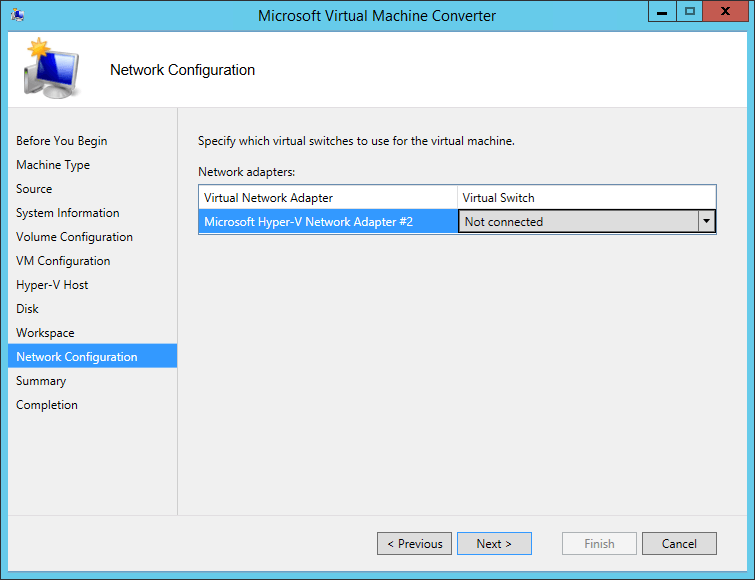
- Select the virtual switch, if any, that you will connect the virtual machine to. I recommend that you leave it on Not Connected. This helps ensure that the system doesn’t appear on the same network twice.
MVMC Target Virtual Switch
- The next screen (not shown) is a simple summary. Review it click Back to make changes or Finish to start the conversion.
- You’ll now be shown the progress of the conversion job. Once it’s complete, click Close.
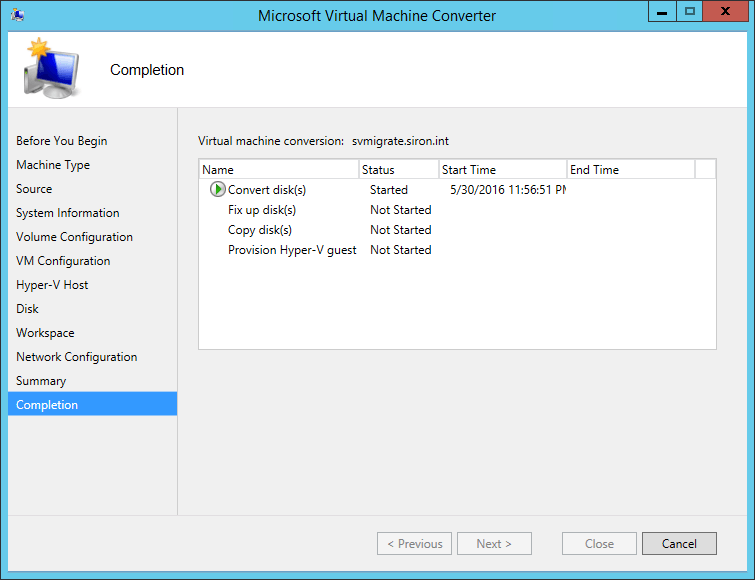
MVMC Progress
If all is well, you’ll eventually be given an all-green success screen:
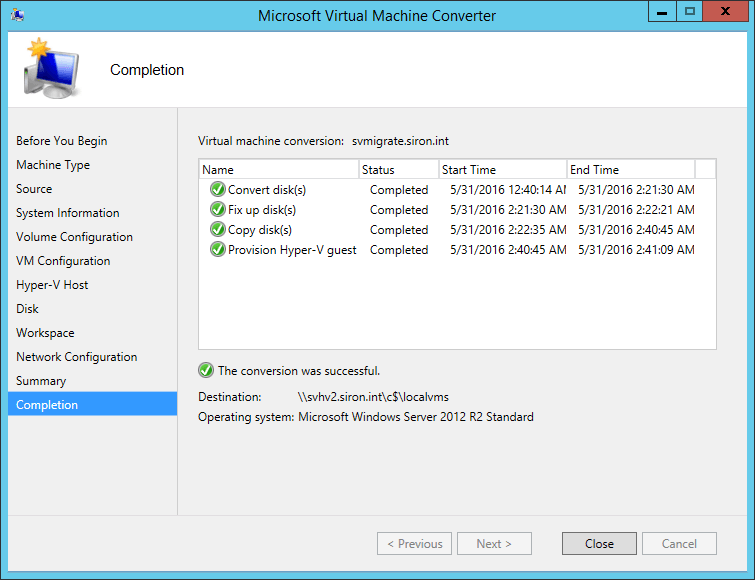
MVMC Success
There will be some wrap-up operations to carry out. Jump over the PowerShell section to find those steps.
How to use Microsoft Virtual Machine Converter’s PowerShell Cmdlets to Perform P2V
For some reason, MVMC’s cmdlets are not built properly to autoload. You’d think if any company could find an internal resource to show them how to set that up, it would be Microsoft. You’ll need to manually load the module each time that you want to use it. It should also be theoretically possible to place the files into an MvmcCmdlet sub-folder of any of the Modules folders listed in your system’s PSModulePath environment variable and it would then be picked up by the auto-loader. I wasn’t certain which of the DLLs were required and didn’t spend a lot of time testing it.
- Open an elevated PowerShell prompt on your broker system.
- Import the module: Import-Module -Name ‘C:Program FilesMicrosoft Virtual Machine ConverterMvmcCmdlet.psd1’
- Load the credential to use on the source physical machine. You can load a credential set in a wide variety of ways. To interactively enter a credential set and save it to a variable: $SourceCredential = Get-Credential
- Connect to the source machine: $SourceConnection = New-MvmcP2VSourceConnection -PhysicalServer ‘svmigrate.siron.int’ -SourceCredential $SourceCredential
- Set up the P2V agent and retrieve information from it: $SourceInfo = Get-MvmcP2VSourceSystemInformation -P2VSourceConnection $SourceConnection. We’ve stored this information in a variable so that we can continue to use it with other cmdlets in this module, but you are more than welcome to look at the information that it gathered. Use $SourceInfo | Get-Member to see its properties. You can then look at any of the members just by entering the variable name, a dot, and the property that you’d like to see. Ex: $SourceInfo.Services
- Create a variable to hold the parameters of the virtual machine to be created: $TargetVMParameters = New-MvmcP2VRequestParam. This object has a few properties that you can look at in the same way that you did with the $SourceInfo variable, although they’ll all be empty this time.
- Populate the SelectedDrives parameter of $TargetVMParameters with all of the drives from the source machine: $TargetVMParameters.SelectedDrives.AddRange($SourceInfo.LogicalDrives). If you’d prefer, you can add individual drives, ex: $TargetVMParameters.SelectedDrives.Add($SourceInfo.LogicalDrives[0]) will add only the first drive from the source machine. You can continue using .Add to specify other drives until you have the ones that you want. Every single item here will have a VHD created just for it.
- The VHDs will be created as dynamically expanding, and I don’t recommend that you change that. You’re probably going to want to convert them to VHDX later anyway, so, if you’re dead set on fixed, wait until you can convert it yourself. Otherwise, your temp and destination space consumption will be higher than necessary. If you really want to create them as fixed right now: $TargetVMParameters.SelectedDrives | foreach { $_.IsFixed = $True }
- Populate the CPUCount parameter of $TargetVMParameters. You can enter a number or use the same as the source: $TargetVMParameters.CpuCount = $SourceInfo.CoreSystem.PhysicalProcessorCount.
- Populate the StartupMemoryInMB parameter of $TargetVMParameters. As with CPU, you can pull it from the source system: $TargetVMParameters.StartupMemoryInMB = $SourceInfo.CoreSystem.MemoryInMB. This is potentially a bit more dangerous, as it could create a VM that is simply too large to start. You can, of course, just specify an integer value.
- The final task is to set up the network adapter(s). If you skip this step, your virtual machine will be created without any virtual network adapters at all. That’s a viable option, but I recommend against it because MVMC can keep the OS-to-adapter IDs intact. You can add virtual adapters somewhat like you did with the hard drives. The differences are that you can only add one adapter at a time and you also need to specify which, if any, virtual switch to connect the adapter to. If you use an empty string, then the adapter remains disconnected. Some samples:
- Copy the first physical adapter and leave it disconnected: $TargetVMParameters.SelectedNetworkAdapters.Add($SourceInfo.NetworkAdapters[0], ”)
- Add all adapters and connect them to the virtual switch named “vSwitch”: $SourceInfo.NetworkAdapters | foreach { $TargetVMParameters.SelectedNetworkAdapters.Add($_, ‘vSwitch’) }
- You’ve collected all the information from the source system and defined the target system. Let’s turn our attention to the target host. Start by gathering the credential set that will be used to create the new virtual machine: $DestinationCredential = Get-Credential. You can use the same credential as the source if that will work: $DestinationCredential = $SourceCredential
- Open a connection to the target Hyper-V host: $DestinationConnection = New-MVMCHyperVHostConnection -HyperVServer ‘svhv2.siron.int’ -HostCredential $DestinationCredential.
- All that’s left is to perform the conversion: ConvertTo-MvmcP2V -SourceMachineConnection $SourceConnection -DestinationLiteralPath ‘\svhv2c$LocalVMs’ -DestinationHyperVHostConnection $DestinationConnection -TempWorkingFolder ‘C:Temp’ -VmName ‘svmigrated’ -P2VRequestParam $TargetVMParameters. Take a close look at the DestinationLiteralPath that I used. This cmdlet operates from the perspective of the broker, not the target host (contrast with Move-VM/Move-VMStorage).
Post-Conversion Fix-Up and Notes
Do not forget to turn off or otherwise disconnect the source physical system before turning on the virtual replacement!
Virtual network adapters are not placed in a VLAN. If a VLAN is needed, you’ll need to set that after the VM is created.
The virtual machine will be set to use fixed memory. If you’d like to use Dynamic Memory, you’ll need to set that after the VM is created.
The process automatically creates a sub-folder of DestinationLiteralPath with the name of the virtual machine. All of the virtual machine’s files are placed there. Feel free to use Storage Live Migration to place the files anywhere that you like.
I do not know of any way to recombine the volumes so that they are all together in a single VHD. It might be possible to use a partition manipulation tool such as Clonezilla.
Assuming that you don’t want to continue using the older VHD format, you’ll need to convert to VHDX. We have an article explaining how to do that. Remember that the new disk is created alongside the old.
When I was first running through the PowerShell steps, I didn’t realize that the DestinationLiteralPath was from the broker’s perspective so I used the local path on the Hyper-V host (C:LocalVMs). The cmdlet accepted my input, ran for a very long time, and then failed due to the path. I then discovered that it had created an entire VM on my broker machine in C:LocalVMs. Where it failed was in connecting that folder to the target host. So, I could have copy/pasted and imported its output rather than going through the whole thing again.
Even though I used what would ordinarily be a completely non-workable path for DestinationLiteralPath, the cmdlet automatically fixed up the VM completely so that it ran from the correct local path.
If the conversion process does fail for some reason during the final stage, it will almost always have created a virtual machine. You’ll need to manually delete it before retrying.
[thrive_leads id=’17660′]


Not a DOJO Member yet?
Join thousands of other IT pros and receive a weekly roundup email with the latest content & updates!
More in this category


About the Author

Eric Siron


31 thoughts on "How to use Microsoft Virtual Machine Converter (MVMC) for Hyper-V P2V"
“It’s really not that well-developed.”
That’s putting it mildly. This should be a straight forward tool just like DSK2VHD, but it is awkward to get it working.
I’m sticking to DSK2VHD in the absence of anything better.
Thanks for the guide though… 🙂
“It’s really not that well-developed.”
That’s putting it mildly. This should be a straight forward tool just like DSK2VHD, but it is awkward to get it working.
I’m sticking to DSK2VHD in the absence of anything better.
Thanks for the guide though… 🙂
Hello. I get an error during the Fix up stage that says “The configuration registry database is corrupt” and the conversion stops. Would you have an idea on how to fix that? Thank you.
Ouch! No, I don’t know what that is, sorry. I believe that it’s the MVMC tool finding a problem in the source system, and not a problem within MVMC itself. You might try doing a general search on the problem because I think it’s a problem inside the OS that you’re trying to move.
Ok, thanks.
Hello,
Do you found the solution? I have the same problem…
Thanks
I got this:
There are blocking issues for the physical-to-virtual conversion: There is no BCD boot device found in the source machine, noticing that conversion of an EFI boot machine is currently not supported
What I’ve to do?
Awesome Blog. Thanks.
I was getting an error
Value of ‘ErrorMessage’ = ‘MVMC is unable to create a volume snapshot set on . Error code: 0x8004231F.’
Did some research on the error: Cleaned up the source machine, created a 75Gb shadow storage amount. (Way above used space on the disk) and still no dice. So I used Disk2vhd v2.01 and it worked 1st time.
Specify a network share on the Hyper-V server. We have created a share on the virtual machine root folder (VMs). Click Next to continue.
Hi,
You will use the format \servernameShareName when specifying the file share. This SMB3 file share must already be created and accessible by both the source and destination server.
Thanks,
Symon Perriman
Altaro Editor