Save to My DOJO
The most frustrating issue that I ever encountered in all of the backup issues that I ever handled were the times when customers had done everything right — backups were taken regularly, the media cared for, etc. — and we were still unable to restore lost data. There are several reasons that can happen. Many times, it was just that there was something wrong with the backup media. Many other times, the backup application had design flaws that blocked our way. Sometimes, the users were simply uneducated and had inadvertently caused their own problems. For the record, leaving backup tapes on your vehicle’s dashboard on a sunny summer day is ill-advised. Ultimately, though, the causes weren’t important. What mattered was that they needed to restore and couldn’t. There’s one lesson to be learned from their misfortunes: the time to discover whether or not you can restore from your backup is when you don’t need to restore from your backup.
Why Should I Perform Test Restores in Hyper-V?
The primary reason to test restores is to ensure that restores can be accomplished. A successful test restore verifies the following:
- Your backup media is in usable condition
- Your backup application is taking solid backups
- Your backup selections include everything that must be restored, ex:
- All necessary SQL databases
- All critical files and folders
- All desired Exchange stores
- Your backup application can read what it wrote
- You might get an opportunity to practice dealing with restore failures
- You understand how to use your backup application to perform a restore
That last bullet point is more important than many people think. I know that a lot of administrators think, “Hey, I’m smart, I wouldn’t be doing this job if I didn’t understand computers, I can figure this out if I ever need to.” That’s probably true, but why would you want to learn when the CEO is hovering over your shoulder while you attempt to retrieve a file that he accidentally deleted? What about the other people in your organization? If there’s a true disaster going on, you might not be available to even discover whether or not you’re smart enough to figure out the restore process under duress. That task might fall to someone with minimal server literacy. Use test restores as a training opportunity for yourself and at least a few other people.
All of that, of course, is true for any computer-reliant organization. Everyone should be periodically taking their restore procedure through a trial run. Most traditional backup applications in traditional environments facilitate this with something called a redirected restore which is a wonderful thing. If you’re not familiar with that term, it means that the restored data is placed in a location other than the source. That has many uses, but in this context, you can perform inspections, including bit-for-bit comparisons, between the live data and whatever is on the backup media. Hyper-V, and really, any virtualization platform, grants additional capabilities for such test restores. Hyper-V allows us to go beyond file restore redirection by restoring entire servers without colliding with the originals. With a bit more effort, we can even restore server groups to test that inter-dependencies are still functional.
How To Perform Test Restores in Hyper-V
This post will illustrate everything using the Altaro VM Backup product because that’s what I use (and since this is an Altaro-sponsored blog, I think that’s perfectly reasonable). What I’m not going to do is use any Altaro-specific features. If you own a paid edition, you’ll notice that there is a Sandbox & Verification section with Test & Verify Backups and Schedule Test Drills sub-sections. If you’re not using these, I highly recommend that you start immediately. They can automate a lot of the manual processes that I’m about to demonstrate.
If you’re not using an Altaro product, you should still be able to follow along well enough. I won’t be able to specifically tell you how to locate the exact elements that match up in your program, of course, but I will stick to features that should be more or less fundamental to any Hyper-V-aware backup application. I’d say that if yours is missing any of the features that I’m going to use that you should start downloading trial versions of something else.
To perform a test restore of a virtual machine in Hyper-V:
- Open up the application that you use to set calendar events with reminders, or use your smartphone, and create a recurring event to test your restores every month. Invite other people.
- Open your backup and restore application. Locate the restore section.
- Find the virtual machine that you want to test (in Altaro VM Backup, you must first select a restore source; other applications may organize the procedure differently). Make sure that you pick one that has meaningful data. I would also recommend changing your test subject each month.

Select a VM to Restore
- The next part, or parts, depending on your backup application, are crucial. I have taken a picture of what these parts look like in Altaro VM Backup. The two most important are highlighted in red, with a third in a dark blue. Look after the screenshot for an explanation.
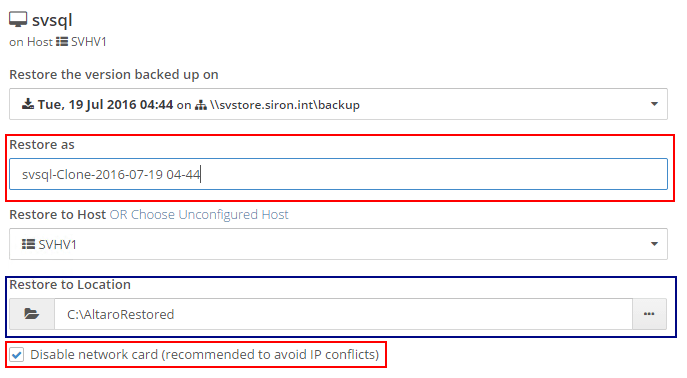
Virtual Machine Restore Target Options
- The most important part shown here is the Restore as section. Basically, we don’t want to restore a virtual machine with the same name as the source because that would just be confusing. You might not know it, but it would be possible to use the same name; Hyper-V doesn’t care if two or more virtual machines have the same name because it tracks by Virtual Machine IDs. The Altaro product is smart enough that it’s not going to use the original VM’s ID because it can see that it’s still in use. Your backup application might have a different strategy for dealing with IDs, so make certain that you understand it.
- The second most important component is Disable network card. The virtual machine container name and ID might be different, but everything in the guest operating system will be the same. We don’t want it jumping on the same network with the same Active Directory computer account, computer name, IP address, etc., because that would not end well at all. If your application doesn’t have this exact feature, you must remember to disconnect the virtual adapter from the virtual switch before turning on your test restore.
- The third option, the one that I’ve highlighted in blue, isn’t necessarily as important depending upon how your application functions. The Altaro product is always going to require that you select a target location. Others might just pick a spot. As long as you aren’t restoring over the top of your source virtual machine’s files, you should be OK. Hopefully, no product will allow that without sufficient warning. Just ensure that the selected target has sufficient space and is capable of running a virtual machine for at least enough time to test.
- I didn’t highlight it, but this particular edition of Altaro VM Backup allows me to select a host other than the original to restore to. If you’ve done everything else correctly, it should matter what you pick unless it doesn’t have enough capacity to run the restored VM alongside whatever else it’s running. Remember that, for what we’re doing, you can probably lower the resource assignment to the restored virtual machine before turning it on.
- Make any other selections as necessary (that’s the last page for Altaro VM Backup) and perform the restore. A successful completion of the restore job is a very good sign, but do not be satisfied with that.
- While the restore is processing, make a list of the things that you want to verify. Use the live virtual machine as a guide, if possible. For example, if you’re restoring a SQL database, find the rows in the original that you’ll expect to find in the restored copy.
- When the restore completes, double-check that the virtual network adapter is disconnected. If necessary, reduce any resource allocation that might cause trouble for your environment (such as the startup RAM).
- Turn the restored virtual machine on. You may not be able to log on using a domain account due to the inability to contact a domain controller (oddly, if you wait a while, this condition might go away). I normally just log in using the local administrator account by entering .administrator and the local password:
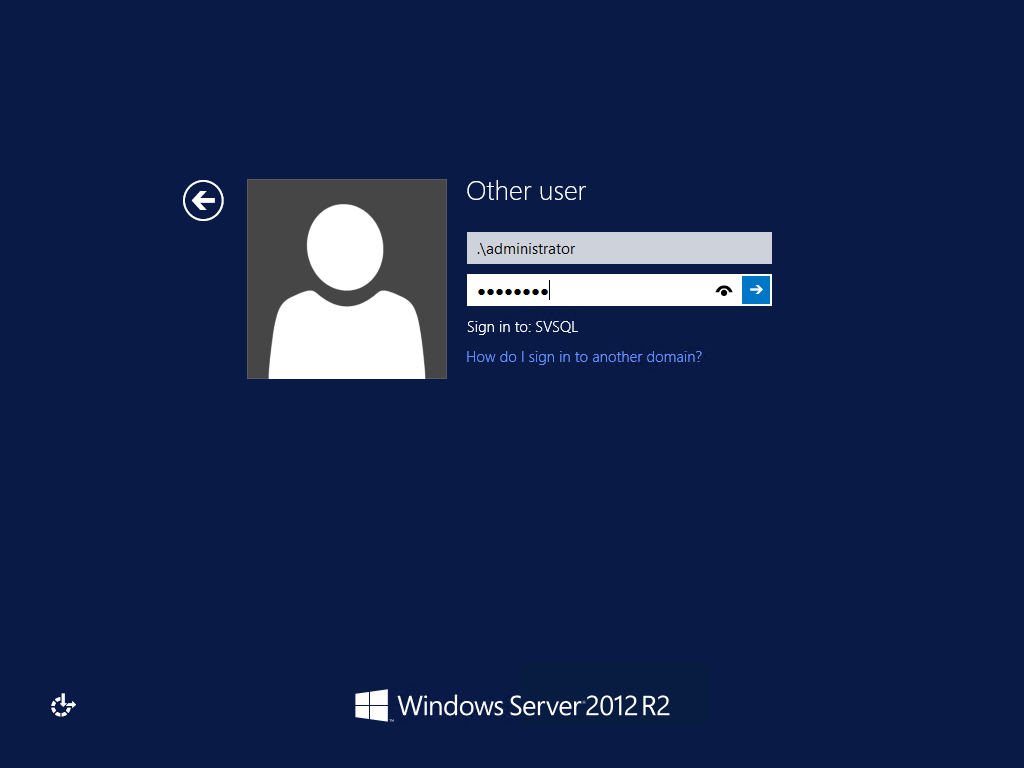
Local Admin
- Verify the item(s) that you identified in step 6.
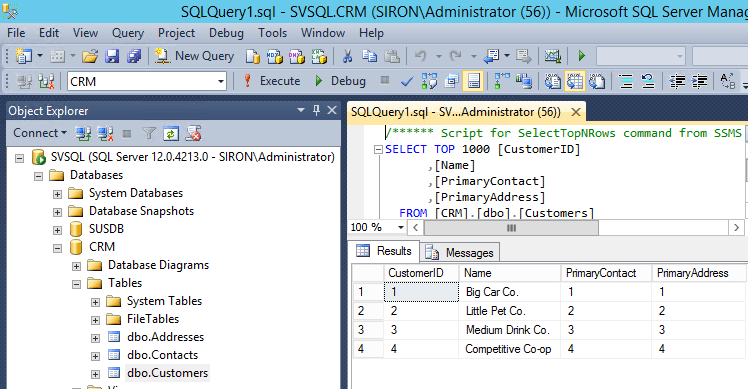
Data Verification
- Once you are satisfied that all is well, delete the cloned virtual machine. This is not something that you want hanging around.
Testing Restores of Interdependent Virtual Machines
The obvious problem with what I showed you is that if that SQL server were reliant on something else, or if another virtual machine were reliant on that SQL server, the test would not be very conclusive. One very common inter-dependency that you’ll need to verify is Active Directory integration. You want to be absolutely certain that any applications that depend upon domain services will be able to function after a disaster. The best way to do that is to restore both the application and a domain controller to verify that they can work together.
Fortunately, Hyper-V (and again, most any hypervisor) is very well-suited to dealing with that problem. There are three ways to leverage Hyper-V to enable the restored systems to communicate with each other without causing havoc to any live systems.
- Create a a private virtual switch to connect the restored virtual machines to
- Place the virtual machines into an unused VLAN
- If you are making use of hardware network virtualization (HNV), create a network
I would select from these options based on what you have available to you.
Using a Private Virtual Switch for Test Restores
This option is best for small shops that do not get involved with advanced networking. Create a private virtual switch on your host and name it “RestoreNet” or something similarly identifiable by sight. When you bring up virtual machines to test, connect them to this. You can include domain controllers in your test restore procedure, which will enable authentication for your test machines. Remember that private virtual switches are locked to the host on which they are created. You cannot migrate any virtual machines attached to them. If you need assistance with understanding this virtual switch type, please refer to our explanatory article.
As long as all of your restored virtual machines are connected to this switch, they’ll be able to communicate with each other but not with anything else. You will have safely and effectively used Hyper-V’s isolation to prevent them from causing any trouble for your production system.
Because private switches are very easy to set up and tear down, I leave it to you as to whether or not you want to leave it up at all times. It’s handy to have, and other administrators should recognize it and its purpose on sight. It won’t be doing anything when you’re not testing restores, so its resource consumption won’t be noticeable. But, if you want to maintain the cleanest possible environment, you can delete it between testing operations.
Using an Empty VLAN for Test Restores
The empty VLAN concept is very similar to that of the private virtual switch. It is more suited to environments making use of clustering and more advanced networking.
You could opt to use a VLAN ID that is not in use anywhere; that will be effectively the same as connecting to a private virtual switch. A better idea would be to integrate the VLAN into the rest of your network, but do not make it routable. This way, you can restore the virtual machines to different cluster nodes and they’ll still be able to communicate. They can even Live Migrate, if you have any need to do so.
This VLAN should become a permanent part of your infrastructure and be very carefully marked in documentation.
Using Hardware Network Virtualization for Test Restores
Using HNV in this situation is nothing more than applying the VLAN concept to HNV, which in many ways is the purpose of HNV anyway. It’s most appropriate in environments that are already using HNV instead of VLANs. Build a fully isolated network (or multiple networks, as applicable) just for the purpose of hosting restored virtual machines for testing purposes.
Environments large enough to use HNV often have spare equipment, so this could also give you the ability to use this process to test restoring to a fresh hardware environment as well. Such a procedure has value both for training and for working through complete disaster recovery scenarios.


Not a DOJO Member yet?
Join thousands of other IT pros and receive a weekly roundup email with the latest content & updates!
More in this category


About the Author

Eric Siron


3 thoughts on "Hyper-V Test Restores: Why and How To"
THX a lot for this great and easy to understand article!
I’m a novice to Hyper-V and Altaro Backup at all. Due to your guide I realized, that I didn’t ever made any ‘test restore’ of my (virtual and physical) machines. From now on I will follow your suggestion!
The first “isolated” restore is currently in progress…