Save to My DOJO
A little while back, we published an eBook detailing how to build an inexpensive Hyper-V cluster. At that price point, you’re not going to find anything that breaks performance records. Such a system could meet the needs of a small business, though. For those of you lucky enough to have a more substantial budget, it also works well as a cheap test lab. Whatever your usage, the out-of-box performance can be improved.
The steps in this article were written using the hardware in the previously linked eBook. If you have a Dell T20 that uses a different build, you may not have access to the same options. You may also need to look elsewhere for guidance on configuring additional hardware that I do not have.
A little upfront note: Never expect software or tweaks to match better hardware. If you expect a few switches and tips to turn a T20 into competition for a latest generation PowerEdge R-series, you will leave disappointed. I am always amazed by people that buy budget hardware and then get upset because it acts like budget hardware. If you need much better performance, break out your wallet and buy better hardware.
Step 1: Disable C-States
The number one thing you should always do on all systems to improve Hyper-V performance: disable C-States. You make that change in the system’s BIOS. The T20’s relevant entry appears below. Just clear the box.

I also recommend that you disable SpeedStep, although you probably won’t gain much by doing so.
Step 2: Update Drivers
I know, I know, updating drivers is the oldest of all so-called “performance enhancement” cliches. Bear with me, though. All of the hardware works just fine with Windows default drivers, but the drivers unlock some options that you’ll need.
Start at https://support.dell.com. You’ll be asked for the system’s service tag. At an elevated PowerShell prompt, enter gwmi win32_bios and look at the SerialNumber line:

Highlight and press [Enter] to copy it to the clipboard.
Select the Drivers and Downloads tab, then locate the Change OS link so that you can select the correct operating system. Dell periodically changes their support site, so you may something different, but these named options have been the same for a while:
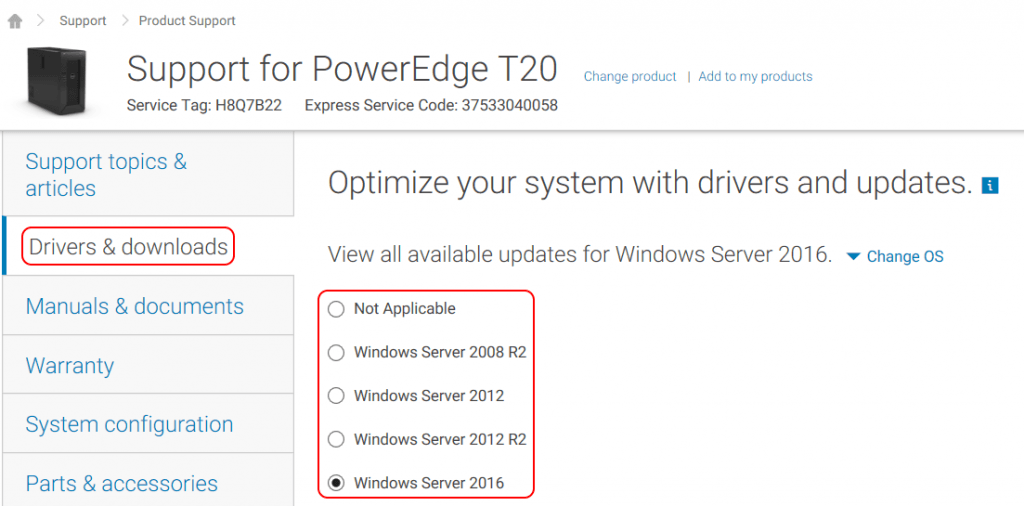
Items that you want:
- BIOS (reboots without asking; stop your VMs first)
- Chipset
- Intel(R) Management Engine Components Installer
- Intel Rapid Storage Technology Driver and Management Console
- Intel Rapid Storage Technology F6 Driver
After gathering those files, go to Intel’s support site: https://downloadcenter.intel.com/.
This site also changes regularly. What I did was search for the “I217-LM”. On its list of downloads, I found the Intel Ethernet Adapter Connections CD. That includes drivers for just about every Intel network adapter in existence. If you have the system build that I described in the eBook, this file will update the onboard adapter and the add-in PRO/1000 PTs (and any other Intel network adapters that you might have chosen).
If you’re targeting a GUI-less system, unblock the files. An example:
gci \storageserverfilelocation | Unblock-File
If you prefer the mouse, then you can use each item’s individual property dialog instead.
Also make sure that you use a GUI system to unzip the Intel CD prior to attempting to install on a GUI-less system.
I’m sure you can install drivers without my help. Do that and read on.
Step 3: Networking Performance Tweaks
Three things you want to do for networking:
- Enable jumbo frames for storage adapters
- Disable power management
- Disable VMQ on any team adapters
Enabling Jumbo Frames
First, make sure that jumbo frames are enabled on your physical switch. It’s always OK for a system to use smaller frames on equipment that has larger frames enabled. The other way around usually just causes excessive fragmentation. That hurts performance, but things still work. Sometimes, it causes Ethernet frames to never be delivered. Always configure your switch first. Many require a power cycle for the change to take effect.
Once jumbo frames are set on your switch, make the change on the T20’s physical adapters. You can make the change in the GUI or in PowerShell.
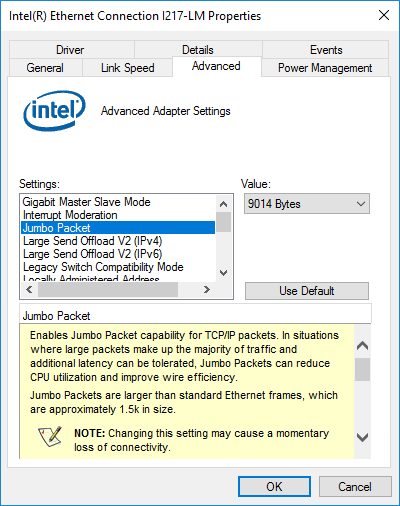
Enabling Jumbo Frames via the GUI
- In Network Connections, access an Intel adapter’s property sheet.
- Click the Configure button.
- Switch to the Advanced tab.
- Set Jumbo Packet to its highest number; usually 9014.
When you install the Intel network drivers and management pack, the I217-LM driver page will look like the following:
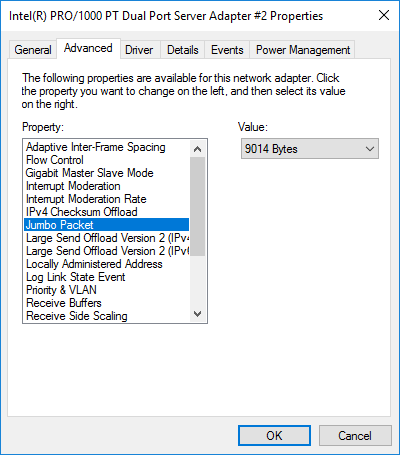
Intel adapters not under management will look like this:
Enabling Jumbo Frames in PowerShell
PowerShell makes this fast and simple:
Get-NetAdapter -Physical | Get-NetAdapterAdvancedProperty -DisplayName 'Jumbo Packet' | Set-NetAdapterAdvancedProperty -DisplayValue '9014 Bytes'
Disabling Network Adapter Power Management
Windows likes to turn off network adapters. Unfortunately, it doesn’t always do the best job ensuring that you’re not still using it. You can disable power management using the GUI or PowerShell.
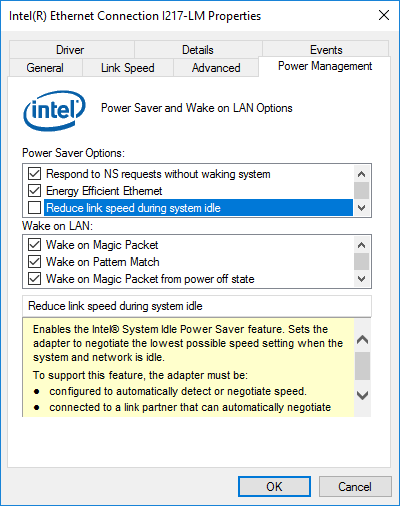
Disabling Network Adapter Power Management in the GUI
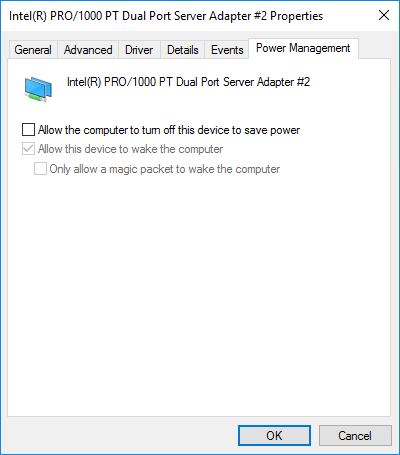
Navigate to the adapter’s properties like you did to enable jumbo frames. This time, go to the Power Management tab. For a device under the control of the Intel management system, just uncheck Reduce link speed during system idle.
For adapters using default drivers, uncheck Allow the computer to turn off this device to save power:
Disabling Network Adapter Power Management in PowerShell
The process is a bit more involved in PowerShell, but I’ve done the hard work for you. Just copy/paste into an elevated PowerShell prompt or run as a script:
$SleepEnableDevices = Get-WmiObject -Namespace rootwmi -Class 'MSPower_DeviceEnable'
Get-NetAdapter -Physical | foreach {
    Disable-NetAdapterPowerManagement -Name $_.Name
    $NICWMI = Get-WmiObject -Class Win32_NetworkAdapter -Filter "InterfaceIndex='$($_.InterfaceIndex)'"
    $WakeEnableDevice = $SleepEnableDevices | where InstanceName -Like "$($NICWMI.PNPDeviceID)*"
    $WakeEnableDevice.Enable = $false
    $OutNull = $WakeEnableDevice.Put()
}
Disable VMQ on Team Adapters
None of the adapters included with this system or in the eBook build support VMQ. That’s good because I don’t know of any manufacturers that properly implement VMQ on gigabit adapters. However, if you create a native Microsoft LBFO team, VMQ will be enabled on it. Whether or not it does anything… I don’t know. I do know that I seemed to clear up some strange issues when I disabled it on 2012. So, I’ve been doing it ever since. It’s quick and easy, so even if it doesn’t help, it certainly won’t hurt.
Note: If you are using the build from the eBook, only follow this section on the Hyper-V hosts. The storage server won’t use VMQ anyway.
Disabling VMQ on Team Adapters Using the GUI
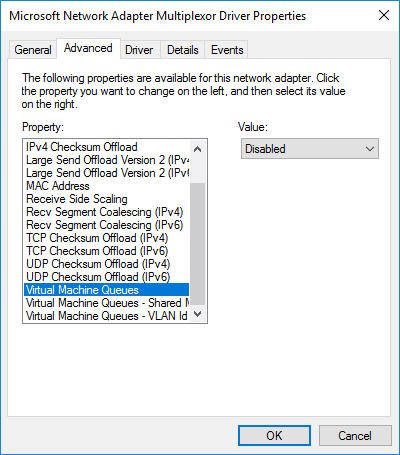
Find the team adapter in Network Connections. It should be quite obvious, since the icon shows two physical adapters. Its description field will say Microsoft Network Adapter Multiplexor Driver.

Open it up and get into its adapter configuration properties just as you did for the physical adapters above. Switch to the Advanced tab. Find the Virtual Machine Queues entry and set it to Disabled:
Disabling VMQ on Team Adapters in PowerShell
PowerShell can make short work of this task:
Get-NetLbfoTeamNic | Get-NetAdapterAdvancedProperty -RegistryKeyword '*VMQ' | Set-NetAdapterAdvancedProperty -RegistryValue 0
Step 4: Storage Performance Tweaks
The disks in these systems are slow. Nothing will change that. But, we can even out their transfer patterns a bit.
Changing the Disk Cache Mode for the Hyper-V Hosts
The Hyper-V hosts don’t do a great deal of disk I/O. In my personal configuration, I do place my domain controllers locally. However, for any domain these systems could reasonably handle, the domain controllers will perform very little I/O. We’ll enable the read cache on these systems. It will help, but you may not see much improvement due to their normal usage pattern.
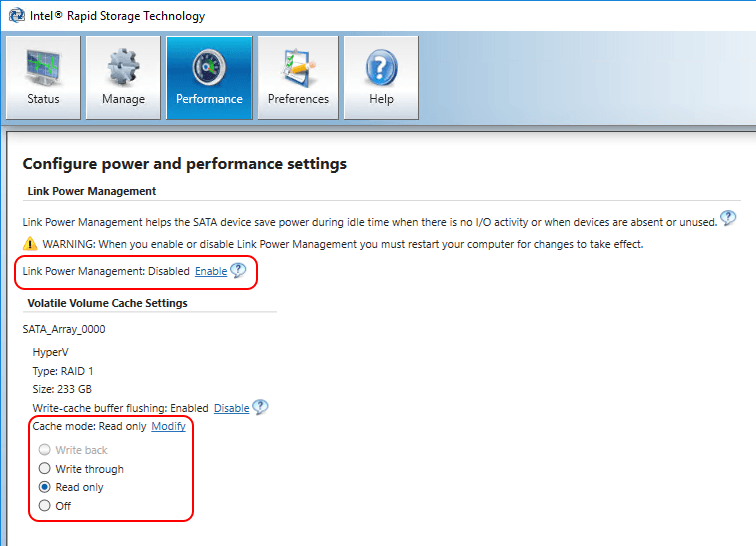
Note: I have not attempted any of this on a GUI-less system. If the graphical interface works, you’ll find its exe at: “C:Program FilesIntelIntel(R) Rapid Storage TechnologyIAStorUI.exe”.
Under the Intel Start menu entry, open Intel® Rapid Storage Technology. Switch to the Performance tab. You could disable the Link Power Management. Its not going to help much on the Hyper-V hosts. Change the Cache mode to Read only.
Changing the Disk Cache Mode for the Storage Host
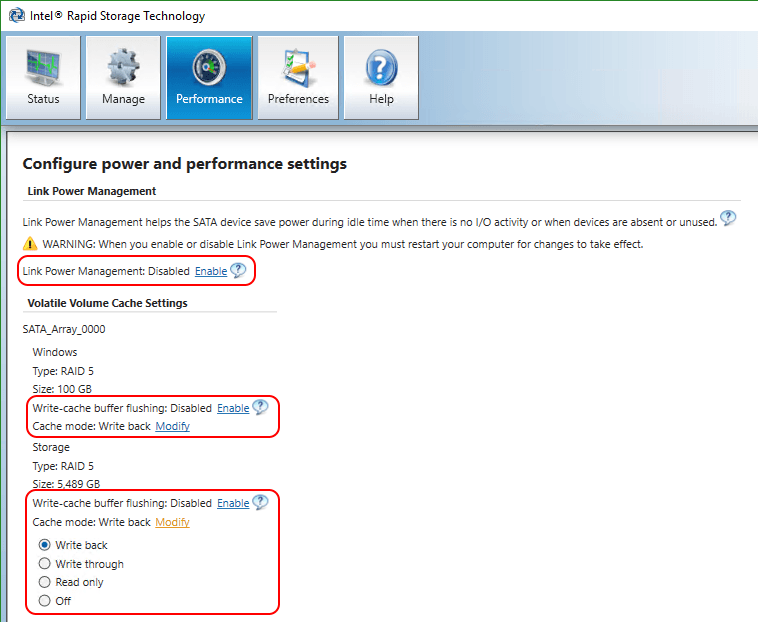
The storage server does most of the heavy lifting in this build. We can set some stronger caching policies that will help its performance.
Warning: These steps are safe only if you have a battery backup system that will safely shut down the system in the event of a power outage. As shipped, these systems do not have an internal battery backup for the RAID arrays. You can purchase add-on cards that provide that functionality. My system has one external battery that powers all three hosts. However, its USB interface connects only to the storage system. Do not follow these steps for your Hyper-V hosts unless you have a mechanism to gracefully shut them down in a power outage.
Follow the same steps to access the Intel® Rapid Storage Technology‘s Performance tab as you did on the Hyper-V hosts. This time, disable the power management option, enable write-cache buffer flushing, and set the cache mode to Write back:
Microsoft’s Tuning Guide
At this point, you’ve made the best improvements that you’re likely to get with this hardware. However, Microsoft publishes tuning guides that might give you a bit more.
Access the 2016 tuning guide: https://docs.microsoft.com/en-us/windows-server/administration/performance-tuning/role/hyper-v-server/index
The 2016 guide doesn’t contain very many instructions to follow; it contains a great deal of information. Aside from changing the power plan to High Performance, you won’t find much to do.
The 2012 R2 guide contains more activities: https://msdn.microsoft.com/en-us/library/windows/hardware/dn567657(v=vs.85).aspx. I do not know how many of these settings are still honored in 2016. I do know that any further changes that you make based on this guide involve trade-offs. For instance, you can disable the I/O balancer; that might speed up I/O for one VM that feels slow, but at the cost of allowing storage bottlenecks.
Test
After any performance change, test things out. You shouldn’t expect to see any Earth-shattering improvements. You definitely don’t want things to become worse. If any issues occur, retrace your steps and undo changes until performance returns — if it returns. It’s not uncommon for performance tweaking to uncover failing hardware. It’s best to carry out these changes soon after you spin up your new equipment for that reason.
Testing Jumbo Frames
Verify that jumbo frame works by pinging a target IP connected via physical switch using the following form:
ping 192.168.50.10 -l 8000 -f
If pings drop (but normal pings go through) or you receive a message that says, “Packet needs to be fragmented but DF set.”, then something along the way does not support jumbo frames.
The “8000” number doesn’t need to be exact, but it must be large enough to ensure that you are sending a jumbo Ethernet frame (somewhere in the 6000s and over). Due to variances in the way that “jumbo” can be calculated, the displayed “9014” will almost never work. Usually, Windows will send an unfragmented ping no larger than 8972 bytes.
Verify Settings After Driver Updates
Some driver updates return settings to defaults. You might lose jumbo frames and power management settings, for instance. It’s tempting to automate driver settings, but network setting changes cause network transmission interrupts. You’re better off performing manual verification.


Not a DOJO Member yet?
Join thousands of other IT pros and receive a weekly roundup email with the latest content & updates!
More in this category


About the Author

Eric Siron


9 thoughts on "How to Optimize Hyper-V Performance for Dell PowerEdge T20"
Hi,
New to HyperV.
Is there any need/possible to install/update any drivers for the HyperV Server? (bare HyperV Server 2019) If yes, what driver OS would I be installing, Windows Server 2019?
I usually install drivers, yes.
Use the corresponding Windows Server drivers where available.