Save to My DOJO
Table of contents
Anyone who has read much of my work on Hyper-V knows that I’m of the opinion that networking is one of the most complicated aspects of setting up Hyper-V, especially in a clustered environment. Part of it is that a lot of the concepts in Hyper-V networking lack a corollary in the physical realm so previous experience doesn’t carry forward very well. Another part of it is that Hyper-V is the first time that many administrators will see multiple network cards in the same physical unit that aren’t teamed together. One aspect that confuses a lot of people is the role of binding order for all those adapters in the parent partition. The contents of this post will apply to both Hyper-V R2 and 2012.
The Very Basics of Hyper-V Network Binding
If you want the very quick and dirty to answer to how to set the Hyper-V binding order, the answer is: don’t. Just leave it alone. Whatever problem you’re trying to solve, changing the binding order isn’t the solution. It’s fairly difficult to do under Hyper-V and Server Core anyway, so just avoid the hassle.
A full coverage of how Windows and the TCP/IP stack interoperate is very lengthy and there are an enormous number of technical details. The content that follows will simplify that as much as possible. In order to follow along, you’ll need to have a basic understanding of how subnets are used to determine whether or not traffic should be routed through a gateway.
Binding order only comes into play when Windows has no other guidance on how to route TCP/IP traffic. This occurs commonly when you have two NICs that are DHCP clients that are on the same subnet (local traffic) or have an automatic metric (routed traffic). If you’ve encountered a laptop that directs its requests across the wireless adapter even when plugged in to a much faster and more stable wired connection, then you know exactly what I mean. Changing the binding order so that the wired adapter takes precedence over the wireless adapter is the optimal solution in that case. What makes that the best solution is that it’s not ideal to manually override the settings on a DHCP connection. In the case of the laptop, that’s going to leave two adapters with the same metric and different gateways. Windows won’t have any tips from the TCP/IP configuration on which network is preferred, so it falls back to the binding order (note: if you read the Windows documentation, it indicates that the adapter with the higher speed is chosen before binding order is considered; in practice, either this does not happen or it considers all adapters beyond a certain speed to be equivalent). With your Hyper-V system, you want to use TCP/IP to instruct the parent partition how to work with network traffic. With that configured properly, the binding order will never come into consideration.
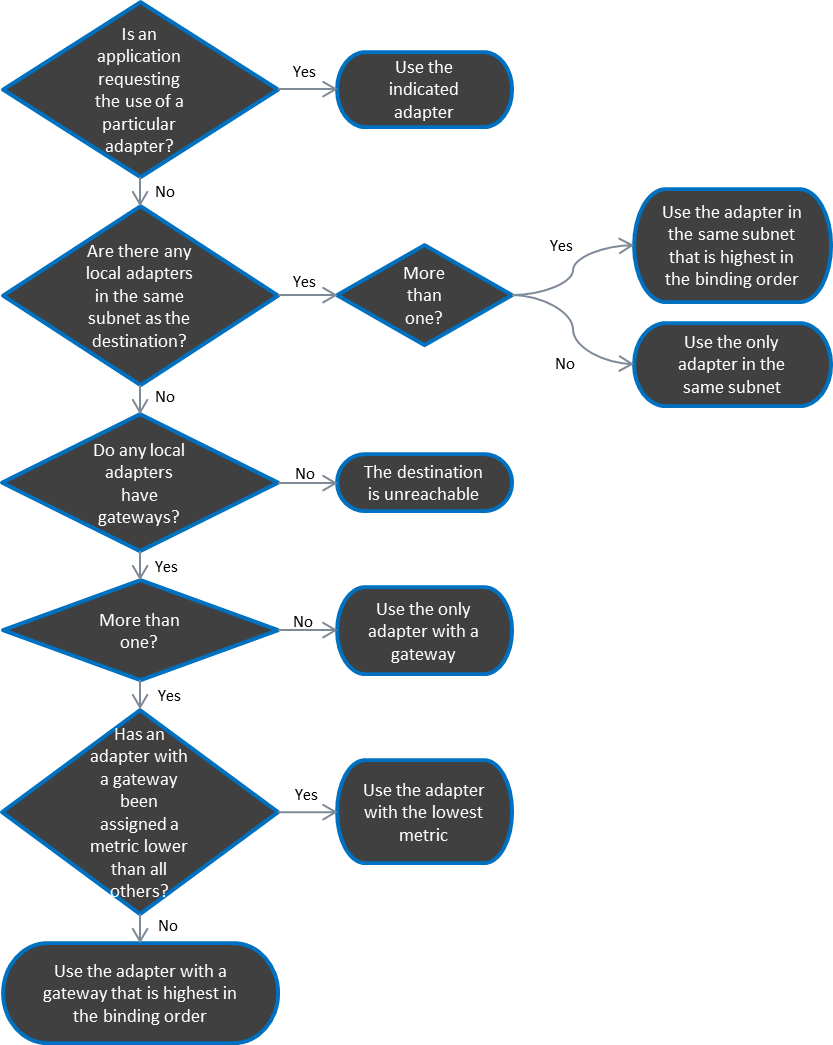
The following flowchart shows the methods that Windows uses to determine how to route traffic. The process starts with the top-left item (click for full size).
Applying to Hyper-V
Your parent partition in Hyper-V really only needs to communicate with the outside world using a single adapter. Normally, this is referred to as the “Management” adapter. Any other network cards in your host should be used solely for application-specific purposes for local traffic, so don’t assign any gateways to them. This instantly solves any questions involving what binding order to use. Furthermore, leaving gateways off of adapters intended for other purposes makes securing those roles much simpler. As an added precaution, manually set the metric on the management adapter. This way, if someone else decides to add a gateway to another adapter or if you come up with a special reason to need to route a particular type of traffic, the binding order still won’t be a consideration. To set the metric, first use IPCONFIG at a command prompt to find the name of the adapter in question, then use NETSH to set it:
NETSH INTERFACE IP SET INTERFACE "Local Area Connection 3" METRIC=1
Now the only way that your parent partition would be confused is if someone manually sets the metric to 1 on another adapter. If you are concerned about that, you can set the binding order to place your management adapter on top. Re-ordering any other adapters is generally a waste of time.
Virtual Networks/Switches
Hyper-V controls all traffic to and from its virtual machines, which means that the adapter to use will be application-controlled. Note in the flowchart that this will take precedence over any other determining factor. When you create a virtual network/switch on a physical adapter, that adapter is unbound from TCP/IP and is no longer considered at all in the binding order. Some administrators will set the option to “Allow management operating system to share this network adapter”. Unless you just can’t afford to put an additional network card in, don’t do that. If you must share the adapter, understand that it is still going to be unbound from TCP/IP and a virtual adapter will be created to be used as the shared function. Assign any TCP/IP settings to that.
iSCSI Traffic
You should do everything in your power to avoid routing iSCSI traffic. Routing it introduces performance problems and exposes you to security risks. Among other things, utilizing a router could potentially cause your jumbo frames to fragment or drop on a device that doesn’t have jumbo frames enabled or doesn’t even support gigabit. Remember that even if your iSCSI devices are connected to the same physical switch, if they aren’t on the same subnet, 100% of their packets are going to go through a router somewhere.
iSCSI traffic is controlled by the iSCSI service in Windows, which gives you two options to control which networks it uses, neither of which relies on binding order. The first and best way is to have your iSCSI NICs and your iSCSI targets all exist in the same subnet. Everything will take care of itself in that instance. The second method is to manually instruct the iSCSI service what networks to use. In 2012 there are new PowerShell commands for this and in either version you can use “iscsicli.exe”; I would only select these tools for scripting scenarios. Instead, use “ISCSICPL.EXE” (it has an icon in Control Panel if you are running Hyper-V as part of a GUI installation of Windows). A full discussion of setting up iSCSI targets needs a post of its own; the quick version is that you can manually designate the local adapter and initiator IP addresses when setting up your targets and/or sessions.
Multiple iSCSI NICs
If you have multiple adapters for iSCSI, you need to enable and configure MPIO (on your iSCSI target as well). Otherwise, binding order could come into play when Windows is trying to decide which adapter to use for iSCSI traffic and you haven’t specifically designated one. That, however, is a secondary concern. Without MPIO enabled, your iSCSI traffic will just head down the highest-bound functioning NIC on the correct subnet and any others will sit idle.
iSCSI Networks in a Failover Cluster
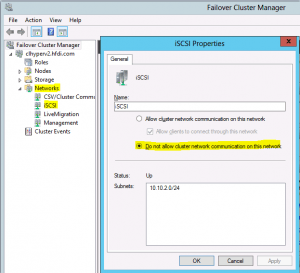
iSCSI networks are not a cluster-controlled resource, but Failover Cluster Manager will automatically try to claim them anyway. You need to manually exclude your iSCSI networks from cluster communications or you could suffer a performance hit. The process is the same on either version of Hyper-V:
- In Failover Cluster Manager, expand the cluster name and then click on or expand “Networks”.
- Under the Networks node on the left or in the center pane, right-click on the network that contains the iSCSI network. If you’re not sure, you can highlight each network on the left or double-click one on the right. In the center pane, click the + sign next to any network card shown. It will display the IP address for that adapter. You can also see the network in the Properties sheet for any network.
- Right-click on the network you want to change and click Properties. Change the setting to “Do not allow cluster network communication on this network.”
Shared Nothing LiveMigration Network (2012 only)
In a “Shared Nothing” environment without a cluster, you can use Hyper-V Manager or PowerShell to manipulate the LiveMigration network settings. While this process is very simple, there are a number of steps to take to enable Shared Nothing LiveMigration so it is advised that you read all the steps on the related TechNet page. If you have a designated LiveMigration adapter and it needs a gateway address in order to function, rely on metric, not binding order, to solve the issue. As long as you set the metric on the management adapter to 1, you can leave the LiveMigration network at automatic and everything will work out. If you like, feel free to manually set a metric on the LiveMigration adapter that is higher than 1.
Failover Cluster Traffic
When you create a cluster in Failover Cluster Manager, it locates all the NICs on each host that share subnets with NICs on the other host(s) and tries to automatically build cluster networks out of them. If you don’t tell it otherwise, it will automatically decide which networks to use for which purposes. Just as Hyper-V does with virtual machine traffic, the Failover Cluster role will determine which adapters will be used for its purposes and again, binding order will be ignored. You can override the default preferences and the following sections will show you how, but be aware that the Failover Clustering role might still decide to use a different network in some situations, such as loss of connectivity on the preferred network. The only technical reason to override the default behavior is if you are using teamed adapters for some functions but not others. That said, many administrators, including myself, override the default behavior because we like to use neat, orderly labels on our networks and we want the system to honor our wishes.
LiveMigration
This traffic can be manually set using Failover Cluster Manager. The UI in 2008 R2 is a little clumsy but was made more sensible in Failover Cluster Manager 2012.
For Failover Cluster Manager for 2008 R2:
- In the left pane, expand your cluster name and then expand “Service and applications”.
- Left-click on any virtual machine to highlight it.
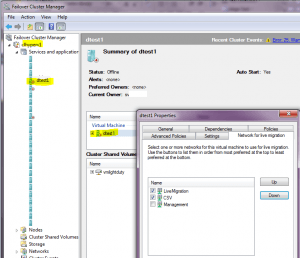
- In the center pane, right-click on the object under “Virtual Machine” and choose Properties.
- On the “Network for live migration tab”, set the networks as desired. The order they are presented in determines the preference your deployment with have for the network. If a network’s box is cleared, it won’t be used at all. This setting will apply to all virtual machines, not just the one you selected.
For Failover Cluster Manager for 2012: In Failover Cluster Manager, right-click on “Networks” in the left pane and choose “Live Migration Settings”. The screens involved look almost identical to the screen shot above for 2008 R2. The only real difference is how you get there.
Cluster Communications (Heartbeat) and CSV
With all the above configurations in place, the leftover network will be used for CSV and cluster communications traffic. If you want to manually set this one as well, PowerShell is where you need to be. In 2008 R2, you have to load the module each time you want to use the cmdlets. For 2012, you have to enable a feature once.
2008 R2 (each time):
Import-Module FailoverClusters
2012 (once):
DISM /ONLINE /ENABLE-FEATURE /FEATURENAME:FailoverCluster-PowerShell
After that, the commands are the same for both versions. Start by seeing how they are currently configured:
Get-ClusterNetwork | ft Name,AutoMetric,Metric,Role
The “AutoMetric” column indicates if the metric has been overriden or not. If you manually override, this will automatically change to “False”. For both versions, the number in the “Role” column works the same: “0” for networks that are excluded from the cluster, “1” for networks that are allowed for cluster use but disallowed for client use, and “3” for networks that can pass either type. The “Metric” column numbering will differ based on your version. For auto assignments in 2008 R2, four-digit numbers are assigned for a networks that have a role of “1”, starting at 1000 and increasing by 100 for each subsequent network; role “0” and “3” networks are lumped together and start at 10000, although the cluster will only actually use “3” networks. In 2012, role “1” networks start at 30384 and count upward by 1; role “0” and “3” networks start at 70384 and count upward by 1. The role “1” network with the lowest metric is used for CSV/cluster traffic and the next highest is used for LiveMigration. If there are additional role “1” networks, they will be used as backups for either traffic type as necessary. For role “3” networks, all are used for management traffic with the lowest taking precedence.
To override your CSV/cluster traffic, use the following command; you can use any number you like, it just needs to be the lowest in role “1”:
(Get-ClusterNetwork "Cluster Network 2").Metric = 900
Note that if you used the directions in the previous section to set the network for LiveMigration, those settings override anything here in terms of LiveMigration traffic. The instructions in this section are best used for setting CSV/cluster traffic and nothing else. If the autometric already placed that network below the LiveMigration network, it is best to just leave it alone.


Not a DOJO Member yet?
Join thousands of other IT pros and receive a weekly roundup email with the latest content & updates!


3 thoughts on "Hyper-V Network Binding Order"
[…] So, I’ve put together a comprehensive blog post that covers the issue. You can read it on the Altaro blog. It is applicable to both Hyper-V R2 and 2012. Share […]