The bulk of Hyper-V Manager’s functionality is geared toward working with virtual machines. This article will take you through the related actions. They encompass several day-to-day chores as well as initial build and configuration procedures. What it won’t cover is changing settings on existing virtual machines; that will be the subject of the next article in the series.
From a few of the other articles in our blog’s Hyper-V Fundamentals section you should already have Hyper-V Manager installed and connected to a host. If not, revisit those before proceeding with this article. You will need to at least be connected to a host before you can use the following information.
How to Create a Virtual Machine
The best place to start is by creating a virtual machine.
- In the left pane, click to select the host that you want to create the virtual machine on.
- On the host’s context menu (which can be found by right-clicking the host or in the Actions pane at the far right of the screen), click New, then click Virtual Machine…
- The New Virtual Machine wizard will appear with an introductory screen that briefly explains the purpose of the wizard. If you don’t want to see this introductory screen again, you can select the Do not show this page again checkbox. Click Next to proceed.
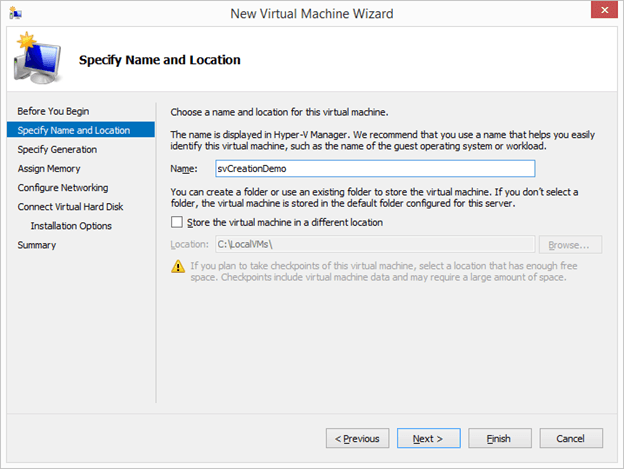
- On the Specify Name and Location page, you first need to specify the name of the virtual machine. Remember that, at this level, a virtual machine is just a container. The name that you use here will have no meaning except to Hyper-V. It will appear in the list of virtual machines and you can use it with PowerShell commands, but it won’t be used anywhere else. The guest operating system, once installed, will not automatically use this as its computer name.
Think of it as the virtual equivalent of placing an identifying sticker on a physical machine.
After selecting a name, you have the option to change where the virtual machine’s files are placed. This applies to all files that make up the virtual machine except its virtual hard disk files. Those are selected on a later screen. By default, the location is not selectable and is already targeted to the host’s default virtual machine storage location (you chose this in the previous article on Virtual Machine actions in Hyper-V Manager).
If you’d like to override it, check the Store the virtual machine in a different location box. You can then type or browse to the location where the virtual machine will be stored. Be aware that the wizard will place the files in a “Virtual Machines” subfolder of the selected location and that it will further create a subfolder named with the virtual machine’s automatically-created unique identifier.
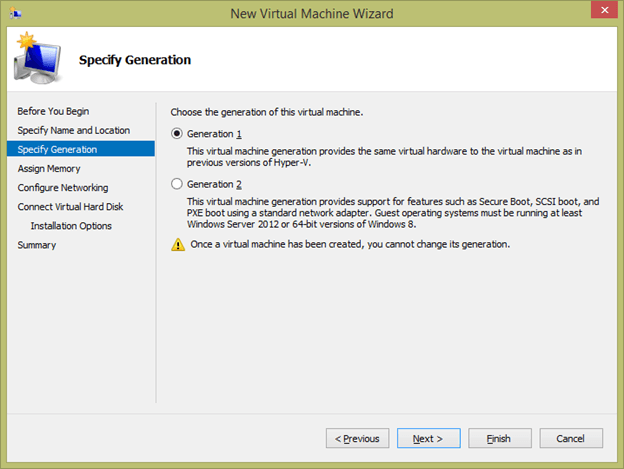
- The next screen is the Specify Generation page. This allows you choose between the original virtual machine style that emulates a traditional BIOS or the second generation virtual machine that uses UEFI (Unified Extensible Firmware Interface). UEFI VM’s can only run UEFI-compatible guest operating systems (Windows 8/Windows Server 2012 or later), do not allow the use of virtual IDE devices, and grant access to Secure Boot for Windows guest operating systems that support it. They also start a little bit faster than generation 1 virtual machines. This is a permanent selection, so if you’re not certain, choose Generation 1. Utilities do exist that can convert from Generation 1 to Generation 2, but they are not supported nor are their outcomes reliable.
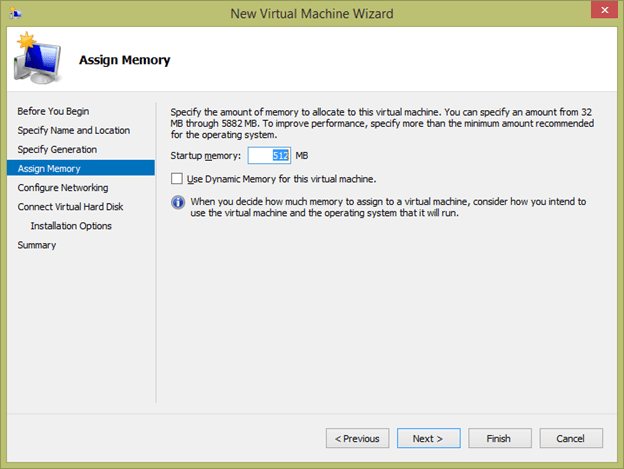
- Next, you’ll be taken to the Assign Memory screen. While Hyper-V has many memory configuration options, this screen only presents two of them. First, choose how much memory the guest will have available at the moment that it starts. The default is 512MB, which is acceptable for most modern operating systems. However, Windows Server 2012 and later have been known to throw cryptic installation errors if there is less than 1 GB of memory assigned.
The second option is to Use Dynamic Memory for this virtual machine. If you select this, then the virtual machine will be allowed to dynamically allocate up to the host’s maximum available memory or 1 terabyte, whichever is lower. These settings can be changed later, but it’s a good idea to use a value for the startup memory that is reasonable for the guest’s running purposes and to leave Dynamic Memory disabled until such time as you can fine tune its allocation.
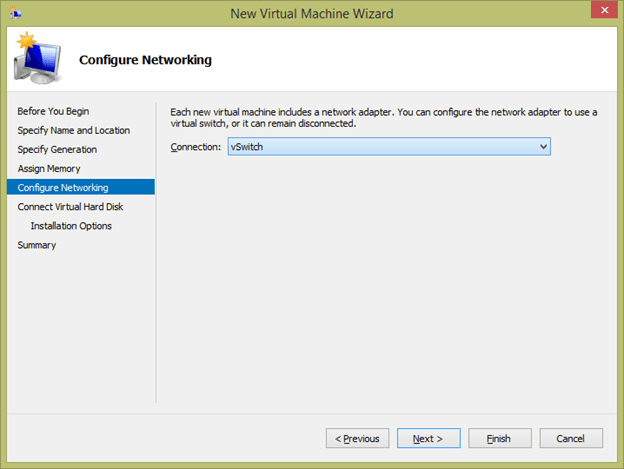
- After setting the initial memory configuration, the next screen is Configure Networking. As the text indicates, a single virtual network adapter will be automatically created. While it’s not explained here, this is a “synthetic” adapter, which means that it is the higher-performing of Hyper-V’s two virtual adapter types. The only loss is that it won’t be available for generation 1 virtual machine to PXE boot with. The only option you have here is to connect it to a virtual switch.
-
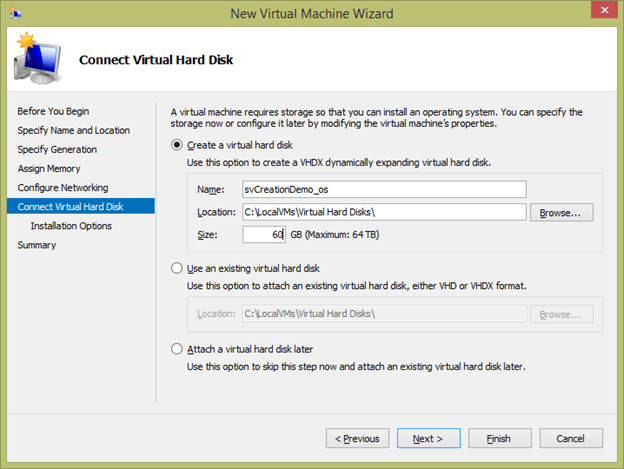
The Connect Virtual Hard Disk screen is up next, and it has a lot of options. You can only assign a maximum of one virtual hard disk while creating a virtual machine, but you can create and attach more at any time afterward. There are three general choices here:
- Create a virtual hard disk. The first option is the most common choice, and it creates a completely new virtual hard disk file. Start by giving it a name. The wizard defaults to the same name as the virtual machine, but you’re free to override it. Be aware that you cannot override to the old .vhd style.
After the name, specify the location of the virtual hard disk. The wizard will suggest the host’s default location (which, again, you would’ve set as per the previous article). Unlike the virtual machine files, no special subfolders will be created for the virtual hard disk; if you want it to be in a particular folder, you must create it manually.
The final option is the maximum size of the virtual hard disk file. This will be a dynamically expanding disk, so the file will start at a minimum size and grow as necessary, up to the maximum that you specify here.
- Use an existing virtual hard disk. If you want to use a virtual hard disk file that’s already created, type or browse to the full path of the file. Unlike the creation option, you can select the old VHD style file.
- Attach a virtual hard disk later. Selecting this option leaves the virtual machine without any virtual hard disks at all.
-
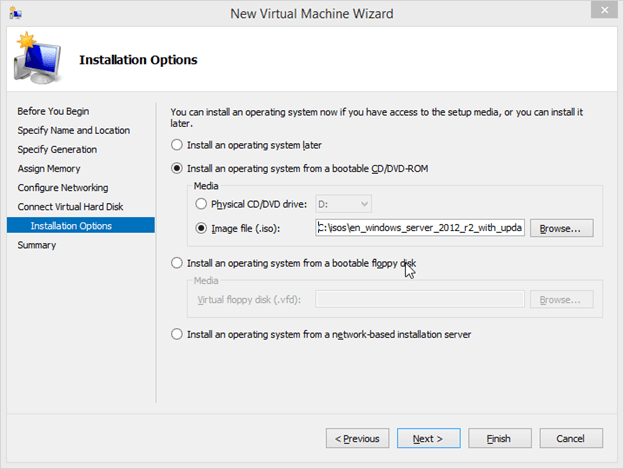
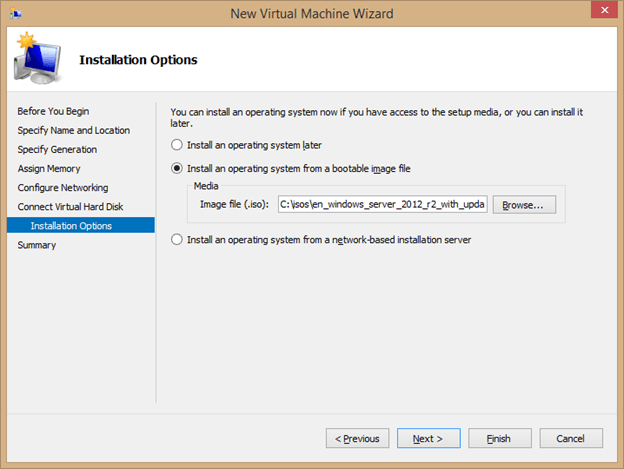
If you chose to create a new virtual hard disk, the next screen will be the Installation Options page. This suggests that the wizard will be involved in installing an operating system in the guest, but that doesn’t actually happen. The option that you select here simply attaches media as you indicate and sets the virtual machine’s initial boot order. The screen that you see depends on whether or not you selected a Generation 1 or 2 virtual machine.
-
Generation 1 options:
- Install an operating system later. This essentially does nothing.
- Install an operating system from a bootable CD/DVD-ROM. Selecting this gives you two sub-options. The first is to use physical media. Be aware that this is always from the perspective of the Hyper-V host. If you’re connected remotely, you can’t use the optical media on your management machine. The second option is to pick a bootable .ISO image. As with the physical drive, this is from the perspective of the Hyper-V host. You are allowed to point it to network shares, but it will only work if the Hyper-V host is in a domain and the sharing computer has been configured for delegation of CIFS in Active Directory (see the discussion on constrained delegation in section 3.2).
- Install an operating system from a bootable floppy disk. If your guest operating system or its boot loader is stored on a virtual floppy disk (VFD) file, you can browse to it and attach it here. As with the CD/DVD-ROM options, this selection process is local to the Hyper-V host, not any remote computer.
- Install an operating system from a network-based installation server. This option configures the guest for PXE boot by creating an “emulated” virtual adapter alongside the synthetic adapter and connecting it to the same virtual switch.
-
-
Generation 2 options:
- Install an operating system later. This essentially does nothing.
- Install an operating system from a bootable image file. You can type or browse to the full path of a bootable ISO. All the rules covered for the Generation 1’s bootable ISO in the preceding text apply.
- Install an operating system from a network-based installation server. This option configures the guest for PXE boot. Unlike the same option for a Generation 1 virtual machine, a second virtual adapter is not created. Generation 2 virtual machines can PXE boot from the synthetic adapter.
- The process ends on the Summary screen. This is an opportunity for you to review the options that you selected and go back to correct them if necessary. Click Finish if you’re satisfied. If there are no problems with your selections, a progress bar will be displayed as your virtual machine is created.
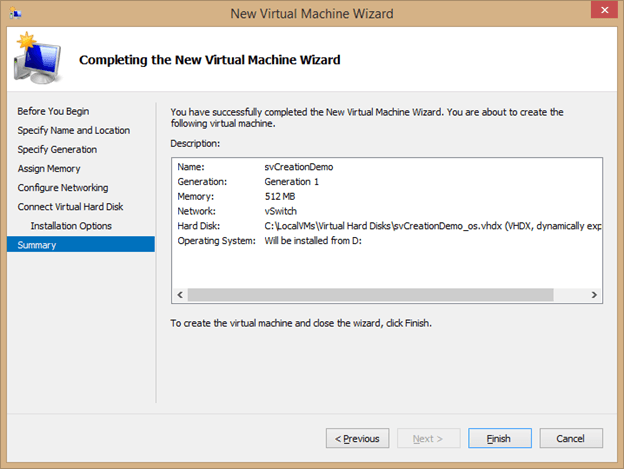
At this point, the virtual machine is created and should be visible in the center pane of the Hyper-V Manager screen. The wizard leaves the virtual machine in the Off state, which gives you an opportunity to change any settings that weren’t configurable during creation prior to starting the new VM. You access those settings through the virtual machine’s context menu. (More on that in the article that follows).
How to Manipulate Virtual Machines in Hyper-V Manager
Now that you have a virtual machine, the next order of business is to learn how to work with it. As with the host, this is done through its context menu. This menu is “dynamic”, which means that its contents will change depending upon the status of the virtual machine. Also like the host’s context menu, there are two places to access it. Begin by highlighting a virtual machine in Hyper-V Manager’s central pane. You can then right-click it to access its context menu, or you can look to the right pane of Hyper-V Manager where the same options will be displayed in the Actions panel:
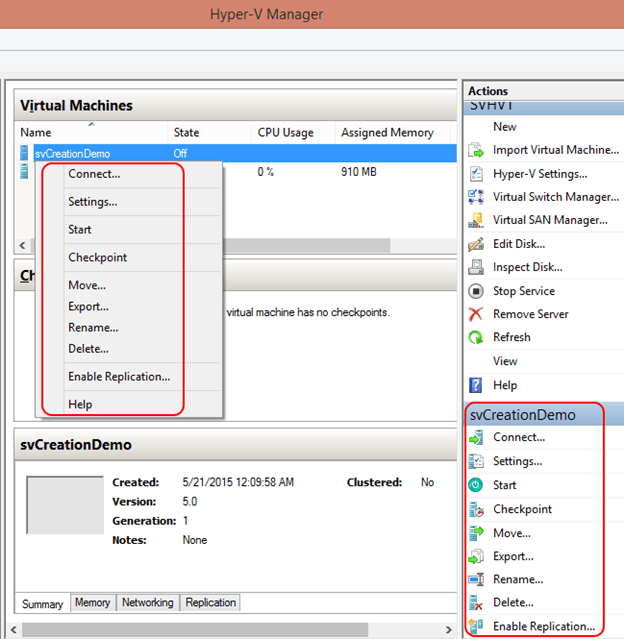
These are the available options for a virtual machine that’s turned off. Most of the options that vary are in the power control section. In the screenshot, that lists Start as the only option. If the virtual machine is powered on, Start is replaced with Turn Off, Shut Down, and Save and an additional section with options to Pause or Reset the virtual machine is added. If Hyper-V can no longer find the backing files for a virtual machine, most of these options disappear.
To make this section as simple as possible, the possible menu items will be discussed in simple alphabetical order. This will make them easier to reference later and reduce any confusion over when they appear. There is one exception: the Replication options. I’ve covered those in an article later in this series.
Cancel Exporting
This option appears when an export of the virtual machine is in progress. It will stop the export and, if the export was done while the virtual machine was online, will merge the automatically-created differencing disk(s) back into the active virtual machine disk(s). Files that were created or in the process of being created for the export are deleted. The folder that was created for the export is not deleted.
Checkpoint
The Checkpoint item does exactly that: it creates a checkpoint of the virtual machine. This feature will be covered in the next article on virtual machine operations.
Connect
Clicking the Connect option opens the vmconnect.exe application and targets it to the selected virtual machine. This is the equivalent of using a local monitor, keyboard, and mouse on a physical machine.
If the host has Enhanced Session Mode enabled and the virtual machine is running a compatible operating system (Windows 8.1 or later or Windows Server 2012 R2 or later), then you’ll first be asked to select a number of options related to your connection experience. By default, it will only ask you about the resolution to use for the connection. If you click the Show Options button at the bottom left of the small Connect to
virtual machine dialog, it will expand to show another tab and more options:
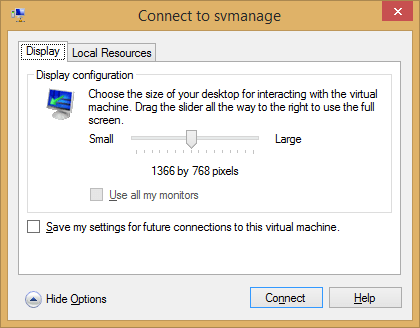
In addition to the resolution slider, a checkbox appears to allow you to save the configuration. If you select this option, another option will appear on the virtual machine’s context menu titled Edit Session Settings option that will be discussed in the relevant section. If you save the settings, be aware that they are local to the computer that you are using and apply only to your user account.
Switching to the Local Resources tab presents the following screen:
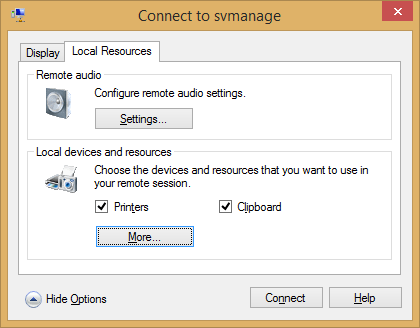
If you use the Remote Desktop Connection screen often, the contents of this tab should like quite familiar. Not all of these options will be discussed in this article as they are fairly self-explanatory. The settings do only apply to the specific virtual machine that you’re connecting to and are only retained if you select the option on the first tab to Save my settings for future connections to this virtual machine.
Delete
If a virtual machine is turned off, it can be deleted. The exact nature of this function can be somewhat confusing. The files that define the virtual machine are deleted. That does not include any of its virtual disks, nor does it include any of the folders that the virtual machine resides in. This option cannot be undone. It is possible to recreate the operating environment of the guest by attaching its virtual disks to a new virtual machine, but the unique identifiers of the original are lost.
Export
Exporting a virtual machine effectively makes a copy of it. This is commonly done for the purposes of relocating it to another host when other means aren’t viable or to clone a base image.
Upon clicking Export, you’re given a small dialog where you can type the location where you want the export to be saved. You can also click Browse to find the location:
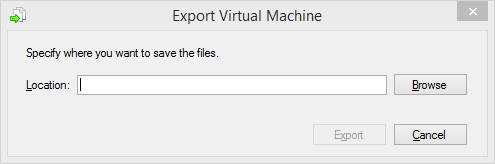
As with most Hyper-V Manager dialogs, the export is performed from the perspective of the Hyper-V host, so performing the export remotely will show the directory structure of the host. When you click Export, a folder will be created in the specified location with the virtual machine’s name and the exported files will be placed there.
Help
The Help option opens up the Microsoft Management Console (MMC) help interface. There is some basic information on MMC itself and some for Hyper-V Manager, including troubleshooting non-functional host connections.
Move
The Move option initiates a wizard that will allow you to relocate a virtual machine to another host and/or another location. The uses for this feature will be discussed in a later article, but the wizard will be covered in the following steps:
- The first screen of the move wizard is simply informational. Read it and click Next.
- The next screen asks you to select the type of move that you wish to perform. The first option relocates the virtual machine to another host entirely. The second only moves the storage for the virtual machine to a location reachable by the current host. Both methods leave the virtual machine online and do not interrupt normal operations.
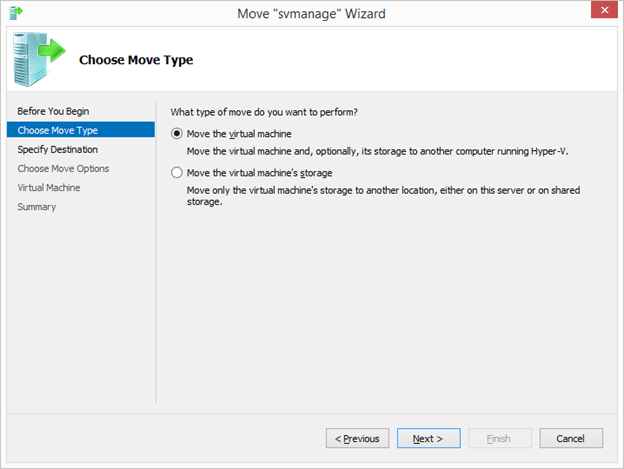
The remaining options vary greatly depending upon which of these options you choose, so the wizard will be covered in two separate sections.
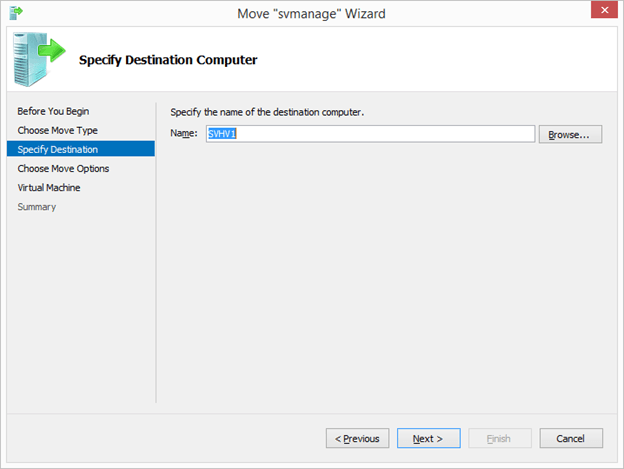
How to Use the Move Wizard to Change a Virtual Machine’s Host
Moving an unclustered virtual machine between hosts using Hyper-V Manager is called “Shared Nothing Live Migration”. Selecting the option to Move the virtual machine in the Move wizard initiates this procedure. Be aware that both the machines must be members of the same domain. If you are not directly connected to the source machine and you did not configure Live Migration for CredSSP, you must have configured constrained delegation.
Follow these steps to carry out the migration:
- After you’ve chosen to move the virtual machine to a new host, you’ll first be asked to select the destination computer. You can type it freely or use the Browse button to locate it:
- The next screen asks how you wish to place the virtual machine’s files on the destination host:

- The first option, Move the virtual machine’s data to a single location, will move the virtual machine’s definition files to one location with all of the virtual machine’s VHD(X) files being placed in a Virtual Hard Disks subfolder. Upon clicking Next, you’ll be prompted to type or browse to the location for the virtual machine’s files. This will be from the perspective of the Hyper-V host, even if you are connected remotely.
-
The second option, Move the virtual machine’s data by selecting where to move the items causes the wizard to prompt you for the location of the virtual hard disks individually. Despite the wording, you are not asked where to place the virtual machine’s definition files. Those are placed in the destination host’s default location. Clicking Next on this screen takes you to a special series of screens applicable only to this option. The screen immediately following has three options for file placement:
- Move the virtual machine’s data automatically: this option attempts to use the same folder structure on the destination host as was in use on the source host.
- Move the virtual machine’s virtual hard disks to different locations: if you choose this option, you’ll be taken through a series of screens that first ask you which virtual hard disk files you want to override and then where you want them to be placed. You cannot choose the location of the configuration files with this option.
- Move the virtual machine’s items to different locations: this option is very similar to the second option, except that you are allowed to choose a destination for each and every component of the virtual machine. You’ll first be presented with a list of the items; check the ones you wish to override. You’ll then be shown a series of screens which will guide you through selecting the location of each particular item.

- The final Move option, Move only the virtual machine, is used when you only want to change the owner of the virtual machine but move none of its files. In order for this to work, all of the virtual machine’s files must already be in a location accessible by both the source host and the destination host.
- After all these screens, you’ll be presented with a summary page. If you selected multiple target locations, this is an opportunity to double-check them. Click Finish if you are satisfied.
How to Use the Move Wizard to Change the Location of a Virtual Machine’s Files
Moving a virtual machine’s files while it is online is called a “Storage Live Migration”. This is done in Hyper-V Manager by choosing the option to Move the virtual machine’s storage in the Move wizard. The screens are very similar to those presented for moving between hosts in the preceding sections, but the wording used is different in many places. The related screens are as follows:
-
Immediately after choosing to move the virtual machine’s files, you’re taken to a screen with three options:
- Move all of the virtual machine’s data to a single location: after selecting this option, you will be prompted for the new location for the virtual machine. All of its files will be moved to that location with the VHD(X) being placed in a Virtual Hard Disks subfolder.
- Move the virtual machine’s data to different locations: this option allows you to select the new location for each individual component. You’ll first be presented with a list of checkboxes, one for each component. For each item that you check, you’ll then be taken through a series of screens where you can select the location for that item to be moved to. Unchecked items will not be moved.
- Move only the virtual machine’s hard disks: this item is nearly identical to the preceding option except that you will only be given the option to move the VHD(X) files.
- After making your selection and providing the necessary location(s), you’ll be taken to a summary screen. Review your settings. Click Finish to start the file move.
Pause
When a virtual machine is paused, its I/O, memory, and CPU operations are all placed in a suspended state, but they continue to be maintained by Hyper-V. This is a somewhat fragile state; if the host loses power, it will be as if the guest lost power as well. This is rarely used by human operators, but Hyper-V will employ it under certain circumstances. (More on that later.)
Rename
Renaming a virtual machine changes the name that’s displayed in Hyper-V Manager. It does not change the name of the operating environment inside the virtual machine, nor does it change any of the virtual machine’s files. If you’d like to perform these tasks, a host/guest synchronization PowerShell script is provided in this article.
Resume
Resume reverts a Paused state, if possible. Hyper-V will not resume a virtual machine if its storage location does not contain enough space.
Save
Saving a virtual machine places it into a condition defined as Saved State. The operations of the virtual machine are paused. The contents of its memory are written to a special file with a BIN extension. The condition of the virtual machine’s hardware is saved in a file with a VSV extension.
Once the save operation completes, the virtual machine is taken offline. The created files can be found in a subfolder of the virtual machine’s primary storage location and will have the same name as the virtual machine’s identifier. The most important thing to know about Saved State is that it is safe to perform external operations, such as host reboots. The virtual machine will be not be harmed as long as its files are intact.
Settings
The Settings menu option opens up the Settings dialog for the selected virtual machine. These options will be explored in the next article.
Start
As its name implies, the Start command starts a virtual machine. This option will be available when the virtual machine is in an off or saved state.
Shut Down
If the virtual machine is turned on and integration services are installed, the Shut Down option will instruct the guest operating system to perform an orderly shutdown.
Turn Off
The Turn Off option is the virtual equivalent of removing power to a physical computer. The guest is not warned and no preparatory actions are taken. You’ll typically only want to use this as an option of last resort for virtual machines that are hung up.
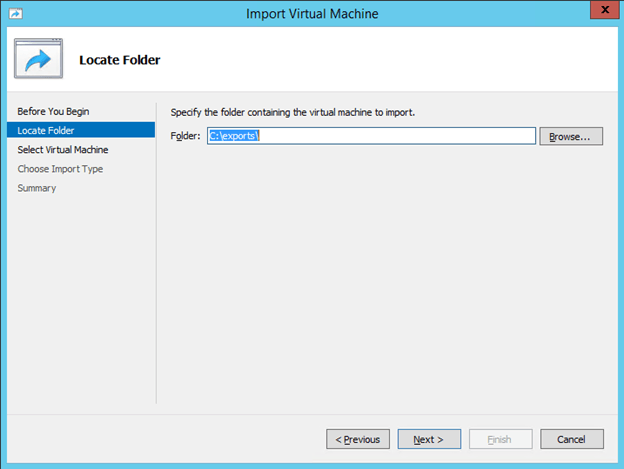
How to Import a Virtual Machine
The option to import a virtual machine is part of the context menu for the host. This function reads in virtual machine files, usually those that have been exported from another host, and adds them to its own list of registered virtual machines. While its name is a mirrored match for the export function, it is not necessary to export a virtual machine prior to importing it. All that is required is the XML descriptor file for the virtual machine to be imported.
To import a virtual machine:
- Begin by selecting Import Virtual Machine from the context menu of the host that will receive the imported virtual machine. This will open the Import Virtual Machine wizard. The first screen is informational. When you’re ready, click Next.
- The next page is the Locate Folder screen. You can type or use the Browse button to select the folder where the virtual machine’s files are. You can pick the folder that contains the XML file or a folder one level above; the import tool looks for that XML file or a “Virtual Machines” folder that contains one. Click Next when you’ve made your selection.
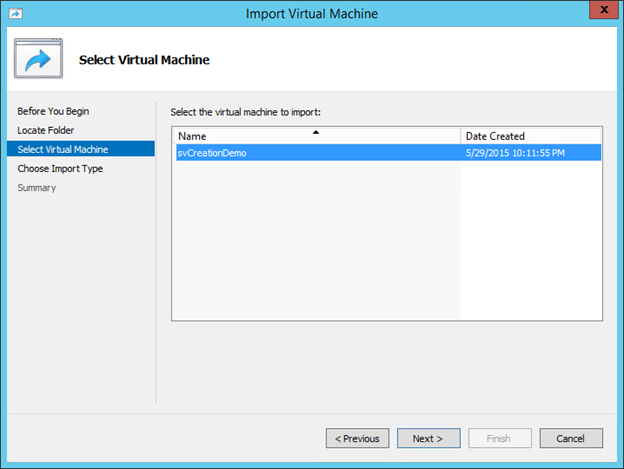
- If you selected a location where Hyper-V can detect one or more virtual machines, it/they will be displayed. You can select one of them. Click Next when ready.
-
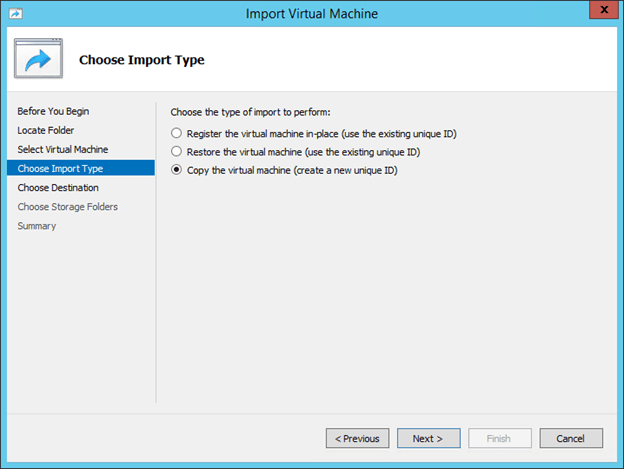
The next page is where you will choose how the import process will be handled. You have three choices:
- Register the virtual machine in-place uses the virtual machine in the folder where you import it from. As the option indicates, the existing virtual machine ID will be retained.
- Restore the virtual machine is nearly the same as the first option, but the virtual machine’s files will be placed in a new location where it will be run from.
- Copy the virtual machine relocates the virtual machine to a location of your choosing like the second option, but a new virtual machine ID will be created. This is the proper option to choose if your plan is to create a clone of the source.
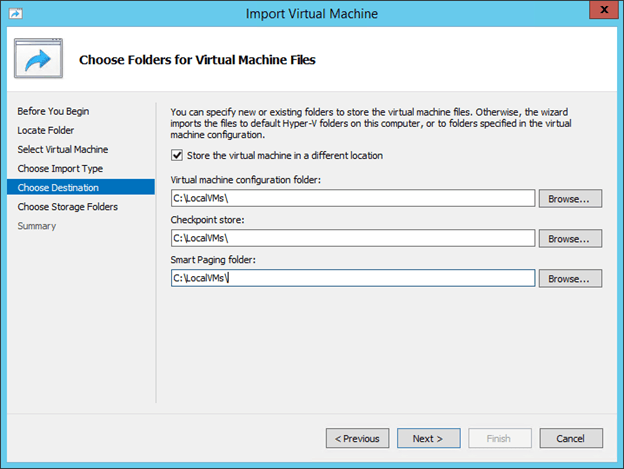
- If you chose the second or third option on the Import Type page, the next screen will ask you where you want to place the imported virtual machine. If you pick nothing, then it will be created in the host’s default location for virtual machines. You can select distinct locations for the virtual machine’s definition files, its checkpoints, and its Smart Paging files.
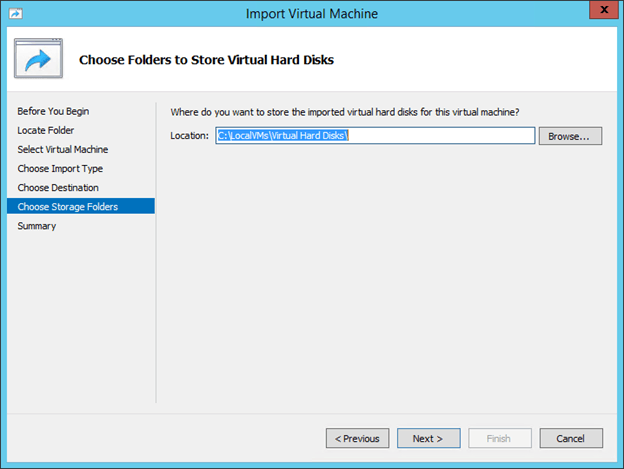
- If you’re restoring or copying the virtual machine, the next page will ask you to select a location for the virtual machine’s hard disk files. The wizard will suggest the host’s default location and you can change it to whatever location you like.
- The final screen is for review. You’ll be shown the options that you chose and can click Previous to change any options necessary or click Finish to perform the import.
Checkpoints Pane
The middle of the tripartite center pane is the Checkpoints pane. If a virtual machine has no checkpoints, it will be completely empty. Otherwise, it will show its checkpoints in a tree format.
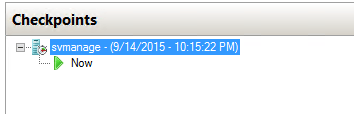
The Now object represents the running virtual machine. It has its own truncated action menu that only contains Connect, Settings, and Help, all of which are explained above.
Each checkpoint has its own context menu with the following items:
- Settings opens the same dialog as for a running virtual machine. The settings in this dialog represent the virtual machine as it was when the checkpoint was created. None of the setting are changeable.
- Apply causes this checkpoint to become the active virtual machine. You’ll be prompted to create a new checkpoint; if you do not, the active state is discarded and permanently lost.
- Export works exactly as described for the active virtual machine, but the export is of the virtual machine’s state as it was when the checkpoint was created.
- Rename changes the name of the checkpoint. It does not affect the virtual machine in any other way.
- Delete checkpoint removes this particular checkpoint but does not affect any others. If it is the last checkpoint, then the Checkpoints tab is cleared. This will automatically trigger a merge operation that will show its progress in the Status field in the upper pane.
- Delete checkpoint subtree deletes the selected checkpoint and any child checkpoints that it might have. It otherwise operates in the same fashion as the Delete checkpoint action.
Virtual Machine Extended Status Information
With a virtual machine selected, the lower third section of the center pane shows a series of tabs, each with extra information about the virtual machine.
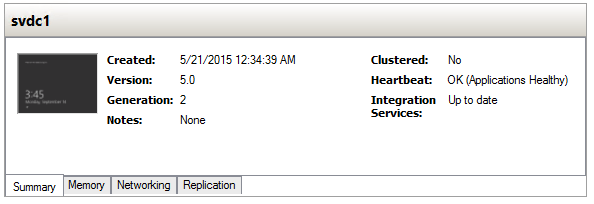
Summary
The summary tab contains quick, common information about the selected guest. The first item is a thumbnail view of the current console screen. There is a slight delay on the updating of this tile.
The rest of the fields are named:
- Created shows the timestamp for when the virtual machine was created. This field does sometimes become corrupted. You can attempt to use this script created by Jeff Hicks to recover it.
- Version: shows the version information for the virtual machine’s .XML file. Version 5.0 is a Generation 1 virtual machine. Version 6.0 is a Generation 2 virtual machine. Earlier versions should be automatically updated to version 5.0 when 2012 R2 takes control of them. Versions after 6.0 will no longer use XML files and will not be operable on 2012 R2.
- Clustered: this is a simple yes or no field that reflects whether or not the virtual machine is highly available. This can be No even when the host is clustered as it not required for all guests on a virtual machine to be set as highly available.
- Heartbeat: this field reflects the status of the heartbeat service and any configured applications.
- Integration Services: This is a simple field that reflects if the services are current, outdated, or not detected.
Memory
The memory display tab shows several simple text fields about the current status of memory. It is most useful when the virtual machine is using Dynamic Memory. The Startup Memory, Minimum Memory, Maximum Memory, and Assigned Memory fields are all self-explanatory numeric fields. The Dynamic Memory field shows Enabled or Disabled accordingly. The other fields are as follows:
- Memory Demand indicates the pressure on the balloon driver. It will show what the guest operating system is requesting from the memory manager.
- Memory Status will show OK when the guest’s memory demand is satisfied and Warning when it is not.
Networking
This is a fairly simple tab that shows all of the virtual machine’s virtual network adapters in list format. The fields are:
- Adapter: This field shows the name that Hyper-V has assigned to the adapter (usually “Network Adapter”). It is not related to the name given inside the guest operating system. This field also shows the MAC address of the adapter and whether or not it is dynamically assigned.
- Connection: shows the name of the virtual switch that the adapter is connected to, if any.
- IP Addresses: shows all detected IPv4 and IPv6 addresses on this adapter.
- Status: shows the reported status of the adapter. It will be OK if all is well and blank if the adapter is not responding (usually because the virtual machine is off).
Replication
This tab provides a quick synopsis of the virtual machine’s Replica state with these fields:
- Replication Mode: This will be Primary, Replica, or Not enabled to indicate what Replica role this virtual machine is serving.
- Replication State:
This is a simple Enabled or Disabled status field. - Replication Health: This will show Normal if replication is working or a brief indicator of any other state.
- Primary Server: This field contains the fully-qualified domain name of the Hyper-V host running the source virtual machine.
- Replica Server: This field contains the fully-qualified domain name of the Hyper-V host running the replica virtual machine.
- Last synchronized at: a timestamp with the last verified replication action.


