Save to My DOJO
One of the core functions of a hypervisor is to abstract the hardware that guests use, and hard disks are no exception. What virtual machines see as their mass storage devices are, in actuality, files that reside on another mass storage device accessed by Hyper-V (which might itself be abstracted, as in the case of Storage Spaces or NAS devices). The virtual hard disk file format that Microsoft used in the early versions of Hyper-V was known quite simply as VHD. While versatile enough to adequately handle most situations, there were also several limitations. The release of version 2012 of Hyper-V brought with it a revamped virtual hard disk specification called VHDX. Some of its more important benefits over VHD, and reasons for why you may want to convert VHD to VHDX are:
- Maximum size extended from 2 terabytes to 64 terabytes
- Improved compatibility with physical disks with 4 kilobyte sectors
- Protection against data loss from sudden interruptions, such as power failures
While only 2012 and later versions can operate virtual machines with disks in the new VHDX format, the newer hypervisors can continue to use the earlier VHD format as necessary. This allows you to bring forward virtual machines without extra downtime for conversions. Some appliance vendors prefer to distribute their products in VHD as it enjoys wider platform support. Some other hypervisor vendors designed their virtual machines to utilize VHD, as Microsoft opened the specification, which also makes it easy to migrate those virtual machines into Hyper-V. However you came by them, the benefits of VHDX are compelling enough that you’ll likely want to Convert VHD to VHDX so that they’ll operate more efficiently on your newer Hyper-V deployment. Even if the new features don’t matter that much to you, you might need to attach an old data disk to a Generation 2 virtual machine, which can only accept VHDX. The conversion process is a very simple task using Hyper-V Manager.
Note: Before you get started, be aware that the virtual hard disk file is not converted in-place. A new file is created. You can delete the original once the new is complete, but you must provide sufficient space for both to co-exist for a time.
Choose How to Select the Disk to Edit
Hyper-V Manager does not require that a virtual hard disk file be attached to a virtual machine in order to work with it, but it also doesn’t require you to detach it in advance. Therefore, you can might wish to use the tool to manually locate a disk to work with. You can also start with a virtual machine’s property pages and drill down to the disk in question. Whichever method you choose, if the VHD in question is owned, the virtual machine must be in an Off state before you start or the conversion will fail.
Selecting a Free Disk
To manually locate a VHD that may or may not be attached to a virtual machine, follow these steps:
- In Hyper-V Manager, select that host to use to perform the conversion in the left pane. In the far right pane, under Actions, click Edit Disk.
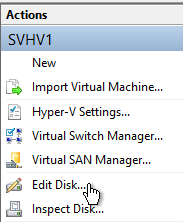
Hyper-V Manager: Edit Disk
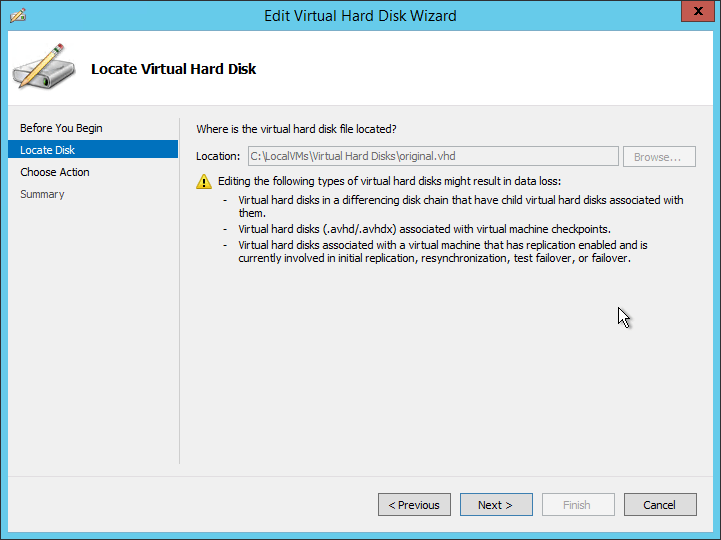
- The Edit Virtual Hard Disk Wizard will appear. Like most wizards in Hyper-V Manager, the first screen is informational. Click Next to change to the Locate Virtual Hard Disk page. Click the
Browse button to locate the VHD file that you wish to modify. You can select a disk that’s already attached to a virtual machine. If the VHD is in a shared location, its owning virtual machine can even be on a server other than the one that is performing the conversion. However, the virtual machine must be Off.
Convert VHD: Locate Disk
- Skip down to the Using the Wizard to Convert a VHD to VHDX section below.
Selecting a Disk Attached to a Virtual Machine
If the VHD to be converted is already attached to a virtual machine, it might be quicker to work with the virtual machine’s property pages rather than explore the file system.
- In Hyper-V Manager, select the host that owns the virtual machine in the left pane. In the center pane, locate the virtual machine whose disk you wish to modify. Right-click it and choose Settings.
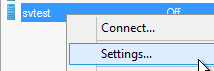
Access VM Settings
- In the VM’s settings dialog, click the virtual hard disk to be modified in the left pane. In the right pane, locate and click the Edit button. If it’s grayed out, either the virtual machine is on and the VHD is connected to the vIDE controller or the virtual machine is clustered. In the former case, you must first turn it off. In the latter, you can use Failover Cluster Manager to accomplish the same task. Note that even though the Edit button will be available when the disk is connected to a vSCSI controller, you will not be allowed to convert it while the VM is on.

VM Settings: VHD Edit
- Upon clicking Edit, the Edit Virtual Hard Disk Wizard will open. The first screen is informational, although invoking the wizard from this point usually causes that screen to be automatically skipped even when that option has not been selected; read the screen if desired (clicking Back to get to it, if necessary), then click Next. After that, the Locate Virtual Hard Disk page is shown (if not, the owning virtual machine is not Off). All controls except the navigation items are disabled, but take this opportunity to verify that you are working with the correct file:
Locate VHD Page; Disabled
- Continue in the next section.
Using the Wizard to Convert a VHD to VHDX
Whichever of the two methods you chose above, you’ll now be in the same place in the Edit Virtual Hard Disk Wizard. Continue with these steps to complete the conversion:
- After proceeding from the Locate Virtual Hard Disk page, you’ll be on the Choose Action page. The exact options displayed with vary based on the virtual hard disk’s configuration, but the option that we are concerned with always be present if any hosting VM is off: Convert. Select that option and click Next.
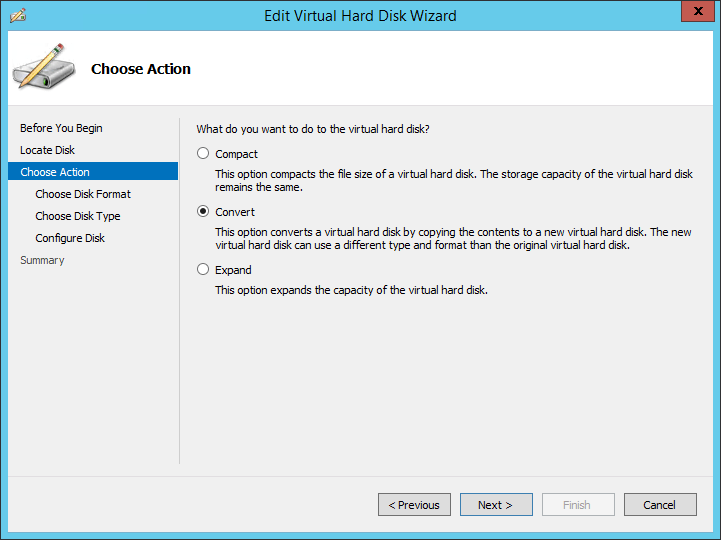
Convert
- The next page that will appear asks for the new disk format. It’s not necessary to switch (for example, you might only be switching between fixed and dynamically expanding). In this case, the purpose of running the wizard is to convert to VHDX, so choose that option and click Next.
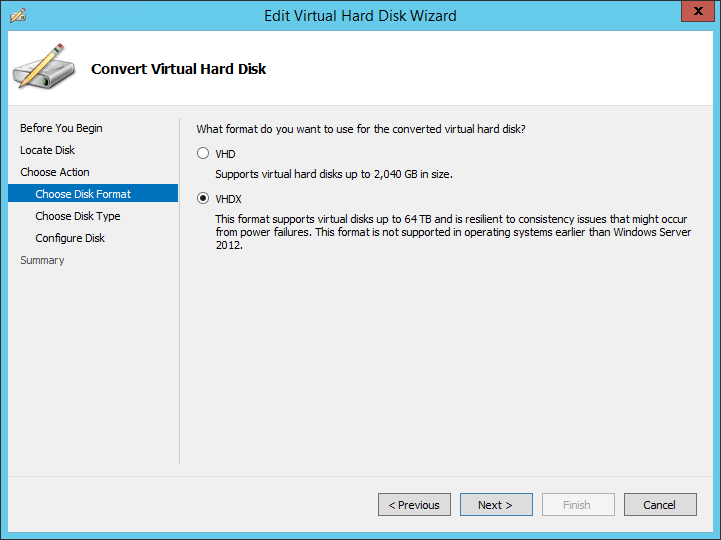
VHDX Conversion
- You will now be asked if you wish for the new disk to be Fixed size or Dynamically expanding. It is perfectly acceptable to convert from VHD to VHDX and change the type in the same pass. So, if you’ve found that the allocated disk space has gone largely unused or if it was initially set as dynamic and has constantly been full, now is your opportunity to switch to the opposing type.

Type Conversion
- Finally, you’ll be asked where to place the new disk. Notice that the wizard suggests the host’s default location which is not necessarily the same place as the source.
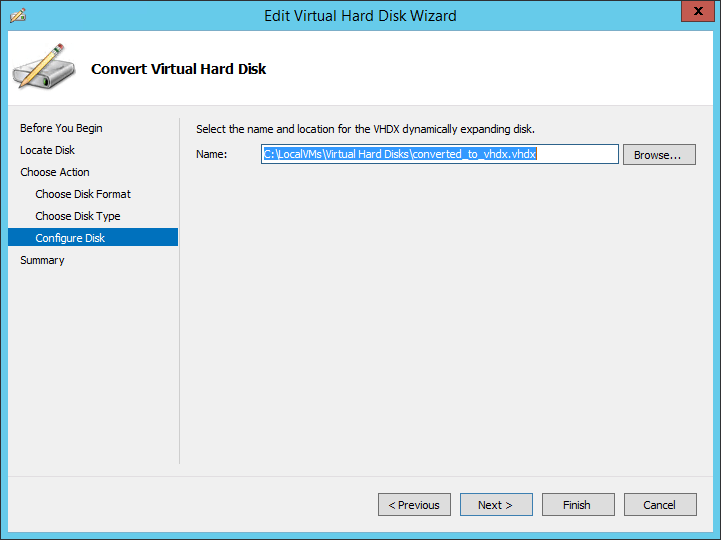
Conversion Output
- The final screen is simply a summary. Review it, click Back to make any changes, or click Finish to instruct Hyper-V to carry out the conversion. This process will take time, depending upon the amount of data in the source VHD and the performance characteristics of your storage device(s).
- Important! If you are working from the property sheet of an existing virtual machine, it does not automatically select it in the virtual machine’s property page! You must click the Browse button and navigate to the new file in order to instruct the virtual machine to use it.
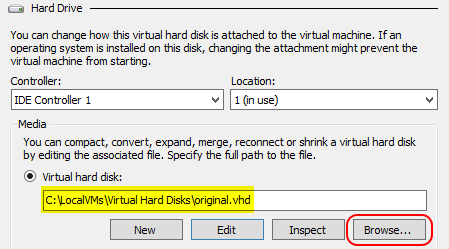
Convert VHD: Original Unchanged
Conversion Notes
There are a few things to remember about conversion.
- If converting to a dynamically-expanding VHDX, even if the source was also dynamically-expanding, any blocks that are empty in the source VHD will not be brought forward into the newly created VHDX. Along with the format improvements in VHDX, this means that you should expect the resulting file to be smaller than the source.
- The note on the Choose Disk Format page about VHDX not being supported by versions earlier than 2012 only applies to the hypervisor. The guest operating does not know, and does not have any way to know, what sort of container its mass storage is in. It’s abstracted to the guest, remember? A VHDX can contain any operating system, including old and unsupported versions of Windows and any version of Linux.
- As mentioned in the final conversion step, the wizard does not select the new disk file when you are converting a virtual machine’s existing VHD. Take care that you do not inadvertently continue using the old disk or the contents of the new VHDX will become stale and you’ll need to perform the conversion again.
- The wizard already implied it, but you do not need to place the newly created disk on the same storage as the source. Since it isn’t on during the conversion, the target could even be a temporary space where you’d never run the VM from, such as an external USB drive or even a remote SMB 2 share (permissions and delegation for the Hyper-V computer name are still necessary, however). This grants you the flexibility to get around storage space limitations. You could make the conversion to a temporary place, then delete the original and replace it with the new prior to turning the VM back on. Even if you aren’t facing such conditions, you are also being given the opportunity to place the VHDX on newer, faster storage without an additional copy process.
- You cannot fool Hyper-V by using the same destination and file name for the output as the input. The wizard will fail gracefully. If it did not, all of the file’s data would be lost anyway, so there’s no value in trying this.
- Backup utilities that operate directly on VMs should continue working normally, but almost all will consider the new disk to be completely distinct from the old. As a result, any program of this type that utilizes delta technology will build up a completely new image of the new disk. If the source disk was very large or you were already concerned about space in your backup repository, take this into account before performing the conversion.


Not a DOJO Member yet?
Join thousands of other IT pros and receive a weekly roundup email with the latest content & updates!
More in this category


About the Author

Eric Siron


2 thoughts on "Hyper-V How To: Convert VHD to VHDX"
I cannot caovert my .vhdx to .vhd