Save to My DOJO
Hello once again avid readers! We’re back again with our ongoing series covering Microsoft’s Desired State Configuration technology.
Today’s post will cover the concept of a Desired State Configuration Pull server and how to use that pull server as a repository for other entities in your environment to “pull” MOF files from.
We’ve covered quite a bit in this series thus far. Hard to believe, but we’ve covered all the topics on the following list:
- Part 1: System Requirements and Benefits
- Part 2: DSC Resources
- Part 3: Generating DSC MOF Files
- Part 4: Pushing DSC Configurations
As we saw in the previous post, pushing configurations has its uses, but it can be limited in the event that you want a more automated process. This is where pull servers come in. With a DSC pull server it’s entirely possible to create a DSC configuration, place it on a pull server, and then tell your target nodes: “I want you to refresh your configuration from this pull server every X number of minutes”.
This is really powerful if you think about it, as the push method is limited in its capabilities. We “push” our DSC configurations on our time when we want to push them. The pull method really allows for a set it and forget it approach.
The DSC Pull method also lends itself as a valuable tool for the setup of new machines that may need to be identical. Make a single MOF file, install the OS, and then point the node to the pull server. The pull server will install roles..etc..etc as defined in the MOF file.
So how do we enable the pull method? Let’s cover each step.
HTTP(S) or SMB?
This is really the first question that needs to be asked. The configurations can be served up via HTTP, HTTPS, or SMB. Each has their advantages and disadvantages.
HTTP(S) is a great option when you are planning on pulling configurations across several different networks. Certain protocols may or may not be allowed to traverse all those different subnets, so HTTP(S) is really a good choice for this as it’s a widely accepted protocol for passing through firewalls with ease, once the needed NATs/PATs are created.
Now it should be noted that both HTTP and HTTPS are both options. In my opinion HTTP isn’t REALLY a valid option for cross network DSC. At least not from a high security perspective. For cross network DSC the HTTPS protocol is HIGHLY recommended.
We are essentially going to tell computer resources on our network to go look at this MOF file on the defined web server and do “anything” the MOF file tells it to do.
Think about that for a second. The MOF file itself is stored in plain text and we’re sending that over an unprotected HTTP stream. Should that file ever be intercepted and tinkered with, that could be a serious security concern for your business.
Therefore, I would argue that HTTP and SMB be left out in favor of HTTPS in high security environments. With DSC traffic being secured by the HTTPS protocol, we can now sleep sound knowing that our target nodes are pulling their configurations in a safe and secured manner.
So, that covers HTTP(S) what about SMB? What are its use cases?
Like HTTP, SMB is primarily intended to be used on a private routable network were all nodes can reach a centralized SMB resource. The idea is that your private network is already being secured at the endpoints so the MOF files themselves don’t need to use an ultra-secure protocol for transmission. Due to this fact, you’ll find that SMB pull servers are quite a bit easier to setup and configure as we’ll see in the next section, however it can be difficult to route them across different networks. In that use case you’ll want to use HTTPS as your deliver protocol.
As I stated in an earlier post, this series is intended to be an entry level series to get you started with DSC. As such, we will focus on the SMB method in this howto, as it is the simpilist approach to getting a pull server setup.
If you are looking for resources on setting up and configuring a HTTP(S) pull server, Windows PowerShell Desired State Configuration Pull Servers is a good resource to get you started.
Setting up an SMB Pull Server
While I could certainly walk through each minor step of the process in excruciating detail. I’d be hard pressed to do it as well as Don Jones and Steve Murawski do in The DSC Book. Much of the following example is pulled from that book and I’ll explain what each step is doing along the way.
Let’s get started.
To complete the installation of the Pull server itself, we’ll actual utilize DSC. The resources needed to setup the pull server are contained within PowerShell resource kits wave 1 and wave 2, but I’ve found it easier to just download the entire kit.
Once downloaded you need to make sure the contents of the ZIP file are extracted to C:\Program Files\WindowsPowerShell\Modules on the machine that you’ll actually be setting up as the pull server and any other machines that may be actually using our DSC configurations.
Once that step is completed it’s just a matter of prepping a configuration much like the one below.
configuration CreatePullServer
{
    param
    (
        [string[]]$ComputerName = 'localhost'
    )
    Import-DSCResource -ModuleName xPSDesiredStateConfiguration
    Node $ComputerName
    {
        WindowsFeature DSCServiceFeature
        {
            Ensure = "Present"
            Name   = "DSC-Service"
        }
        xDscWebService PSDSCPullServer
        {
            Ensure                  = "Present"
            EndpointName            = "PSDSCPullServer"
            Port                    = 8080
            PhysicalPath            = "$env:SystemDrive\inetpub\wwwroot\PSDSCPullServer"
            CertificateThumbPrint   = "AllowUnencryptedTraffic"
            ModulePath              = "$env:PROGRAMFILES\WindowsPowerShell\DscService\Modules"
            ConfigurationPath       = "$env:PROGRAMFILES\WindowsPowerShell\DscService\Configuration"
            State                   = "Started"
            DependsOn               = "[WindowsFeature]DSCServiceFeature"
        }
    }
}
CreatePullServer -ComputerName ando-az-tst02.andoaz.local
Once written, we’ll execute the configuration by running it, and this will spit out a MOF file, much like we saw in Part 3 of this series, Generating MOF files.
Finally, with MOF file in hand, we push the configuration using the below command:
Start-DscConfiguration ./CreatePullServer -Wait
This is really doing two things:
- Installing the DSC Service on the machine and configuring it.
- Installing the bits needed for the Pull Server itself and setting all the configuration settings as defined.
The –Wait flag is simply another tip that is given by Don and Steve from The DSC Book that will actually print any errors to the screen. If you run it without this option, the command runs as a job and it is much harder to get meaningful error messages should they crop up.
The pull server is now installed. Let’s move on.
Creating a Pullable DSC Configuration
Now I have titled this section as if creating a pullable configuration is something special. There really isn’t anything special about the configuration itself, but there are some extra steps that have to be taken to get the configuration in the proper place on the pull server so that it can be used by remote nodes.
Below I have created a very basic configuration that will simply verify that the Hyper-V-tools role is installed on a target node, and if it isn’t, to install the role.
Configuration HyperVtoolsRoleInstall {
    Node ANDO-AZ-TST03.ANDOAZ.LOCAL {
        WindowsFeature HyperVtools {
            Ensure = 'Present'
            Name = 'Hyper-V-tools'
        }
    }
}

HyperVtoolsRoleInstall
This will spit out a MOF file targeting ANDO-AZ-TST03.ANDOAZ.LOCAL. Also, the working directory for my DSC configs is C:\DSC. We’ll need this information shortly.
The next step we need to take is to upload this MOF file to the pull server, and place it into the directory that was defined in the DSC Pull Server configuration further up the page: $env:PROGRAMFILES\WindowsPowerShell\DscService\Configuration. The only gotcha here is that the pull server won’t deal with a node name as the filename (such as ANDO-AZ-TST03.ANDOAZ.LOCAL.mof). As the pull server is going to be serving up all kinds of different MOF files for different target nodes…etc..etc, it wants a unique GUID for each MOF file that is present in the repository.
We can do this in a few steps with the below commands:
We first need to define a new unique GUID and save it to the $guid variable:
$guid = [guid]::NewGuid()
Then we need to copy the MOF file to the repository and rename it as the new GUID we just created. In my case, we can do that with the below command:
copy C:\DSC\HyperVRoleInstall\ANDO-AZ-TST03.ANDOAZ.LOCAL.mof “C:\Program Files\WindowsPowerShell\DscService\Configuration\$guid.mof"
Now upon viewing that folder we can see that our MOF file for the Hyper-V-Tools Role installation has been copied to the necessary location and renamed into GUID format for use with the pull server.
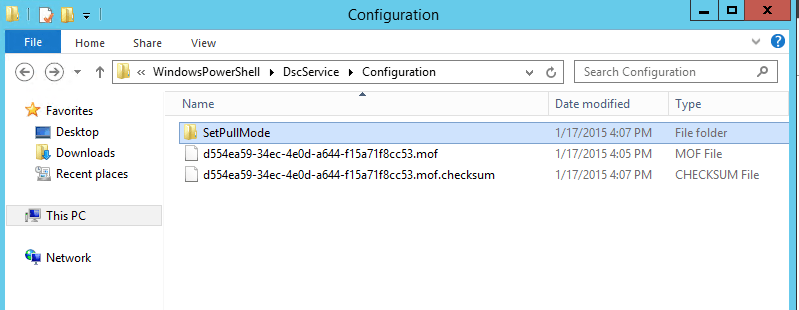
We’re nearly done with this piece, however, there is one last step here. When a node contacts the pull server for a MOF file it will do a checksum review to verify the authenticity of the file. As you can see in the above image there is also a checksum file present. We need to generate this checksum file for each MOF file we upload to the pull server and place the checksum file in the same directory as our GUID named MOF files. This can be accomplished with the below command:
New-DSCChecksum <target MOF>
Or, in my case in this example:
New-DSCChecksum “C:\Program Files\WindowsPowerShell\DscService\Configuration\d554ea59-34ec-4e0d-a644-f15a71f8cc53.mof”
You could also re-use the $guid variable from the previous commands in the path above if you’d like for ease. I just used command line completion myself.
This will generate the needed checksum file and we’re good to go!
Now… onto the last step!
Configuring a Node to Pull the Configuration
We need to make one last DSC configuration to round out our pull server configuration. We need to create a configuration that will configure DSC on a target node to use our pull server.
The Below DSC config is doing a number of things:
Configuration SetPullMode
{
param([string]$guid)
Node ando-az-tst03.andoaz.local
{
LocalConfigurationManager
{
ConfigurationMode = 'ApplyOnly'
ConfigurationID = $guid
RefreshMode = 'Pull'
DownloadManagerName = 'DscFileDownloadManager'
DownloadManagerCustomData = @{
SourcePath = "\\ando-az-tst02.andoaz.local\pullserver" }
}
}
}
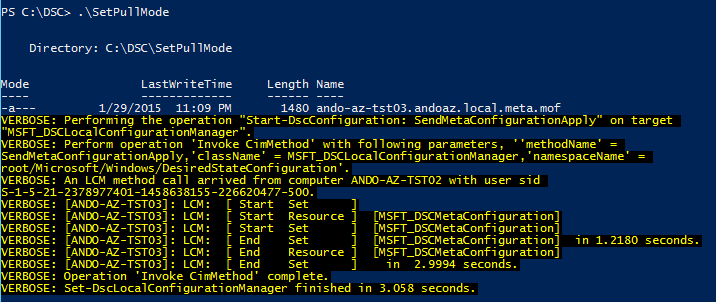
SetPullMode –guid $guid
Set-DSCLocalConfigurationManager -Computer ando-az-tst03.andoaz.local -Path C:\DSC\SetPullMode –Verbose
As you can see the script is referencing the $guid variable we defined earlier, otherwise you’ll have to manually type in the GUID from the associated MOF file yourself. This tells the target node which MOF to grab from the pull server.
You’ll also see the two lines regarding the download manager settings. These lines are actually defining the SMB share that should be checked for the defined MOF file.
I have pre-created the share as \\ando-az-tst02.andoaz.local\pullserver which points to the hard path of “C:\Program Files\WindowsPowerShell\DscService\Configuration” on my pull server.
Finally, at the bottom of the above script, we are creating the MOF file associated with this DSC configuration and then pushing the settings to the target machine. In my case the target machine is ANDO-AZ-TST03.ANDOAZ.LOCAL.
Before we run the script, lets go verify that the Hyper-V-Tools role is not installed currently on the target node.

Now let’s actually run the script and see what happens!
As you can see the configuration gets pushed to the end point, which will then tell that node to report into the pull server, and grab the defined MOF file. By default this will now happen every 30 minutes.
After 30 minutes, we see that the machine now has the Hyper-V-Tools role installed. Our pull server is now fully functional!

One benefit of this setup that I’ve probably already mentioned is that if for some reason this role or this configuration is ever changed on the target machine, DSC will correct the settings during the next 30 minute check-in. Effectively making sure this machine adheres to the DSC config at all times.
Summary
This post was a long one, but we saw how easy it is to setup a DSC pull server for use on your local networks, and how easy it is to maintain settings compliance on all our target nodes using DSC in this configuration.
We’ve got one more post coming up in this series comparing DSC and Group Policy. Stay tuned for more!


Not a DOJO Member yet?
Join thousands of other IT pros and receive a weekly roundup email with the latest content & updates!
More in this category


About the Author
Andy Syrewicze

