Save to My DOJO
In our first post on this topic, we got a brief introduction to Cluster-Aware Updating and how to give it a basic configuration. We’re going to use this post to push beyond the basics.
Where we want to start this discussion is on the Advanced Options screen of the GUI. If you don’t remember how to get here, you can start CAU from the tools menu in Server Manager (2012 and later), from the Administrative Tools menu in the Start Screen, or from the cluster’s home page in Failover Cluster Manager. Once you get that open, click Configure cluster self-updating options.
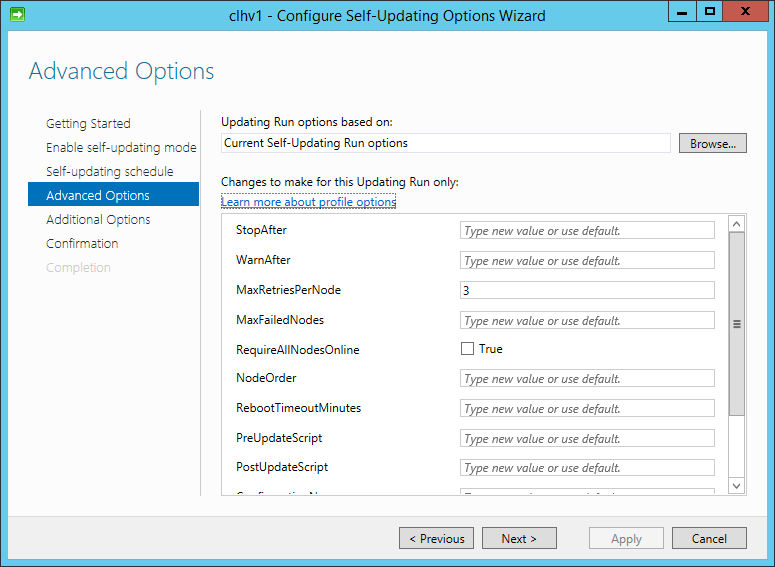
We’re not going to talk about all these options. Most of them are pretty easy to understand and the link at the top of the dialog box does an OK job of explaining them. Some warrant further explanation.
If at First You Don’t Succeed…
The retries field seems pretty obvious. It still manages to trip people up, though.
Pop quiz: Your CAU run is configured for 3 retries. How many times is a failing run attempted?
Did you say 3? Nope. The answer is 4. It tries, then it retries. So, 1 try + 3 retries = 4 attempts.
CAU Plugins
This screen shows the plugins as a selection box when it should be a list view with multiple selectable items. By default it will only allow items from Windows Update. As we’ve all learned, Hyper-V and Failover Clustering both get periodic must-have hotfixes that don’t make it into the Windows Update distribution channel until after you wish you had them. The way this screen looks, it appears that you have to choose between them. Fortunately, you can have both. The following script shows how it can be done (sort of, keep reading after the script):
Set-CauClusterRole `
    -ClusterName clhv1 `
    -Force `
    -CauPluginName Microsoft.HotfixPlugin, Microsoft.WindowsUpdatePlugin `
    -CauPluginArguments @{ 'IncludeRecommendedUpdates' = 'False' } `
    -MaxRetriesPerNode 3 `
    -StartDate "4/21/2014 3:00:00 AM" `
    -DaysOfWeek 4 -WeeksOfMonth @(3) `
    -UseDefault -EnableFirewallRules
Enable-CauClusterRole -ClusterName clhv1 -Force
I’ve highlighted the line containing the CauPluginName parameter so you can see how you can add multiple plugins. These are the only two that are available by default, but it’s entirely possible for a third-party application developer to add their own plugins.
This isn’t all you have to do for the hotfix plugin though. If you want, you can learn all about the extra options and then type them into the CAUPluginArguments field. I’m going to show you the easy way.
Go back into the GUI configuration (Configure cluster self-updating options). Now you’ll see that CauPluginName has been changed to “Multiple plug-ins”. Change it to Microsoft.HotfixPlugin. Click next. You’ll be rewarded with this screen:
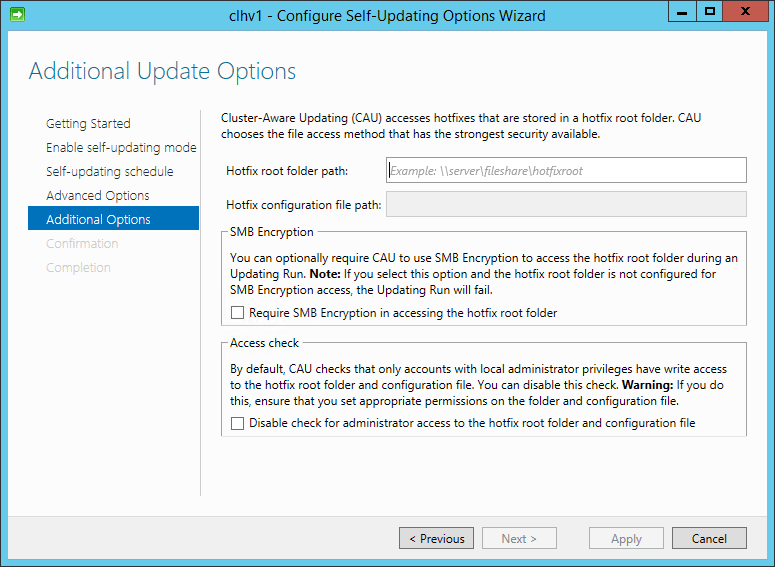
The fields here are pretty well-explained right in the dialog. You have to retrieve the hotfixes from an SMB share. This dialog does not allow you to modify the name of the XML file that contains the list of hotfixes (DefaultHotfixConfig.xml). It also won’t let you process unless you give it a folder that actually contains such an XML file. Where do you get that file from? Well, you have to build it by hand. Just kidding! Open up Windows Explorer on any computer with the Failover Clustering tools installed and navigate to %systemroot%System32WindowsPowerShellv1.0ModulesClusterAwareUpdating. Copy the DefaultHotfixConfig.xml file to the share you specified.
Once you have this screen the way you want, you can step through to the summary page to get your script. Manually edit the complete plugin line and submit it manually. That will look something like this:
Set-CauClusterRole `
    -ClusterName clhv1 `
    -Force `
    -CauPluginName @("Microsoft.WindowsUpdatePlugin", "Microsoft.HotfixPlugin") `
    -CauPluginArguments @{ 'HotfixRootFolderPath' = '\svstorehotfixes'; 'DisableAclChecks' = 'False'; 'HotfixConfigFileName' = 'DefaultHotfixConfig.xml'; 'RequireSmbEncryption' = 'False' } `
    -MaxRetriesPerNode 3 -StartDate "4/21/2014 3:00:00 AM" `
    -DaysOfWeek 4 -WeeksOfMonth @(3) -UseDefault -EnableFirewallRules
Enable-CauClusterRole -ClusterName clhv1 -Force
Notice the different way that the CauPluginName parameter is entered (comma-separated list as opposed to encapsulated in “@()”). Either method is acceptable. However, there is one very large point that I need to make here. You must reverse the order of the plugin names so that Microsoft.HotfixPlugin is FIRST. If you do not, you will get the following error: “The plug-in argument HotfixRootFolderPath has invalid value .” If you look carefully, there is a space between “value” and the period at the end, so that error is telling you that you have absolutely nothing entered for HotfixRootFolderPath. The error is not listed in the documentation, but the method to avoid it is part of the Add-CauClusterRole page. What’s going on is that if it finds multiple entries for CauPluginName, it looks for separate values for each of the key-value pairs in CauPluginArguments. The first key-value set that it finds is applied to the first item in CauPluginName. The second set that it finds is applied to the second plugin, etc. So, the above script applies all of those settings to the Microsoft.WindowsUpdatePlugin plugin and none to Microsoft.HotfixPlugin. Since none of those options are applicable to the standard WU plugin, Windows Updates will work normally. However, the hotfix plugin needs all of those options, so it will fail. The easy fix is to reverse the order of the plugins in CauPluginName (as shown in the earlier script). The harder way is to modify the entry lines to include a blank value group for position 1 and a valid value group for position 2, ex: -CauPluginArguments @(@{}, @{ ‘HotfixRootFolderPath’ = ‘\svstorehotfixes’; ‘DisableAclChecks’ = ‘False’; ‘HotfixConfigFileName’ = ‘DefaultHotfixConfig.xml’; ‘RequireSmbEncryption’ = ‘False’ }) `. That looks cleaner on one line than it does separated.
Now it’s just a matter of placing the hotfix files. This has to be done in a very particular fashion. Inside the shared folder you created, make a subfolder named CAUHotfix_All. Patch files placed in here will be applied to all nodes. Neat, huh? You can also apply node-specific files. Just make sub-folders with the computer name of the node they should be applied to.
Extending the Hotfix Plugin
Now we’re about to get into the real power of this tool. You aren’t restricted to Microsoft patches. Want to update your BIOS? No problem. Want to install an updated antivirus engine while your virtual machines are safely on another node? You can do that.
Open up the DefaultHotfixConfig.xml file that you copied. This is where the rules for hotfixes are. The first thing to notice is that there are three Extension types. These outline the file types that CAU is already allowed to work with. As is, there are only MSI, MSU, and MSP files. You’re welcome to add anything you like. The structure is right there for you to work with. These are best used if you want to place other file types in the existing folder structure.
If you want to apply other items, such EXE-based updates, the Folder Rules are probably what you’re after. These are commented out at the bottom. To enable them, just remove the comments (XML comments start with <!– and end with –>). You can also copy the desired section outside of the comment area. That’s what I’ve chosen to do in the following example:
<?xml version="1.0" encoding="utf-8"?>
<?Copyright (c) Microsoft Corporation. All rights reserved.?>
<!-- ==========================================Security Warning==========================================-->
<!-- This configuration file controls how the Microsoft.HotfixPlugin coordinates the installation of
	hotfixes in a failover cluster. You should maintain this file in a secure location and ensure that
	appropriate safeguards are in place to restrict access to authorized users.
	If a malicious user tampers with this file, it is possible to corrupt or destroy important data or
	functionality on the failover cluster when hotfixes are applied.
-->
<root>
	<DefaultRules>
		<ExtensionRules>
			<Extension name="MSI">
				<Template path="%systemroot%system32msiexec.exe" parameters="/i $update$ /quiet /norestart"/>
				<ExitConditions>
					<Success>
						<ExitCode code="0"/>
					</Success>
					<Success_RebootRequired>
						<ExitCode code="3010"/> <!-- ERROR_SUCCESS_REBOOT_REQUIRED -->
					</Success_RebootRequired>
					<Fail_RebootRequired>
						<ExitCode code="3017"/> <!-- ERROR_FAIL_REBOOT_REQUIRED -->
					</Fail_RebootRequired>
					<NotApplicable>
						<ExitCode code="1642"/> <!-- ERROR_PATCH_TARGET_NOT_FOUND -->
					</NotApplicable>
				</ExitConditions>
			</Extension>
			<Extension name="MSU">
				<Template path="%systemroot%system32wusa.exe" parameters="$update$ /quiet /norestart"/>
				<ExitConditions>
					<Success>
						<ExitCode code="0"/>
					</Success>
					<Success_RebootRequired>
						<ExitCode code="0x00240005"/> <!-- WU_S_REBOOT_REQUIRED -->
						<ExitCode code="3010"/>       <!-- ERROR_SUCCESS_REBOOT_REQUIRED -->
					</Success_RebootRequired>
					<Fail_RebootRequired>
						<ExitCode code="3017"/>        <!-- ERROR_FAIL_REBOOT_REQUIRED -->
						<ExitCode code="0x8024D00E"/> <!-- WU_E_SETUP_REBOOTREQUIRED -->
					</Fail_RebootRequired>
					<NotApplicable>
						<ExitCode code="0x80240017"/>  <!-- WU_E_NOT_APPLICABLE -->
					</NotApplicable>
					<AlreadyInstalled>
						<ExitCode code="0x00240006" /> <!-- WU_S_ALREADY_INSTALLED -->
					</AlreadyInstalled>
				</ExitConditions>
			</Extension>
			<Extension name="MSP">
				<Template path="%systemroot%system32msiexec.exe" parameters="/update $update$ /quiet /norestart"/>
				<ExitConditions>
					<Success>
						<ExitCode code="0"/>
					</Success>
					<Success_RebootRequired>
						<ExitCode code="3010"/>        <!-- ERROR_SUCCESS_REBOOT_REQUIRED -->
					</Success_RebootRequired>
					<Fail_RebootRequired>
						<ExitCode code="3017"/>        <!-- ERROR_FAIL_REBOOT_REQUIRED -->
					</Fail_RebootRequired>
					<NotApplicable>
						<ExitCode code="1642"/>        <!-- ERROR_PATCH_TARGET_NOT_FOUND -->
					</NotApplicable>
				</ExitConditions>
			</Extension>
		</ExtensionRules>
	</DefaultRules>
	<!-- Folder Rules section below can be used for extending the hotfix plugin to install other type of updates
	<FolderRules>
		<Folder name="Custom_Update" alwaysReboot="true">
			<Template path="$update$" parameters="/i /q"/>
			<ExitConditions>
				<Success>
					<ExitCode code="0"/>
				</Success>
				<Success_RebootRequired>
					<ExitCode code="3010"/>
				</Success_RebootRequired>
				<Fail_RebootRequired>
					<ExitCode code="3017"/>
				</Fail_RebootRequired>
			</ExitConditions>
		</Folder>
		<Folder name="Firmware_Update">
			<Template path="$update$" parameters="/install /quiet /noreboot"/>
			<ExitConditions>
				<Success>
					<ExitCode code="0"/>
				</Success>
				<Success_RebootRequired>
					<ExitCode code="1"/>
				</Success_RebootRequired>
			</ExitConditions>
		</Folder>
	</FolderRules>
	-->
	<FolderRules>
		<Folder name="Firmware_Update">
			<Template path="$update$" parameters="/install /quiet /noreboot"/>
			<ExitConditions>
				<Success>
					<ExitCode code="0"/>
				</Success>
				<Success_RebootRequired>
					<ExitCode code="1"/>
				</Success_RebootRequired>
			</ExitConditions>
		</Folder>
	</FolderRules>
</root>
This will look inside a folder called “Firmware_Update”. When it finds a file, it will attempt to execute it with “/install /quiet /noreboot” parameters. When that executable ends, if it returns a 0 to the command shell, then it will be considered a success and nothing else will be done. If it returns a 1, the system will be marked as needing a reboot. I didn’t play with it enough to know what happens if anything else is returned, but I suspect the result code is logged and the update continues. If you need a specific response to a specific code, use the examples provided earlier in the XML file.
Pre- and Post-Update Scripts
This is my favorite part of CAU. It enables us to get around some of the limitations Microsoft placed on guests that have host restrictions. The topic is large and detailed enough that it definitely deserves its own post. Stay tuned for the next installment in this series.
Wrap-Up
There’s not a lot of information or information-sharing available on these advanced CAU options. If you’re doing something no one else has documented, please share and let the community learn from your experiences.


Not a DOJO Member yet?
Join thousands of other IT pros and receive a weekly roundup email with the latest content & updates!
More in this category


About the Author

Eric Siron


5 thoughts on "Cluster-Aware Updating and Hyper-V Part 2: Advanced Operations"
Hi Eric,
Thanks for the great write-up on this. I’m working through my CAU setup to include hotfixes as well as regular Windows updates and have a question on your writeup:
In your second script example, should the line -CauPluginName @(“Microsoft.HotfixPlugin”, “Microsoft.HotfixPlugin”) instead be
-CauPluginName @(“Microsoft.WindowsUpdatePlugin”, “Microsoft.HotfixPlugin”)?
Thanks!
Well, that’s embarrassing.
Hi Eric,
Thanks for the great write-up on this. I’m working through my CAU setup to include hotfixes as well as regular Windows updates and have a question on your writeup:
In your second script example, should the line -CauPluginName @(“Microsoft.HotfixPlugin”, “Microsoft.HotfixPlugin”) instead be
-CauPluginName @(“Microsoft.WindowsUpdatePlugin”, “Microsoft.HotfixPlugin”)?
Thanks!
Hi Eric,
What if you have a cluster with more than 30 hosts? Is there any way to configure CAU so that more than 1 host is patched and updated? I’ve looked into the advanced options, but nothing like that. Or do you recommend manual patch&update?
Hi Eric,
What if you have a cluster with more than 30 hosts? Is there any way to configure CAU so that more than 1 host is patched and updated? I’ve looked into the advanced options, but nothing like that. Or do you recommend manual patch&update?